Advertisement
EN
Instruction manual
Thank you for purchasing this product.
Before using this product please read the instructions carefully.
After reading the instruction manual, please keep it for reference.
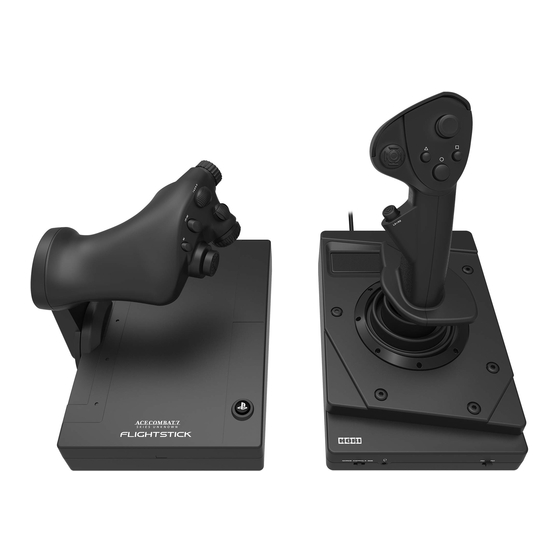
Joystick ・ ・ ・ ×1
Throttle ・ ・ ・ ×1
Suction cups ・ ・ ・ ×8
Handrest Extender ・ ・ ・ ×1
Xbox One
*This product does not include vibration feedback or expansion port.
*Not compatible with Xbox 360.
* This product is not a wireless controller.
Advertisement
Table of Contents

Related Manuals for HORI Ace CombatT 7: Skies Unknown


Summary of Contents for HORI Ace CombatT 7: Skies Unknown
- Page 1 Instruction manual Thank you for purchasing this product. Before using this product please read the instructions carefully. After reading the instruction manual, please keep it for reference. Joystick ・ ・ ・ ×1 Throttle ・ ・ ・ ×1 Suction cups ・ ・ ・ ×8 Handrest Extender ・ ・ ・ ×1 Xbox One *This product does not include vibration feedback or expansion port. *Not compatible with Xbox 360. * This product is not a wireless controller.
- Page 2 Layout * Parts names are based on Gamepad Mode. Joystick Back Front Right Stick / RSB (Flight Mode : UP/DOWN : Extra Axis 2 LEFT/RIGHT : Extra Axis 1 VIEW Button / Fire 1) X Button B Button MENU Button Y Button D-Pad A Button LSB + RSB (Flight Mode: NEXT Button) LB + RB (Flight Mode: Fire 2) Left Stick (Flight Mode: UP/DOWN : Pitch Axis LEFT/RIGHT : Roll Axis) Modular Jack Mode Toggle Switch (To connect Throttle unit) Controller cable 3.5mm port USB Connector Quick Release Connector Joystick Sensitivity Toggle Switch Throttle Back Front No function (Decorative purpose only) No function (Decorative purpose only) AUDIO Button D-Pad Rudder ...
-
Page 3: How To Connect
Mode Toggle Switch Can toggle between Flight Mode and PAD Mode. * Toggle the switch before connecting. * Ace Combat 7: Skies Unknown is not compatible with Flight Mode. How to connect ①Insert the modular connector to the joystick modular jack. Xbox One console USB port ②Insert the USB connector to the Xbox One. ② *Plugging and unplugging during gameplay may cause a malfunction. USB Connector *Reconnect the connector if any malfunction occurs. Modular Connector ① Throttle Joystick The Inline Release Your controller cord has an inline release. This is a safety feature designed to reduce the chance of the Xbox One console or computer falling when the cord is pulled. If the console or computer falls and hits someone, especially a small child, it could cause serious injury. To reduce the risk of injuries or damage to the console or computer, it is important to use the controller and the inline release properly. Use the controller connector, not the inline release, to routinely connect and disconnect the controller. If an inline release disconnects, simply reconnect it by aligning the grooved indentations and pressing the two parts completely together. The controller will not work unless the inline release is connected properly. Never tape, glue, or otherwise prevent an inline release from pulling apart. The inline release reduces, but does not eliminate, the risk of the computer or console being pulled off its surface. To further reduce the risk: • Do not allow anyone to pull on the controller or controller cord in a way that causes the computer or console to move. • Do not allow controller cords to become crossed or tangled with one another. -
Page 4: Attaching The Suction Cups
Attaching the Suction Cups ①Insert the suction cups into the holes located on the bottom side of joystick and throttle. ②Rotate the suction cups 90 degrees to lock in place. *Please attach to smooth, flat, stable surface. Hole ② 90° ① Throttle Bottom Side Attaching the Handrest Extender If you feel the joystick does not fit for your hands, try attaching the grip pad to the base of the joystick. Peel off the sheet on the backside of the grip pad and affix onto the base of the joystick as shown in the diagram. Handrest Extender Armrest *Make sure to remove any dust or dirt from the armrest prior to affixing the Handrest Extender. 3.5mm port You can connect Headphone/Headset to 3.5mm port. Joystick Before placing a headset onto your ears, make sure to lower the volume to avoid hearing damage. 3.5mm port ... - Page 5 Adjusting throttle resistance The resistance can be adjusted by turning the screw located on the bottom side of the throttle. Throttle Bottom Side Adjusting joystick sensitivity The joystick sensitivity toggle switch can be set to 3 different levels of sensitivity. Joystick Joystick Sensitivity Toggle Switch Narrow Mode Normal Mode Wide Mode More sensitive Normal joystick Less sensitive than normal mode. sensitivity level than normal mode.
-
Page 6: Audio Function
AUDIO Function You can adjust the audio settings by pressing the buttons below while holding onto the AUDIO button. AUDIO Button Functions AUDIO Button + D-Pad UP / DOWN *D-Pad on either main stick or Volume Adjustment throttles are applicable. D-Pad AUDIO Button + A Button *Beeps once when "ON", beeps twice when "OFF" Mic mute setting A Button AUDIO Button + VIEW / MENU button Mic Input *VIEW: Increase sensitivity, MENU: Decrease sensitivity Sensitivity VIEW Button MENU Button Adjustment AUDIO Button + D-Pad LEFT / RIGHT *D-Pad on either joystick or throttles are applicable. Mixer * Left : In-game volume (MAX), Voice chat volume (MIN) Adjust in-game volume and * Right : In-game volume (MIN), voice chat volume Voice chat volume (MAX) D-Pad... - Page 7 ● Do not pull roughly or bend the cable of the controller. ● If product needs cleaning, use only a soft dry cloth. Do not use any chemical agents like benzine or thinner. ● Keep this product out of the reach of children under 3. THE FCC WANTS YOU TO KNOW This equipment has been tested and found to comply with the limits for a Class B digital device, pursuant to Part 15 of the FCC Rules. These limits are designed to provide reasonable protection against harmful interference in a residential installation. This equipment generates, uses and can radiate radio frequency energy and, if not installed and used in accordance with theinstructions, may cause harmful interference to radio communications. However, there is no guarantee that interference will not occur in a particular installation. If this equipment does cause harmful interference to radio or television reception, which can be determined by turning the equipmentoff and on, the user is encouraged to try to correct the interference by one or more of the following measures: • Reorient or relocate the receiving antenna. • Increase the separation between the equipment and receiver. The normal function of the product may be disturbed by strong Electro-Magnetic Interference. If so, simply reset the product to resume normal operation by following the instruction manual (How to connect). In case the function dose not resume, please relocate to an area which does not have electro-magnetic interference to use the product. The wires are not to be inserted into socket-outlets. Please retain contact information for future reference. PRODUCT DISPOSAL INFORMATION Where you see this symbol on any of our electrical products or packaging, it indicates that the relevant electrical product or battery should not be disposed of as general household waste in Europe. To ensure the correct waste treatment of the product and battery, please dispose of them in accordance with any applicable local laws or requirements for disposal of electrical equipment or batteries. In so doing, you will help to conserve natural resources and improve standards of environmental protection in treatment and disposal of electrical waste. Applicable to EU countries only. Warranty HORI warrants to the original purchaser that the product purchased new in its original packaging shall be free of any defects in material and workmanship for a period of 90 days from the original date of purchase. If the warranty claim cannot be processed through the original retailer please address directly to HORI at infous@hori.jp. Please visit http://stores.horiusa.com/policies/ for warranty details. Warranty For all warranty claims made within the first 30 days after purchase, please check with the retailer where the original purchase was made for details. If the warranty claim cannot be processed through the original retailer or for any other inquiries pertaining to our products, please address directly to HORI at infoeu@hori.jp. Please retain contact information for future reference. The image on the packaging may differ from the actual product. The manufacturer reserves the right to change the product design or specifications without notice. HORI and HORI logo are registered trademarks of HORI. ACE COMBAT™ 7:SKIES UNKNOWN & ©BANDAI NAMCO Entertainment Inc.
Need help?
Do you have a question about the Ace CombatT 7: Skies Unknown and is the answer not in the manual?
Questions and answers