Sony Xperia G1109 Quick Start Manual
Hide thumbs
Also See for Xperia G1109:
- User manual (98 pages) ,
- User manual (97 pages) ,
- User manual (87 pages)
Table of Contents
Advertisement
Quick Links
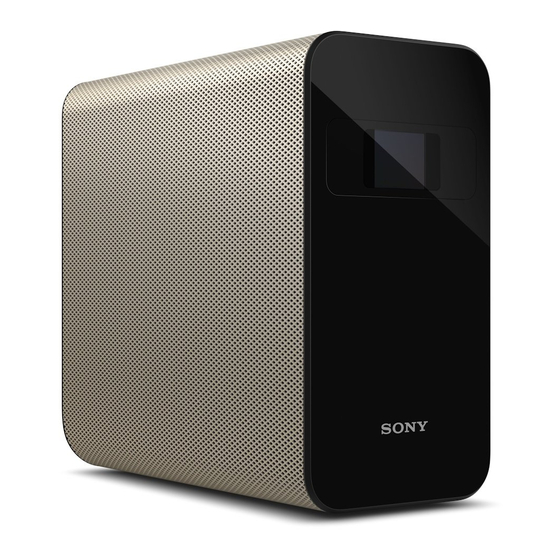
Device basics
1
Projection window (Laser aperture)
2
Power key
3
Volume keys
4
NFC
5
Memory card tray
6
Charger/USB Type-C™ cable port
7
LED indicator
8
HDMI™ Type-D port
To insert the memory card
1
Drag out the memory card tray using your fingernail.
2
Firmly place the memory card in the correct orientation
into the tray as shown in the illustration.
3
Gently push the tray back into the slot until it fits into
place.
2
1
3
4
5
6
7
8
Advertisement
Table of Contents

Related Manuals for Sony Xperia G1109


Summary of Contents for Sony Xperia G1109
- Page 1 Device basics Projection window (Laser aperture) Power key Volume keys Memory card tray Charger/USB Type-C™ cable port LED indicator HDMI™ Type-D port To insert the memory card Drag out the memory card tray using your fingernail. Firmly place the memory card in the correct orientation into the tray as shown in the illustration.
- Page 2 To turn on the device It is important to use the provided USB Type-C charger when charging your device, as other types of USB chargers may damage or not charge your device. Remove the slot cover as show in the illustration. Plug the power cable into its slot as shown in the illustration.
- Page 3 Place the device on a clean, flat, horizontal surface as shown in the illustration. Make sure that there are no obstructions in the projection area. Navigate the projected screen using your finger. The device will automatically pause projection if it is moved or lifted during operation.
- Page 4 Legal information Publication number: XXXX-XXXX.1 This Startup guide is published by Sony Mobile Communications Inc. or its local affiliated company, without any warranty. Improvements and changes to this Startup guide necessitated by typographical errors, inaccuracies of current information, or improvements to programs and/or equipment, may be made by Sony Mobile Communications Inc.
- Page 5 Startup guide Xperia Projector ™ G1109 Sony Mobile Communications Inc. 4-12-3 Higashi-Shinagawa, Shinagawa-ku, Tokyo, 140-0002 Japan XXXX-XXXX.1...
Need help?
Do you have a question about the Xperia G1109 and is the answer not in the manual?
Questions and answers