
Related Manuals for Xiaomi M365


Summary of Contents for Xiaomi M365
-
Page 1: Table Of Contents
Table of contents Warnings Introduction General view Basic specifications Pinout Installation Xiaomi M365 - wiring diagram Xiaomi M365PRO - wiring diagram Installation process video tutorials Setting up the battery Description of parameters Default parameter values Troubleshooting Warranty and technical support... -
Page 2: Warnings
Warnings Warnings WARNING! Lithium-ion batteries are very dangerous! Improper use of this equipment may cause a fire. WARNING! Use of this equipment requires at least basic knowledge in electronics and electrical engineering. WARNING! When installing this equipment, read and follow the manufacturer's instructions exactly. -
Page 3: Introduction
Introduction Introduction Repair BMS is designed to be installed inside a Xiaomi Mijia M365 / M365PRO electric scooter battery instead of an original BMS. This is required when an original BMS fails, or when tuning the battery by replacing all cells with more capacious ones. It is also possible to use this BMS for any self-assembled 10s battery pack. -
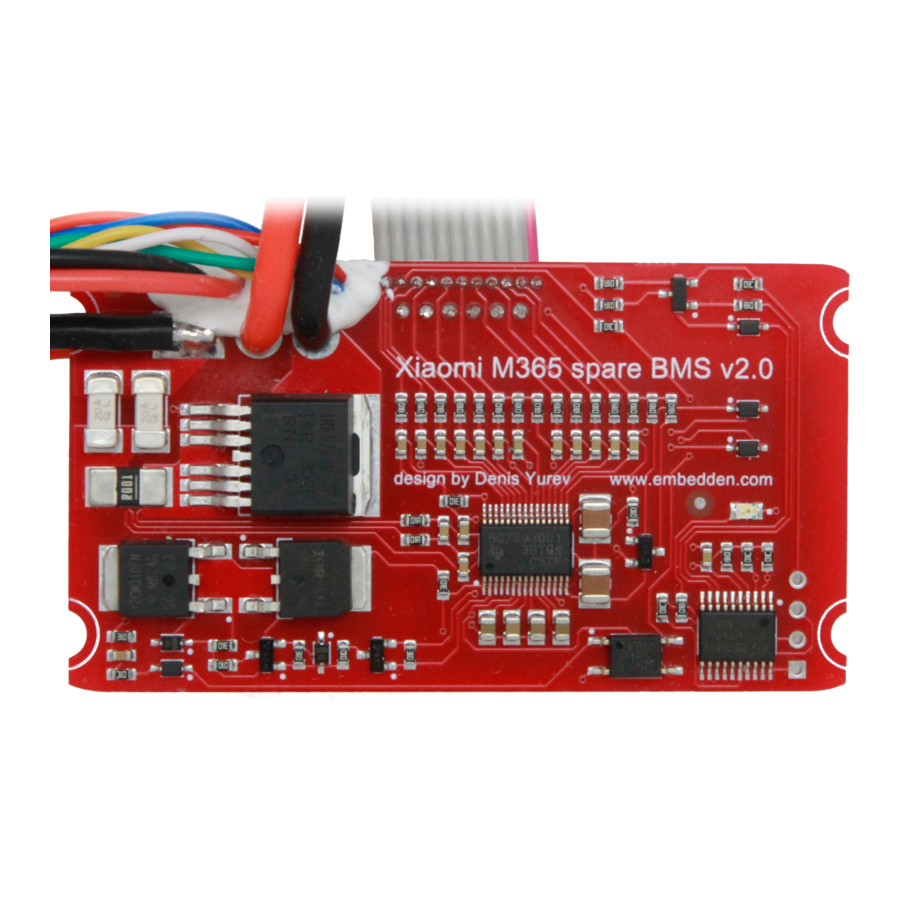
Page 4: General View
General view General view Flashes every half second in normal operation. Activity and error In case of an error, displays its code. indicator For more information on error codes, see the “Troubleshooting” section. Information from these sensors is displayed in the smartphone application. If the Temperature sensors sensors detect an excess of the permissible temperature, the BMS temporarily disables charging and discharging the battery. -
Page 5: Basic Specifications
Basic specifications Basic specifications Supported battery types Li-ion, Li-pol Supported battery configurations 10s only Maximum battery capacity, mA*h 32000 Maximum continuous discharge current, A Maximum continuous charge current, A Effective cells balancing current, mA... -
Page 6: Pinout
Pinout Pinout Battery pack - negative Connects to the negative lead of the battery pack lead Battery pack - positive Connects to the positive lead of the battery pack lead Balancing cable Connects to each parallel of the battery pack Charging connector Connects to the charge port of the scooter Discharging connector... -
Page 7: Installation
Installation Installation Xiaomi M365 - wiring diagram WARNING! Follow the wiring sequence, otherwise the BMS may irreparably fail, with a loss of warranty. 1. Connect the black power wire of the BMS to the negative lead of the battery pack. -
Page 8: Xiaomi M365Pro - Wiring Diagram
Installation Xiaomi M365PRO - wiring diagram WARNING! The cable does not come out of the board in the most convenient way, and when connecting the balancing wires, you have to cross them. The thing is that initially BMS was designed even before the PRO version of the scooter appeared on sale, after which the form of the board was only slightly changed to maintain compatibility. -
Page 9: Installation Process Video Tutorials
Installation Installation process video tutorials Xiaomi M365 BMS replacement Xiaomi M365PRO BMS replacement... -
Page 10: Setting Up The Battery
The repair BMS provides the ability to flexibly configure many parameters. The default values can be left unchanged when the BMS is used just to replace the faulty original Xiaomi M365 board. In the case of the PRO version of the scooter, you must additionally configure the battery capacity. And if you change cells to new ones or even assemble your own battery pack, you need to configure a number of parameters to operate with the new cells. -
Page 11: Description Of Parameters
Setting up the battery Description of parameters Parameter Description This parameter affects only the battery serial number displayed in Battery serial applications. You can enter your name there or the name of your repair shop. Very important parameter, it must be set to the correct value, otherwise, Battery capacity wrong charge level calculation during charge and discharge is possible. - Page 12 Setting up the battery Description of parameters(continuation) Parameter Description Voltage above which at least one parallel is exceeded for a time determined by the “Cell overvoltage delay” parameter, charging is disabled until the Cell overvoltage voltage drops to the value [Cell overvoltage - Cell overvoltage hysteresis].
- Page 13 Setting up the battery Description of parameters(continuation) Parameter Description If the temperature of at least one temperature sensor is above this value during the time determined by the “Critical temperature delay” parameter, Critical temperature then discharge and charge will be disabled until the temperature of each temperature sensor falls below the [Critical temperature - Critical temperature hysteresis] value.
-
Page 14: Default Parameter Values
Setting up the battery Default parameter values Parameter Default value Battery serial “embedden.com” Battery capacity, mAh 7800 Battery date of production 19.07.2019 Discharge curve, mV 3100, 3200, 3300, 3400, 3500, 3600, 3700, 3800, 3900, 4000, 4100 Charge overcurrent, A Charge overcurrent delay, ms 2000 Charge overcurrent cooldown, s Discharge overcurrent, A... -
Page 15: Troubleshooting
Troubleshooting Troubleshooting Trouble : The battery does not work, the LED on the BMS board does not blink Solution : 1. Connect the charger: normally this starts the correctly connected BMS. 2. Check the connection is correct, in case of an error - reconnect correctly. 3. -
Page 16: Warranty And Technical Support
If you did not find the answer to your question after reading this manual, please, feel free to ask your questions in the special telegram group: Xiaomi M365/PRO/1S custom electronics by Denis Yurev...
Need help?
Do you have a question about the M365 and is the answer not in the manual?
Questions and answers