Table of Contents
Advertisement
Advertisement
Table of Contents

Related Manuals for Baur DTA 100 C


Summary of Contents for Baur DTA 100 C
- Page 1 User manual Oil breakdown voltage tester DTA 100 C ▪ ▪ B A U R G m b H R a i f f e i s e n s t r . 6 8 3 2 S u l z , A u s t r i a T + 4 3 5 5 2 2 4 9 4 1 - 0 ▪...
- Page 2 BAUR GmbH, 6832 Sulz, Austria. We reserve the right in the interests of our customers to make amendments as a result of further technical development.
-
Page 3: Table Of Contents
DTA 100 C Table of contents Table of contents About this manual ..................6 Using this manual ................6 Applicability of the instructions ............. 6 Structure of safety instructions ............6 View Settings ..................7 Note on the screenshots and graphics used ........8 For your safety ..................... - Page 4 Table of contents DTA 100 C Fill and use the test vessel ..............29 7.7.1 Instructions for sampling ............30 7.7.2 Insert the test vessel ............31 Turning on the oil breakdown voltage tester ........32 Device settings ..................33 Set display brightness ................
- Page 5 12.1 Measurement log as printout ............. 65 12.2 Measurement log on the display ............66 Putting the device out of operation ............67 BAUR ITS Lite software for measurement data management ....68 14.1 Description of function ............... 68 14.2 Installing ITS Lite ................69 14.3 Starting ITS Lite .................
-
Page 6: About This Manual
If this user manual is lost, please contact BAUR GmbH or your nearest BAUR representative (http://www.baur.eu/baur-worldwide). Applicability of the instructions These operating instructions apply to the DTA 100 C with the firmware version from 1.16. The details of the firmware version currently installed can be found under: Main menu > Tools > Info... -
Page 7: View Settings
DTA 100 C About this manual Danger levels Signal words in the safety instructions specify the danger levels. DANGER Will lead to severe injuries or death. WARNING May lead to severe injuries or death. CAUTION May lead to light to moderate injuries. -
Page 8: Note On The Screenshots And Graphics Used
About this manual DTA 100 C Note on the screenshots and graphics used The screenshots and graphics used are intended to illustrate the procedure and may differ slightly from the actual state. 8 / 90 822-129-8... -
Page 9: For Your Safety
Make sure that the responsible body and persons working with the device or system have carefully read through and understood the user manual for the DTA 100 C, as well as the user manuals for all associated devices, before starting work. -
Page 10: Intended Use
The powerful BAUR DTA 100 C oil breakdown voltage tester automatically measures the electrical breakdown strength of insulating liquids fully. Note: With the DTA 100 C you can test insulating liquids with tan δ values < 4.5 and specific resistance ρ > 30 MΩm. -
Page 11: Dangers When Working With Electric Voltage
(http://www.baur.eu/baur-worldwide). Lifting and carrying the oil breakdown voltage tester The DTA 100 C oil breakdown voltage tester weighs up to 39 kg. It is recommended to seek the help of another person to lift or carry the device. 2.3.1... -
Page 12: Special Personal Protective Equipment
DTA 100 C Special personal protective equipment Personal protective equipment based on the risk assessment for the relevant working conditions is part of the DTA 100 C safety concept. Observe the national safety regulations and your company's working and operating instructions. -
Page 13: Product Information
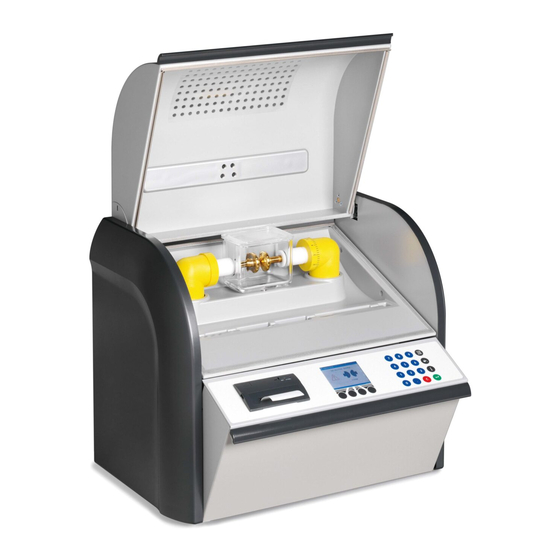
DTA 100 C Product information RODUCT INFORM ATION Full illustration Front view Element Function Handle Used to open and close the protective cover Protective cover Used to protect against dust and oil Safety switch Used as a protective device The protective cover must be closed in order to perform a measurement. - Page 14 Product information DTA 100 C Element Function Test vessel with electrodes Filled with insulating oil The test vessels have a standard holding capacity of 0.4 litres and are made of glass. They comply with the following standards: IEC 60156 Fig. I or Fig. II ...
- Page 15 DTA 100 C Product information Element Function Lifting stick for magnetic Used to remove the magnetic stirrer from the oil sample stirrer Rear view Element Function USB connection Used to connect to a PC Type of interface:USB Type B Protective earthing...
-
Page 16: Operating And Display Elements
Product information DTA 100 C Operating and display elements Element Function Standardised measurement Opens the Standardised measurement menu button Further information: Chapter Standardised measurement (on page 44) Measurement logs button Opens the Measurement logs menu Further information: Chapter Display of measurement results (on page Info button Displays the device information. -
Page 17: Usb Interface
BAUR representative. Type of interface:: USB Type B Power supply The voltage supply for DTA 100 C can be provided via an existing mains supply on site. Permissible mains voltage: 90 – 264 V Permissible mains frequency: 50/60 Hz... -
Page 18: Rating Plate
Product information DTA 100 C Rating plate The rating plate is located on the back of the oil breakdown voltage tester. Element Description Type Device type Serial number Supply voltage If several supply voltages are possible, these are given consecutively one after another. -
Page 19: Technical Data
DTA 100 C Technical data ECHNICAL DATA Further information on the possible test vessels: Chapter Delivery includes and Options (on page 84) 822-129-8 19 / 90... -
Page 20: Basic Insulating Oil Test Procedure
Basic insulating oil test procedure DTA 100 C ASIC INSULATING OIL TEST PROCEDURE Installing the oil breakdown voltage tester Connecting the oil breakdown voltage tester to the power supply Earthing the oil breakdown voltage tester (if operated in a laboratory) -
Page 21: Operating The Oil Breakdown Voltage Tester
DTA 100 C Operating the oil breakdown voltage tester PERATING THE OIL BREAKDOWN VOLTAGE TESTER Menu navigation The control menu is displayed on the colour display. The menu is operated with the control keys under the colour display and the function keys on the membrane keypad. The meaning of the relevant control key is displayed in plain text or as a symbol in the lowest row of the display. -
Page 22: Symbols And Abbreviations On The Display
Operating the oil breakdown voltage tester DTA 100 C Symbols and abbreviations on the display Symbols Symbol Description Indicates an information message Indicates a request Indicates that the menu for setting the time is open Indicates that the menu for setting the date is open... -
Page 23: Main Menu
DTA 100 C Operating the oil breakdown voltage tester Main menu All functions and user settings can be accessed from the main menu. Menu item Description Standardised Configure settings for measurements in compliance with specific standards and measurement start measurements. -
Page 24: Information On The Oil Breakdown Voltage Tester
Operating the oil breakdown voltage tester DTA 100 C Information on the oil breakdown voltage tester Under Main menu > Tools > Info, you will find the following information on the oil breakdown voltage tester: Date on which the oil breakdown voltage tester was last calibrated ... -
Page 25: Commissioning
DTA 100 C Commissioning OMMISSIONING Observe the following information: The safety instructions in the chapter For your safety (on page 9) Local safety and accident prevention regulations Safety instructions and regulations according to the state-of-the-art ... -
Page 26: Installing The Oil Breakdown Voltage Tester
Commissioning DTA 100 C Installing the oil breakdown voltage tester 1. Select the place of installation for the oil breakdown voltage tester in such a way that a stable base with sufficient air circulation is guaranteed, the oil breakdown voltage tester is standing on a flat, horizontal surface, ... -
Page 27: Replacing The Electrodes
DTA 100 C Commissioning Replacing the electrodes The electrode shape is defined by standards and is shown pictographically on the display before a measurement begins. Note: Before each measurement, check that the electrodes used meet the selected standard. If the wrong electrodes are used, replace them. -
Page 28: Clean The Electrodes
Commissioning DTA 100 C Clean the electrodes Clean the electrodes: Before using new electrodes for the first time After having replaced the electrodes, e.g. if another electrode shape is required for the measurement Main menu > Tools > Electrode cleaning 1. -
Page 29: Fill And Use The Test Vessel
DTA 100 C Commissioning 1. Open the dust cover. 2. Set the Vernier scale to zero (1). 3. On the other side of the ring with Vernier scale, there is an adjusting ring without scale (2). Turn the adjusting ring clockwise until you hear an acoustic signal. The electrodes are in contact with each other. -
Page 30: Instructions For Sampling
Commissioning DTA 100 C 7.7.1 Instructions for sampling Important: In order to achieve reliable measurement results, all devices, containers and tools that come into contact with the oil must be clean. Follow the manufacturer's instructions and safety instructions for the relevant sampling container or electrical device. -
Page 31: Insert The Test Vessel
DTA 100 C Commissioning 7.7.2 Insert the test vessel 1. Open the protective cover. 2. Remove the test vessel. Note: To avoid impurities in the test vessel isolators, place the test vessel on an even, clean and dry base when you remove the test vessel from the oil breakdown voltage tester. -
Page 32: Turning On The Oil Breakdown Voltage Tester
Commissioning DTA 100 C Turning on the oil breakdown voltage tester 1. Ensure that the mains voltage matches the specifications on the rating plate. 2. Connect the oil breakdown voltage tester to the mains voltage. 3. There is a mains switch on the back of the device. Use it to switch on the device. -
Page 33: Device Settings
DTA 100 C Device settings EVICE SETTINGS The oil breakdown voltage tester settings are adjusted via the main menu item Device settings. Set display brightness Main menu > Device settings > Display brightness 1. In the main menu, select the menu item Device settings. -
Page 34: Select Language
Device settings DTA 100 C Select language Main menu > Device settings > Language 1. Choose a language by pressing the arrow keys. 2. Click Save to confirm the entry. Switch printer on/off Main menu > Device settings > Printer 1. -
Page 35: Overwrite Measurement Logs
DTA 100 C Device settings Overwrite measurement logs The device can store up to ten measurement logs. When the measurement log memory is full, old measurement logs must be deleted before you can save new ones. Under Clear meas. logs you can define how to proceed when the measurement log memory is full and a measurement is to be performed. -
Page 36: Setting The Hold Time Before The First Measurement
Device settings DTA 100 C Main menu > Device settings > IEC 60156:2018 settings 8.5.1 Setting the hold time before the first measurement Main menu > Device settings > IEC 60156:2018 settings > Hold time 1. In the main menu, select the menu item Device settings. -
Page 37: Adjusting The Stirrer
DTA 100 C Device settings 8.5.2 Adjusting the stirrer Main menu > Device settings > IEC 60156:2018 settings > Stirrer 1. In the main menu, select the menu item Device settings. 2. Select the menu item Next to confirm the selection. -
Page 38: Setting The Electrode Shape
Device settings DTA 100 C 8.5.3 Setting the electrode shape Main menu > Device settings > ... > Electrode shape 1. In the main menu, select the menu item Device settings. 2. Select the menu item Next to confirm the selection. -
Page 39: Configure The Astm Settings
DTA 100 C Device settings Configure the ASTM settings With the ASTM D standards, it is possible to display the individual breakdown values and set the hold time before the first measurement. The settings configured under this menu item are applied automatically for the following standards: ... -
Page 40: Set The Hold Time Before The First Measurement
Device settings DTA 100 C 8.6.2 Set the hold time before the first measurement Main menu > Device settings > ... > Hold time 1. In the main menu, select the menu item Device settings. 2. Select the menu item Next to confirm the selection. -
Page 41: Configure Settings For User-Defined Measurements
DTA 100 C Device settings Configure settings for user-defined measurements With user-defined measurements, it is possible to set the electrode shapes and the distance between the electrodes. Prerequisite The desired distance between electrodes has been set. Further information: Chapter Setting an electrode gap (on page 28) Procedure Main menu >... -
Page 42: Set Date
Device settings DTA 100 C 5. Click Save to confirm the entry. A window appears on the display with an input field for the distance between electrodes. 6. Use the number keys on the membrane keypad to enter the desired distance between electrodes. -
Page 43: Set Time
DTA 100 C Device settings Set time Main menu > Device settings > Time 1. Select the position by pressing the arrow keys. 2. Change the time with the membrane keypad. 3. Click Save to confirm the entry. 8.10 Reset settings Note: This menu item resets all settings to the factory defaults. -
Page 44: Standardised Measurement
Standardised measurement DTA 100 C TANDARDISED MEASUREM ENT Overview of standards The factory calibrated settings for the standardised measurements are configured as follows: Can be selected under Main menu > Device settings > IEC 60156:2018 settings For insulating liquids with a standard viscosity greater than 15 mm /s (40°C), the hold time... -
Page 45: Carry Out A Standardised Measurement
DTA 100 C Standardised measurement Can be selected under Main menu > Device settings > ASTM settings When testing ester liquids in accordance with ASTM D1816:2012 the hold time before the first measurement must be at least 30 mins. Can be deactivated under Main menu > Device settings > IEC 60156:2018 settings... - Page 46 Standardised measurement DTA 100 C 3. Select a standard, then menu item Next. The electrode shape and gap are defined by the relevant standard. A prompt appears on the display to set the electrode gap according to the selected standard. The required electrode shape is displayed pictographically.
- Page 47 DTA 100 C Standardised measurement 8. Click Save to confirm the entry. The measurement begins. A window displays the details of the measurement process. The symbol indicates that there is high voltage at the electrodes. When the oil breakdown voltage tester has completed the measurement, the measurement log is shown on the display.
-
Page 48: Quick Test
Quick test DTA 100 C UICK TEST A quick test is used to make a quick evaluation of the oil status. In this process, an orientation value will be determined for the breakdown strength of the insulating oil. Quick test parameters: ... - Page 49 DTA 100 C Quick test 3. Set the electrode gap according to the selected standard. Further information: Chapter Setting an electrode gap (on page 28) Chapter Overview of standards (on page 44) 4. Set the slew rate for the test voltage. Please use the arrow keys to make entries.
- Page 50 Quick test DTA 100 C 9. Select the menu item Back to perform further measurements or to stop the measurement process. The oil breakdown voltage tester switches to the beginning of the measurement. A prompt appears on the display to set the electrode gap.
-
Page 51: User-Defined Measurement
DTA 100 C User-defined measurement DEFINED MEASUREMENT Main menu > User-defined measurement 1. Select the menu item by pressing the arrow keys. 2. Select the menu item Next to confirm the selection. The User-defined measurement menu opens. 3. You have the following options: ... -
Page 52: Creating A User-Defined Measurement
User-defined measurement DTA 100 C 11.1 Creating a user-defined measurement Main menu > User-defined measurement 1. Select the menu item by pressing the arrow keys. 2. Select the menu item Next to confirm the selection. A prompt appears on the display to enter a name for the measurement. -
Page 53: Overview Of Templates
DTA 100 C User-defined measurement 11.1.1 Overview of templates If your measurement is similar to a standardised measurement, you can load the settings from a standard as a template and customise them in the other menu items. The following table provides an overview of the settings according to the template. -
Page 54: Selecting A Template
User-defined measurement DTA 100 C 11.1.2 Selecting a template Main menu > User-defined measurement > ... > Template 1. In the main menu, select the menu item User-defined measurement. 2. Select the menu item Next to confirm the selection. 3. In the User-defined measurement menu select the menu item Template and then menu item Change. -
Page 55: Setting The Stirring Time During The Hold Time
DTA 100 C User-defined measurement 11.1.4 Setting the stirring time during the hold time Recommendation: As the homogeneity of the oil sample has a strong influence on the quality of the measurement results, stir the oil sample during the measurement process. -
Page 56: Setting The Duration Of The Pauses Between Measurements
User-defined measurement DTA 100 C 11.1.6 Setting the duration of the pauses between measurements Main menu > User-defined measurement > ... > Pause 1. Select the menu item by pressing the arrow keys. 2. Select menu item Change. 3. Enter the duration of the pauses between measurements with the number keys on the membrane keypad. -
Page 57: Setting The Number Of Measurements
DTA 100 C User-defined measurement 11.1.8 Setting the number of measurements Main menu > User-defined measurement > ... > No. measurements 1. Select the menu item by pressing the arrow keys. 2. Select menu item Change. 3. Enter the number of measurements with the number keys on the membrane keypad. -
Page 58: Setting The Withstand Voltage
User-defined measurement DTA 100 C 11.1.10 Setting the withstand voltage Prerequisite The template Withstand voltage has been selected. Procedure Main menu > User-defined measurement > ... > Template > Withstand voltage 1. Select menu item Withstand voltage. 2. Select menu item Change. -
Page 59: Selecting Which Measured Values Are Not To Be Evaluated
DTA 100 C User-defined measurement 6. Select the menu item Next to confirm the selection. 7. Select the duration for which the withstand voltage is maintained during the first step. 8. Select the menu item Next to confirm the selection. -
Page 60: Saving User-Defined Measurements
User-defined measurement DTA 100 C 11.1.12 Saving user-defined measurements After you have defined the parameters for a user-defined measurement, you can save this measurement. Main menu > User-defined measurement > selected measurement 1. Select Back. You will be asked if you want to save the measurement with modified parameters. -
Page 61: Running A User-Defined Measurement
DTA 100 C User-defined measurement 11.2 Running a user-defined measurement Main menu > User-defined measurement 1. In the main menu, select the menu item User-defined measurement. 2. Select the menu item Next to confirm the selection. 3. In the User-defined measurement menu, select a saved measurement, followed by the menu item Next. - Page 62 User-defined measurement DTA 100 C 6. Set the indicated electrode gap. Further information: Chapter Setting an electrode gap (on page 28) 7. Select menu item Start. A prompt to enter a sample number appears on the display. The oil breakdown voltage tester will suggest a sample number composed of the date and time in DDMMYYhhmm format.
-
Page 63: Editing Or Deleting A User-Defined Measurement
DTA 100 C User-defined measurement 11.3 Editing or deleting a user-defined measurement Main menu > User-defined measurement 1. Select a saved measurement by pressing the arrow keys. 2. Select the menu item Next to confirm the selection. 3. Choose one of the following settings by pressing the arrow keys: ... -
Page 64: Display Of Measurement Results
Display of measurement results DTA 100 C ISPLAY OF MEASUREMENT RESULTS Main menu > Measurement logs 1. Choose a measurement log by pressing the arrow keys. 2. Select the menu item Next to confirm the selection. 3. Choose one of the following settings by pressing the arrow keys: ... -
Page 65: Measurement Log As Printout
DTA 100 C Display of measurement results 12.1 Measurement log as printout Main menu > Measurement logs > print Measurement log BAUR DTA 100 C Version 1.16 06.03.2019 10:12 ---------------------------------------------------- Serial number: 0801900001 Sample number: 1002091355 Standardised measurement: IEC 60156:2018 Electrode shape: IEC 60156 Fig. -
Page 66: Measurement Log On The Display
Display of measurement results DTA 100 C 12.2 Measurement log on the display Main menu > Measurement logs > show Use the arrow keys to scroll through the text. 66 / 90 822-129-8... -
Page 67: Putting The Device Out Of Operation
DTA 100 C Putting the device out of operation UTTING THE DEVICE OU T OF OPERATION 1. Close the operating unit. The firmware stops. 2. There is a mains switch on the back. Turn off the oil breakdown voltage tester. -
Page 68: Baur Its Lite Software For Measurement Data Management
ITE SOFTWARE FOR MEASUREMENT DATA MANAGEMENT The BAUR ITS Lite software is used to read measurement results and to design and archive measurement logs of the BAUR DTA 75 C, DTA 100 C and DTL C insulating oil testers. 14.1 Description of function Reading of measurement logs from BAUR insulating oil testers and archiving with ITS Lite takes place automatically. -
Page 69: Installing Its Lite
7. In the Ready to install BAUR ITS Lite window, click Install to start the installation. ITS Lite will be installed. 8. In the Completed the BAUR ITS Lite Setup Wizard window, click on Finish to end the installation process. -
Page 70: Checking The Measurement Accuracy Of The Oil Breakdown Voltage Tester (Optional)
Checking the measurement accuracy of the oil breakdown voltage tester (optional) DTA 100 C HECKING THE MEASUREM ENT ACCURACY OF THE OIL BREAKDOWN VOLTAGE TESTER OPTIONAL You can check the voltage values with a 0.7 % measuring accuracy using a KA DPA/DTA C (option) calibrator. -
Page 71: Maintenance
NOTICE Material damage caused by unauthorised spare parts Use only accessories and original spare parts recommended by BAUR. The use of spare parts, accessories and special fittings that have not been tested and approved by BAUR could adversely affect the safety, function and features of the product. -
Page 72: Cleaning The Oil Breakdown Voltage Tester
Maintenance DTA 100 C 16.1 Cleaning the oil breakdown voltage tester DANGER Electrical voltage on device Danger to life or risk of injury from electrical voltage. Switch off the device before cleaning. To disconnect the device completely from the mains voltage, pull out the mains plug. - Page 73 Cleaning HV isolators BAUR GmbH recommends cleaning the HV isolators at least once a year to guarantee maximum accuracy. HV isolators may be cleaned only by qualified technical staff authorised by BAUR.
-
Page 74: Replacing The Printer Paper Roll
Maintenance DTA 100 C Cleaning the device surfaces and connection cable 1. Clean the device surfaces and connection cable with mild detergent and a lint-free cloth. 2. NOTICE! Damage to device due to leaking fluids. Do not allow liquids to leak into devices. - Page 75 DTA 100 C Maintenance 5. Use scissors to cut the end of the new paper roll in the shape of a trapeze. 6. Put the paper roll holder with the new paper roll into the printer. Paper roll Paper feed Paper feed button LF/SEL 7.
-
Page 76: Replacing The Printer Ink Ribbon
Maintenance DTA 100 C 16.3 Replacing the printer ink ribbon Prerequisites Printer ink ribbon, blue Order number: 565-513 Procedure Cover Printer ink ribbon 1. Remove the cover (1) from the printer. 2. Replace the printer ink ribbon (2). 3. Place the cover (1) on the printer. -
Page 77: Replacing The Fuse
If required, a test and calibration log can be delivered with the proof of return of the calibration to national and international standards. BAUR GmbH recommends calibrating the device once a year to guarantee maximum accuracy. In case of questions, please contact BAUR GmbH or your local BAUR representative (http://www.baur.eu/baur-worldwide). 822-129-8 77 / 90... -
Page 78: Ordering Accessories And Spare Parts
Maintenance DTA 100 C 16.6 Ordering accessories and spare parts Only use accessories and original spare parts recommended by BAUR. Order accessories and spare parts from your nearest BAUR representative (http://www.baur.eu/baur-worldwide). Order number Description 670-087 Transport case 670-085... -
Page 79: Faults
Further information: Chapter Error messages and corrective measures (on page 80) 3. Restart the oil breakdown voltage tester. 4. If the error occurs again after the device has been restarted, contact your nearest BAUR representative (http://www.baur.eu/baur-worldwide). It may be possible for the BAUR GmbH After Sales Service Team to determine the cause of the fault remotely. -
Page 80: Error Messages And Corrective Measures
HV isolators may be cleaned only by qualified HV isolators are not clean technical staff authorised by BAUR. In case of questions, please contact BAUR GmbH or your local BAUR representative (http://www.baur.eu/baur-worldwide). Check the relative permittivity of the oil sample. -
Page 81: Transportation And Storage
Technical Service for repairs or any other reason, ensure the following: The DTA 100 C oil breakdown voltage tester weighs up to 39 kg. It is recommended to seek the help of another person to lift or carry the device. -
Page 82: Storage
ARRANTY AND FTER ALES Warranty For warranty claims, please contact BAUR GmbH or your local BAUR representative (http://www.baur.eu/baur-worldwide). Warranty is cancelled in case of misuse. Wear parts are excluded from the warranty. After Sales For questions contact BAUR GmbH or your BAUR representative (http://www.baur.eu/baur- worldwide). -
Page 83: Disposal
Disposal ISPOSAL 20.1 Disposing of the device BAUR devices do not belong in the domestic waste. Dispose of the device in an environmentally friendly manner and in accordance with the applicable national regulations. 20.2 Disposing of the insulating oil ... -
Page 84: Delivery Includes And Options
Delivery includes and Options DTA 100 C ELIVERY INCLUDES AND PTIONS 84 / 90 822-129-8... -
Page 85: Declaration Of Conformity
Raiffeisenstraße 8 6832 Sulz / Austria headoffice@baur.at www.baur.eu declare, under our sole responsibility, that the BAUR product BAUR oil breakdown voltage tester DTA 100 C to which this declaration refers, conforms to the following standards or standard documents: Low Voltage Directive 2014/35/EC EN 61010-1:2010 ... -
Page 86: Index
Disposal • 83 Basic insulating oil test procedure • Disposing of the device • 83 Disposing of the insulating oil • 83 BAUR ITS Lite software for measurement data management • 68 Earthing the oil breakdown voltage tester • 26 Calibration •... - Page 87 DTA 100 C Index Select language • 34 Main menu • 23 Selecting a template • 54 Maintenance • 71 Selecting which measured values are not to be evaluated • 59 Measurement log as printout • 65 Set date • 42 Measurement log on the display •...
- Page 88 Index DTA 100 C USB interface • 17 User-defined measurement • 51 Using this manual • 6 View Settings • 7 Warranty and After Sales • 82 Withstand voltage template • 53 88 / 90 822-129-8...
- Page 90 822-129-8 BAUR GmbH Raiffeisenstraße 8 6832 Sulz / Austria headoffice@baur.at www.baur.eu 822-129-8-phd-07.03.2019...
Need help?
Do you have a question about the DTA 100 C and is the answer not in the manual?
Questions and answers