Advertisement
Quick Links
Cylindrical Photoelectric Sensor
,
CY-111
Thank you for purchasing products from Panasonic. Please read this
Instruction Manual carefully and thoroughly for the correct and optimum
use of this product. Kindly keep this manual in a convenient place for quick
reference.
● Never use this product as a sensing device for personnel protection.
● In case of using sensing devices for personnel protection, use prod-
ucts which meet laws and standards, such as OSHA, ANSI or IEC
etc., for personnel protection applicable in each region or country.
1
Cautions
● This product has been developed / produced for industrial use only.
● This product is suitable for indoor use only. The cable extension up to
a total of 10m or less with a strength of 0.34mm
and receiver of the thru-beam type) is possible.
● Make a cable length as short as possible to lessen noise pickup.
● Make sure that the power supply is off while wiring.
● Verify that the supply voltage including the ripple is within the rating.
● If power is supplied from a commercial switching regulator, ensure that
the frame ground (F.G.) terminal of the power supply is connected to
an actual ground.
● Shortcircuiting the load or wrong wiring may burn or damage the
product.
● Ensure that an isolation transformer is utilized for the DC power sup-
ply. If an autotransformer is utilized, the main body or power supply
may be damaged.
● If the used power supply generates a surge, connect a surge absorber
to the power supply to absorb the surge.
● Do not use the sensor during the initial transient time (0.5 sec) after
the power supply is switched on.
● Do not run the wires together with high-voltage lines or power lines
or put them in the same raceway. This can cause malfunction due to
induction.
● Avoid using the product where there are strong magnetic fields as they
may prevent the product from working according to the specification.
● Take care that the sensor is not directly exposed to a fluorescent lamp
from a rapid-starter lamp or a high frequency lighting device, as it may
affect the sensing performance.
● Protect the sensor from water, oil, grease, organic solvents such as
thinner, etc., strong acid, and alkaline.
● Avoid using a product where there is excessive vapor, dust or cor-
rosive gases, or in a place where it could be exposed directly to water
or chemicals.
● This product cannot be used in an environment containing inflam-
mable or explosive gases.
● Never disassemble or modify the product.
2
Compliance with standards and directives
This product complies with the following standards and
regulations.
● For the EU: EMC Directive 2004/108/EC
● For the US and Canada:
ANSI/UL60947-5-2, CAN/CSA C22.2 No.14
● For Korea: S1-G-1-2009, S2-W-5-2009
*
In case you require a UL listing mark or C-UL
listing mark, use a class 2 power supply unit.
RoHS directive
● This equipment complies with RoHS (CE and Chinese
directive).
INSTRUCTIONS
,
CY-19
CY-12
Series
q
q
WARNING
or less (each emitter
2
3
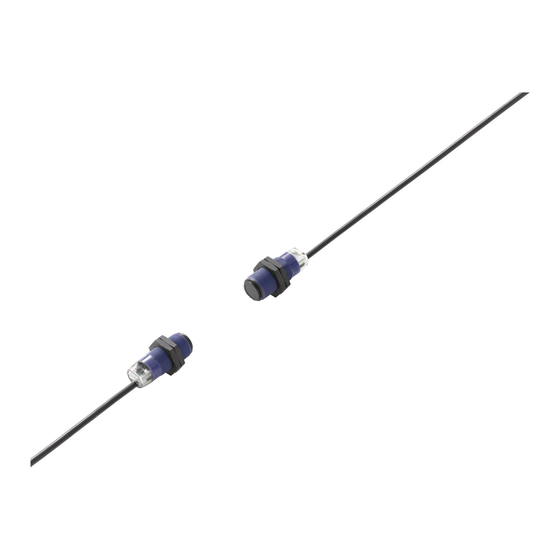
Sensor types
Cable type (2m)
Standard
Side view
4
Part description
2
1
3
3
Main body
1
Mounting plate
2
Nut
3
Cable with connector
4
5
Mounting
General installation hints
1. Attach the sensor directly on your equipment or use one of the optional
mounting brackets to fix the sensor.
2. The tightening torque should be 3Nm or less.
3. If you mount a M12 connector type, you can use the optional cable with
the connector UZZ812
qq
should be 3Nm or less.
Mounting with the mounting bracket MS-CY1-1
1. Using the holes indicated
1, screw the mounting
bracket to the surface.
2. Feed the sensor into the
mounting hole 2 and
affix it with the nuts on the
sensor.
Mounting with the mounting bracket MS-CY1-2
1. Using the holes indicated
1, screw the mounting
bracket to the surface.
2. Feed the sensor into the
mounting hole 2 and
adjust its direction.
3. Use the upper two screws
3 to secure the sensor.
1
Connector type (M12)
4
D. The tightening torque for the connector part
1
3
1
2
2
Advertisement

Related Manuals for Panasonic CY-111 Series


Summary of Contents for Panasonic CY-111 Series
- Page 1 CY-111 CY-19 CY-12 Series Thank you for purchasing products from Panasonic. Please read this Instruction Manual carefully and thoroughly for the correct and optimum use of this product. Kindly keep this manual in a convenient place for quick reference. Side view WARNING ●...
- Page 2 Receiver of thru-beam / reflective type (NPN) Model no. Description MS-CY1-1 Material: Stainless steel MS-CY1-2 Material: Plastic (recommended for a more flexible beam axis alignment) Mating cables % There are two types of mating cables: straight type and elbow type. You only need mating cables for the connector type (M12).
- Page 3 Diffuse reflective type with adjustable sensitivity Mounting bracket MS-CY1-1 ø18.2 -1.4 60 cm Object 10 x 10cm; 1= White 90%, = Gray 18% Retroreflective type Mounting bracket MS-CY1-2 ø18.2 With reflector RF-420 Retroreflective type with polarizing filters Reflector RF-420 4 - R5 2 - ø...
- Page 4 Specifications The connector type (M12) is also available for all models in the following table. To order, simply add “-Z” at the end of the order information. Type Thru-beam (note 6) Retroreflective Diffuse reflective With polarizing filters With sensitivity adjuster Standard Side view Standard...