Advertisement
Quick Links
Advertisement

Subscribe to Our Youtube Channel
Related Manuals for Star Trac FREERUNNER 10TRx


Summary of Contents for Star Trac FREERUNNER 10TRx
- Page 1 Core Health & Fitness 10TRx FREERUNNER ASSEMBLY MANUAL...
-
Page 2: Important Safety Instructions
Read all warnings posted on the machine. Health related injuries may result from incorrect or excessive use of exercise equipment. STAR TRAC strongly recommends you to encourage your members to discuss their health program or fi tness regimen with a health care professional, especially if you or they have not exercised for several years, are over 35, or have known health conditions. -
Page 3: Product Spotlight
PRODUCT SPOTLIGHT 9-9271 110V 9-9274 220V CE/UL/FCC/CSA 10-TRx Treadmill Overall Weight Width Length Height Belt Width Max User Weight 494 lbs (224 kg) 35 in (90 cm) 89 in (226 cm) 57.3 in (146 cm) 21.5 in (55 cm) 0-500 lbs (0-226 kg) Page 2... -
Page 4: Part Identification
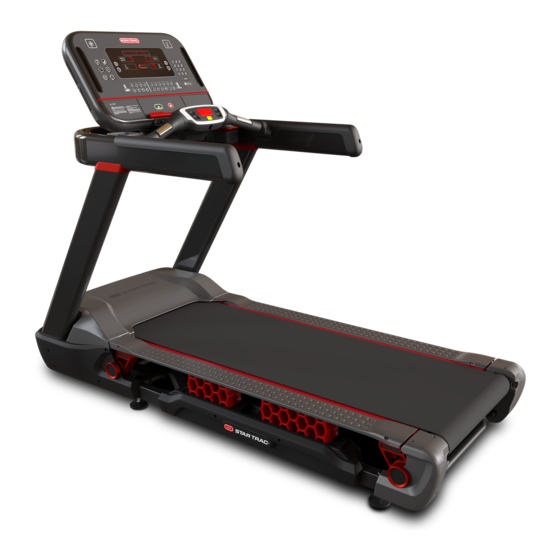
PART IDENTIFICATION Fig. 4 10-TRx Features Part Part Part Console Safety Stop (Cord) Foot Front Handlebar Moving Surface Foot Rail Heart Rate Grips Deck Elevation Frame Safety Stop (Button) Rear Roller Shroud Motor Shroud Handrail Rear Roller Page 7... - Page 5 Required Tools: • Ratchet Wrench • 15mm Socket • 19mm Socket • Torque Wrench • #2 Phillips Screwdriver • Rubber Mallet • Caliper or Ruler • 9/16” Open-ended Wrench CAUTION: This product requires two people to • 3/4” Open-ended Wrench assemble.
- Page 6 Slide the right side handrail grommet onto the right side upright handrail and slide the left side handrail grommet onto the left side upright handrail. Ensure both grommets are moved up to the middle of the handrails. NOTE: Be careful of the orientation of the grommets as they are left-right specifi c.
- Page 7 Use a ratchet wrench with a 19mm socket to adjust the frame wedge bolts to ensure the gap 63.00 mm between the wedge and the frame is 63mm. With two people, carefully lift the handrail assembly and install it onto the frame. Once the handrail assembly is set onto the frame, check to ensure that the wires are not pinched - adjust the handrail assembly if they are.
- Page 8 SUP PWR DATA COAX Route the cable bundle into the motor compartment, then connect the cables to the corresponding connections both on the motor control board (MCB), the RJ45 cables labeled “A” and “B”, as well as the COAX cable. COAX SUP PWR DATA...
- Page 9 Use a #2 phillips screwdriver to remove the four screws securing the side-bed covers to the frame, then lift the side-bed covers up. NOTE: The screws are angled, take care when reinstalling the hardware as to not strip the screws. With the side-bed covers lifted, install the motor shroud, then use a #2 phillips screwdriver to secure the motor shroud to the frame using two...
- Page 10 Before plugging in the treadmill, ensure it is moved to its fi nal position and level the treadmill by using a 9/16” open-ended wrench to adjust the four (4) leveling feet [1]. Once the treadmill is level, use a 3/4” open-ended wrench to tighten the lock nut [2] on each foot to ensure the foot is locked into place.
-
Page 11: Console Installation
CONSOLE INSTALLATION NOTE: Depending on which console was purchased, the install instructions could be diff erent - please see console owner’s manual for additional information. Use a #2 phillips screwdriver to secure the back console shroud to the console mount using ten (10) pieces each of the #8-18 x 3/4”... - Page 12 Install the power cord into the machine and plug the other end into the wall outlet, then push the power breaker to the on position. WARNING: To reduce the risk of electrical shock, fi re, or injury to persons, the installer must ensure that the treadmill is connected to a dedicated power line having an outlet with the same confi guration as that of the plug:...
- Page 13 SUPPORT & SERVICE For Technical Support, Service, Parts Orders or any Customer Service needs, please contact us direct by phone, email, or through our 24 hour support site: GLOBAL SUPPORT CENTER 4400 NE 77th Avenue, Suite 300 Vancouver, WA 98662 Tel: (360) 326-4090 •...
- Page 14 © 2020 CORE HEALTH & FITNESS, LLC PART NUMBER 620-8683, REV E...
Need help?
Do you have a question about the FREERUNNER 10TRx and is the answer not in the manual?
Questions and answers