Table of Contents
Advertisement
Quick Links
Advertisement
Table of Contents

Related Manuals for BolyGuard BG662


Summary of Contents for BolyGuard BG662
- Page 1 BG662 User Manual BG662...
-
Page 2: Table Of Contents
BG662 Table of Contents 1. Getting Started ......... 1 1.1 Product View ..........1 2. Camera Operations ........2 2.1 Power Supply ..........2 2.2 SD Card Information ........2 2.3 Camera Modes ..........3 2.4 Manual Image / Video Capturing ....4 2.5 Manage Images and Videos ...... -
Page 3: Getting Started
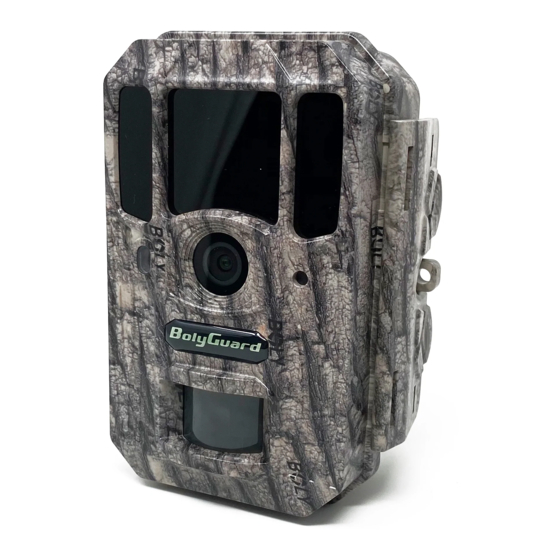
BG662 1. Getting Started 1.1 Product View Fig. 1: Front View Fig. 2: Inner Panel View Fig. 3: Bottom view Infrared LED Lens Microphone Lock Indication LED Right Up/Video OK/Play SD Card Slot Left Down/Photo Speaker Power Switch Menu Shot... -
Page 4: Camera Operations
BG662 2. Camera Operations 2.1 Power Supply 2.1.1 Powered by Batteries ① 4 or 8 AA batteries High-density, high-performance rechargeable or non-rechargeable Alkaline batteries recommended. You can also use NiMH batteries as well, each battery should be above 1.5V. ②... -
Page 5: Camera Modes
BG662 card, and has no built-in internal memory. The camera will not function without the SD card properly inserted into the camera. Make sure the SD card is unlocked before inserting it into the camera If you experience any problems with an inserted SD card, try reformatting the SD card through the camera’s main settings... -
Page 6: Manual Image / Video Capturing
BG662 indication LED (red) will blink for about 10 seconds. This time interval is for you to position the camera for automatic surveillance operation. SETUP Mode: Switching the camera to the SETUP position allows you customize your camera settings or play back pictures and videos the camera has taken on the LCD display. -
Page 7: Quickly Change Camera Mode
BG662 2.6 Quickly Change Camera Mode Place the camera in SETUP Mode and press ▲ ▼ to quickly change the camera mode. 2.7 T rigger odes There are 3 trigger modes for the cameras. PIR trigger: PIR trigger is constantly working when the camera is on. -
Page 8: Remote Display & Settings
BG662 3. Remote Display & Settings 3.1 Basic Key Function & Display To update the camera settings, place the power switch to the ON position. MENU: Enter the program menu in Preview Mode Delete or Send an image/video in Playback ▼►:Move between menu options(OK to select) - Page 9 BG662 keys to select the different options. Press “OK” to save the settings. After changing EACH setting in SETUP Mode, you must press OK or the camera will retain the previous setting. Menu Descriptions Options Choose between capturing images, videos...
- Page 10 BG662 Default: 10 seconds Set the cameras date and time. The date Set Clock format is month/day/year. The time format is hour: minute: second. The camera can capture images or videos at a preset time interval regardless of motion detection. Changing this setting to...
- Page 11 BG662 Default: Normal This setting indicates how long the PIR sensor will be disabled after each camera triggering. During this time the PIR sensor will not react to any detected motion or scheduled timer functions. The Interval PIR Interval can be set between zero seconds to a maximum of 1 hour.
- Page 12 BG662 Enable or disable the sound the camera Beep will make while navigating the menu Sound settings. Default: On Used for multiple cameras in an area. You can set an A-Z indicator for each of your Camera cameras in order to distinguish between Position which photos are from specific camera.
-
Page 13: Pir Detection Zone
BG662 4. PIR Detection Zone The PIR’s detection range can reach 70ft in an open environment. The following picture shows this camera’s PIR detection range compared to standard PIR detection range. The PIR detection angle (α) is smaller than the field of view angle (β). -
Page 14: Technical Specifications
BG662 5. Technical Specifications Picture Resolution 14/25/36MP 3840*2160,2560*1440,1920*1080, Video Resolution 1280*720,640*480 Video Length 5 to 180 Sec Detection Range 100ft. Illumination 100ft. Distance LED Type 940nm LED Number 4pcs Image Sensor 14MP Color CMOS Aperture ƒ/ 2.4 Field of View 110°... -
Page 15: Parts List
BG662 6. Parts List Part Name Quantity Camera USB Cable Belt User Manual Warranty Card Mounting Bracket Version 1.0...
Need help?
Do you have a question about the BG662 and is the answer not in the manual?
Questions and answers