Table of Contents
Advertisement
User's Guide
User's Guide
SF-76xP Series
BASIC
BASIC
This guide provides information concerning installation, basic operation and
troubleshooting on windows.
ADVANCED
This guide provides information about installation, advanced configuration, operation and
troubleshooting on various OS environments.
Some features may not be available depending on models or countries.
Advertisement
Chapters
Table of Contents
Troubleshooting

Related Manuals for Samsung SF-760P


Summary of Contents for Samsung SF-760P
- Page 1 User’s Guide User’s Guide SF-76xP Series BASIC BASIC This guide provides information concerning installation, basic operation and troubleshooting on windows. ADVANCED This guide provides information about installation, advanced configuration, operation and troubleshooting on various OS environments. Some features may not be available depending on models or countries.
-
Page 2: Table Of Contents
1. Introduction Key benefits Features by models Useful to know About this user’s guide Safety information Machine overview Control panel overview Turning on the machine Installing the driver locally Reinstalling the driver 2. Menu Overview and Basic Setup Menu overview Machine’s basic settings Media and tray Basic printing... - Page 3 5. Appendix Specifications Regulatory information Copyright...
-
Page 4: Introduction
1. Introduction This chapter provides information you need to know before using the machine. • Key benefits • Features by models • Useful to know • About this user’s guide • Safety information • Machine overview • Control panel overview •... -
Page 5: Key Benefits
Print Screen key on the keyboard (see "Easy Capture Manager" on page 167). • Samsung Easy Printer Manager and Printing Status (or Smart Panel) is a program that monitors and informs you of the machine’s status and allows you to customize the machine’s settings (see "Using Samsung Printer... - Page 6 Key benefits Wide range of functionality and application support • Supports various paper sizes (see "Print media specifications" on page 94). • Print watermark: You can customize your documents with words, such as “Confidential” (see "Using advanced print features" on page 140). •...
-
Page 7: Features By Models
Features by models Some features and optional goods may not be available depending on model or country. Operating System Operating System SF-76xP Series ● Windows ● Macintosh ● Linux Unix (●: Included, Blank: Not available) Software Software SPL printer driver PCL printer driver PS printer driver XPS printer driver... - Page 8 Scan Twain scan driver WIA scan driver Samsung Scan Assistant SmarThru 4 SmarThru Office a. For XPS driver, it is only supported for Windows through the Samsung website (www.samsung.com) (●: Included, Blank: Not available) SF-76xP Series ● ● ● ●...
- Page 9 Features by models Variety feature Features Hi-Speed USB 2.0 Network Interface Ethernet 10/100 Base TX wired LAN Network Interface 802.11b/g/n wireless LAN Eco printing (Control panel) Duplex (2-sided) printing (Manual) USB memory interface Memory module Mass Storage Device (HDD) Duplex Automatic Document Feeder (DADF) Automatic Document Feeder (ADF) Handset SF-76xP Series...
- Page 10 Features by models Features Multi-send Delay send Priority send Duplex send Secure receive Duplex print Send/ Receive forward - fax Scan Scanning to email Scanning to SMB server Scanning to FTP server Duplex scan Scan to PC SF-76xP Series ● ●...
- Page 11 Duplex copy a. Depending on your country, wireless LAN card may not be available. For some counties, only 802.11 b/g can be applied. Contact your local Samsung dealer or the retailer where you bought your machine. b. Windows only. (●: Included, Blank: Not available) SF-76xP Series ●...
-
Page 12: Useful To Know
Windows (see "Setting your machine as a default machine" on page 139). Where can I purchase accessories or supplies? • Inquire at a Samsung distributor or your retailer. • Visit www.samsung.com/supplies. Select your country/ region to view product service information. -
Page 13: About This User's Guide
About this user’s guide This user's guide provides information for your basic understanding of the machine as well as detailed steps to explain machine usage. • Read the safety information before using the machine. • If you have a problem using the machine, refer to the troubleshooting chapter. -
Page 14: Safety Information
Safety information These warnings and precautions are included to prevent injury to you and others, and to prevent any potential damage to your machine. Be sure to read and understand all of these instructions before using the machine. After reading this section, keep it in a safe place for future reference. -
Page 15: Operating Method
Safety information Caution During an electrical storm or for a period of non-operation, remove the power plug from the electrical outlet. This could result in electric shock or fire. Be careful, the paper output area is hot. Burns could occur. If the machine has been dropped, or if the cabinet appears damaged, unplug the machine from all interface connections and request assistance from qualified service personnel. -
Page 16: Installation / Moving
Safety information Do not block or push objects into the ventilation opening. This could result in elevated component temperatures which can cause damage or fire. Use of controls or adjustments or performance of procedures other than those specified herein may result in hazardous radiation exposure. -
Page 17: Maintenance / Checking
Safety information Use the power cord supplied with your machine for safe operation. If you are using a cord which is longer than 2 meters (6 feet) with a 110V machine, then the gauge should be 16 AWG or larger. Otherwise, it can cause damage to the machine, and could result in electric shock or fire. -
Page 18: Supply Usage
• Fuser units should only be repaired by a certified service technician. Repair by non-certified technicians could result in fire or electric shock. • The machine should only be repaired by a Samsung service technician. Supply usage Caution Do not disassemble the toner cartridge. -
Page 19: Machine Overview
Machine overview Accessories Power cord Quick installation guide Handset Software CD Misc. accessories a. The software CD contains the print drivers user’s guide, and software applications. b. Miscellaneous accessories included with your machine may vary by country of purchase and specific model. 1. -
Page 20: Front View
Machine overview Front view • This illustration may differ from your machine depending on your model. • Some features and optional goods may not be available depending on model or country (see "Features by models" on page 7). Document feeder width guides Tray Control panel 13 Scan unit... - Page 21 Machine overview Document feeder input tray Document feeder Paper width guides Output tray 10 Top cover Document feeder output tray 11 Inner cover One-touch dial 12 Toner cartridge 14 Handset 1. Introduction...
-
Page 22: Rear View
Machine overview Rear view • This illustration may differ from your machine depending on your model. • Some features and optional goods may not be available depending on model or country (see "Features by models" on page 7). Extension telephone socket (EXT.) Telephone line socket (LINE) USB port Power receptacle... -
Page 23: Control Panel Overview
Control panel overview Control panel Address Book Allows you to store frequently used fax numbers or search for stored fax numbers. Redial/Pause Redials the last number in ready mode, or inserts a pause(-) into a fax number in edit mode. Power Turns the power on or off, or wakes up the machine from the power save mode. - Page 24 Control panel overview 15 Multi Send Allows you to send a fax to (see "Sending a fax to multiple destinations" on page 55). 16 Delay Send Allows you to send a fax at a later time when you will not be present (see"Delaying a fax transmission"...
-
Page 25: Turning On The Machine
Turning on the machine Connect the machine to the electricity supply first. Power is turned on automatically. If you want to turn the power off, press and hold (Power) button for about 3 seconds. 1. Introduction... -
Page 26: Installing The Driver Locally
Installing the driver locally A locally connected machine is a machine directly attached to your computer using the cable. • If you are a Macintosh and Linux OS user, refer to the "Installation for Macintosh" on page 114, "Installation for Linux" on page 116. •... -
Page 27: Reinstalling The Driver
Windows Make sure that the machine is connected to your computer and powered on. From the Start menu, select Programs or All Programs > Samsung Printers > your printer driver name > Uninstall. Follow the instructions in the installation window. -
Page 28: Menu Overview And Basic Setup
2. Menu Overview and Basic Setup This chapter provides information about the overall menu structure and the basic setup options. • Menu overview • Machine’s basic settings • Media and tray • Basic printing • Basic copying • Basic scanning •... -
Page 29: Menu Overview
Menu overview The control panel provides access to various menus to set up the machine or use the machine’s functions. • An asterisk (*) appears next to the currently selected menu. • Some menus may not appear on the display depending on options or models. - Page 30 Menu overview Items Fax Feature Priority Send Forward Secure Receive Print Add Page Cancel Job Fax Setup Sending Redial Times Redial Term Prefix Dial ECM Mode Send Report Image TCR Dial Mode Options Fax Setup Copy Feature Items Options Receiving Receive Mode Ring To Answer Stamp RCV Name...
- Page 31 Menu overview Items Copy Feature Contrast Normal Dark+1- Dark+5 Light+5- Light+1 Original Type Text/Photo Photo Text Layout Normal 2-Up 4-Up Adjust Bkgd. Auto Enhance Lev.1 Enhance Lev.2 Erase Lev.1- Erase Lev.4 Options Copy Setup Items Options Change Default Scan Size Copies Copy Collation Reduce/Enlarge...
- Page 32 Menu overview Items System Setup Machine Setup Machine ID Fax Number Date & Time Clock Mode Language Power Save Wakeup Event System Timeout Altitude Adj. Auto Continue Paper Mismatch Paper Substit. Toner Save Paper Setup Paper Size Paper Type Margin Options System Setup Items...
- Page 33 Menu overview Items System Setup Clear Setting All Settings Fax Setup Copy Setup System Setup Address Book Fax Sent Fax Received a. This setting may not be available depending on your country. b. This option only appears if “paper mismatch” is enabled. c.
-
Page 34: Machine's Basic Settings
• You can set the machine’s settings by using the Samsung Easy Printer Manager program or Machine section in Printer Settings Utility program. - For Windows and Macintosh users, see "Device Settings" on page 172. - Page 35 Machine’s basic settings When PC-printing, you can also turn on or off toner save mode in the printer properties. Select the option you want, then press OK. Press OK to save the selection. Press (Stop/Clear) to return to ready mode. Refer to below links to set other settings useful for using the machine.
-
Page 36: Media And Tray
• Using print media that does not meet these specifications may cause problems or require repairs. Such repairs are not covered by Samsung’s warranty or service agreements. • Make sure not to use the inkjet photo paper with this machine. It could cause damage to the machine. -
Page 37: Loading Paper In The Tray
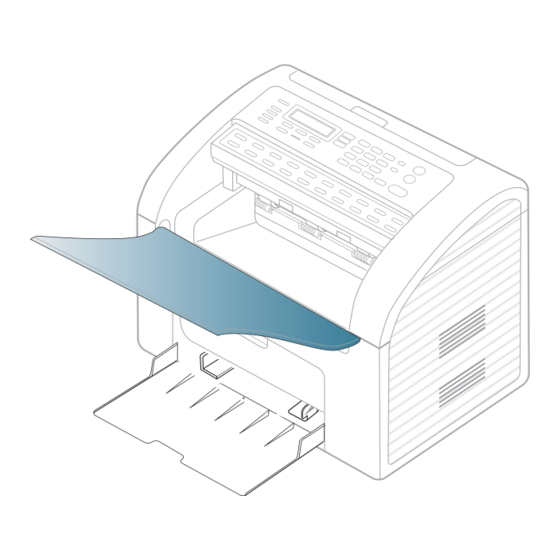
Media and tray Loading paper in the tray Open the tray. Then, adjust the tray size to the media size you are loading (see "Tray overview" on page 36.) Flex or fan the edge of the paper stack to separate the pages before loading papers. - Page 38 Media and tray Squeeze the paper width guide and slide it to the edge of the paper stack without causing it to bend. When you print a document, set the paper type and size for the tray (see "Setting the paper size and type" on page 43). The settings made from the machine driver override the settings on the control panel.
-
Page 39: Manual Feeding In The Tray
Media and tray Manual feeding in the tray The tray can hold special sizes and types of print material, such as postcards, note cards, and envelopes (see "Print media specifications" on page 94). To feed manually in the tray, click the below: See "Loading paper in the tray"... - Page 40 Media and tray Types Labels Envelope Preprinted Cotton Recycled Archive a. The paper types available manual feeding in tray. (●: Included, Blank: Not available) Envelope Printing successfully on envelopes depends upon the quality of the envelopes. To print an envelope, place it as shown in the following figure. Tray ●...
- Page 41 Media and tray • Be sure the seam at both ends of the envelope extends all the way to the corner of the envelope. Acceptable Unacceptable • Envelopes with a peel-off adhesive strip or with more than one flap that folds over to seal must use adhesives compatible with the machine’s fusing temperature for 0.1 second about 170°C (338 °F).
-
Page 42: Preprinted Paper
Media and tray • Make sure that there is no exposed adhesive material between labels. Exposed areas can cause labels to peel off during printing, which can cause paper jams. Exposed adhesive can also cause damage to machine components. • Do not run a sheet of labels through the machine more than once. -
Page 43: Setting The Paper Size And Type
• You can set the machine’s settings by using the Samsung Easy Printer Manager program or Machine section in Printer Settings Utility program. - For Windows and Macintosh users, see "Device Settings" on page 172. -
Page 44: In The Document Feeder
Media and tray The printed pages stack on the output tray. The printer sends output to the output tray by default. Preparing originals • Do not load paper smaller than 142 x 148 mm (5.6 x 5.8 inches) or larger than 216 x 356 mm (8.5 x 14 inches). - Page 45 Media and tray Pull the document feeder input tray or document feeder output tray all the way out. Fold out the extender, if necessary. Load the original face down into the document feeder input tray. Adjust the document feeder width guides to the paper size. 2.
-
Page 46: Basic Printing
Basic printing For special printing features, refer to the Advanced Guide (see "Using advanced print features" on page 140). Printing If you are a Macintosh and Linux OS user, refer to the Advanced Guide.(see "Macintosh printing" on page 147, "Linux printing" on page 148) The following Printing Preferences window is for Notepad in Windows 7. -
Page 47: Canceling A Print Job
Basic printing Canceling a print job If the print job is waiting in the print queue or print spooler, cancel the job as follows: • You can access this window by simply double-clicking the machine icon ) in the Windows task bar. •... -
Page 48: Using A Favorite Setting
Using a favorite setting The Presets option, which is visible on each preferences tab except for the Samsung tab, allows you to save the current preferences for future use. To save a Presets item, follow these steps: 2. Menu Overview and Basic Setup... -
Page 49: Using Help
Basic printing Change the settings as needed on each tab. Enter a name for the item in the Presets input box. Click (Add). When you save Presets, all current driver settings are saved. Select more options and click (Update), settings will be added to the Presets you made. -
Page 50: Basic Copying
• You can set the machine’s settings by using the Samsung Easy Printer Manager program or Machine section in Printer Settings Utility program. - For Windows and Macintosh users, see "Device Settings" on page 172. -
Page 51: Reduced Or Enlarged Copy
Basic copying Darkness If you have an original containing faint marking and dark images, you can adjust the brightness to make a copy that is easier to read. Select (copy) > (Menu) > Copy Feature > Darkness on the control panel. Select the option you want and press OK. - Page 52 Basic copying To select from the predefined copy sizes Select (copy) > (Menu) > Copy Feature > Reduce/Enlarge on the control panel. Select the option you want and press OK. Press (Stop/Clear) to return to ready mode. To scale the copy by directly entering the scale rate Select (copy) >...
-
Page 53: Basic Scanning
(scan) > Scan to PC on the control panel. If you see Not Available message, check the port connection, or select Enable Scan from Device Panel in Samsung Easy Printer Manager > Switch to advanced mode > Scan to PC Settings. -
Page 54: Basic Faxing
Basic faxing For special faxing features, refer to the Advanced Guide (see "Fax features" on page 157). • You cannot use this machine as a fax via the internet phone. For more information ask your internet service provider. • We recommend using traditional analog phone services (PSTN: Public Switched Telephone Network) when connecting telephone lines to use a fax machine. -
Page 55: Sending A Fax Manually
(Start) on the control panel when you hear a high-pitched fax signal from the remote fax machine. Sending a fax to multiple destinations Samsung You can use the multiple send feature, which allows you to send a fax to multiple (Stop/Clear) before the locations. -
Page 56: Receiving A Fax
Basic faxing To enter more fax numbers, press OK when Yes appears and repeat steps 5 and 6. You can add up to 10 destinations. Once you have entered a group dial number, you cannot enter another group dial number. When you have finished entering fax numbers, select No at the Another No.? prompt and press OK. - Page 57 Basic faxing • For memory transmission, Super Fine mode is not available. The resolution setting is automatically changed to • When your machine is set to Super Fine resolution and the fax machine with which you are communicating does not support Super Fine resolution, the machine transmits using the highest resolution mode supported by the other fax machine.
-
Page 58: Maintenance
3. Maintenance This chapter provides information about purchasing supplies, accessories and maintenance parts available for your machine. • Ordering supplies and accessories • Available supplies • Available maintenance parts • Storing the toner cartridge • Redistributing toner • Replacing the toner cartridge •... -
Page 59: Ordering Supplies And Accessories
Available accessories may differ from country to country. Contact your sales representatives to obtain the list of available supplies, and maintenance parts. To order Samsung-authorized supplies, accessories, and maintenance parts, contact your local Samsung dealer or the retailer where you purchased your machine. -
Page 60: Available Supplies
Samsung does not recommend using non-genuine Samsung toner cartridge such as refilled or remanufactured toner. Samsung cannot guarantee non-genuine Samsung toner cartridge's quality. Service or repair required as a result of using non-genuine Samsung toner cartridges will not be covered under the machine’s warranty. Part name MLT-D101S 3. -
Page 61: Available Maintenance Parts
Available maintenance parts To purchase maintenance parts, contact the source where you bought the machine. Replacing maintenance parts can be performed only by an authorized service provider, dealer, or the retailer where you bought the machine. The warranty does not cover the replacement of any maintenance parts once it has reached its “Average yield”. -
Page 62: Storing The Toner Cartridge
Never manually rotate the drum, especially in the reverse direction; this can cause internal damage and toner spillage. Toner cartridge usage Samsung Electronics does not recommend or approve the use of non-Samsung brand toner cartridges in your printer including generic, store brand, refilled, or remanufactured toner cartridges. - Page 63 Storing the toner cartridge Estimated cartridge life Estimated cartridge life (the life of the toner cartridge yield) depends on the amount of toner that print jobs require. The actual print yield may vary depending on the print density of the pages you print on, operating environment, percentage of image area, printing interval, media type and/or media size.
-
Page 64: Redistributing Toner
Redistributing toner When the toner cartridge is near the end of its life: • White streaks or light printing occurs and/or density variation side to side. • The Status LED blinks red. If this happens, you can temporarily improve print quality by redistributing the remaining toner in the cartridge. In some cases, white streaks or light printing will still occur even after you have redistributed the toner. - Page 65 Redistributing toner • Do not use sharp objects such as a knife or scissors to open the toner cartridge package. They might scratch the drum of the cartridge. • If toner gets on your clothing, wipe it off with a dry cloth and wash clothing in cold water. Hot water sets toner into fabric. 3.
-
Page 66: Replacing The Toner Cartridge
Replacing the toner cartridge • Shake the toner cartridge thoroughly, it will increase the initial print quality. • Before opening the top cover, close the output support first. • To prevent damage to the toner cartridge, do not expose it to light for more than a few minutes. Cover it with a piece of paper, if necessary. •... - Page 67 Replacing the toner cartridge When a toner cartridge has reached the end of life, the machine will stop printing. 3. Maintenance...
-
Page 68: Monitoring The Supplies Life
Total: Displays the total number of pages printed. • Scan: Displays the number of pages printed by using the document feeder. Press (Stop/Clear) to return to ready mode. Device Settings in the Samsung Easy Printer Manager program or program. 3. Maintenance... -
Page 69: Setting The Toner Low Alert
- For Linux users, see "Using Smart Panel" on page 175. Select (Menu) > System Setup > Maintenance > TonerLow Alert on the control panel. Select the option you want. Press OK to save the selection. Device Settings in the Samsung Easy Printer Manager program or program. 3. Maintenance... -
Page 70: Cleaning The Machine
Cleaning the machine If printing quality problems occur or if you use your machine in a dusty environment, you need to clean your machine regularly to keep it in the best printing condition and use your machine longer. • Cleaning the cabinet of the machine with cleaning materials containing large amounts of alcohol, solvents, or other strong substances can discolor or distort the cabinet. - Page 71 Cleaning the machine • Use a dry lint-free cloth to clean the machine. • Before opening the top cover, close the output support first. • Turn the machine off and unplug the power cord. Wait for the machine to cool down. If your machine has a power switch, turn the power switch off before cleaning the machine.
- Page 72 Cleaning the machine 3. Maintenance...
- Page 73 Cleaning the machine Cleaning the pickup roller • Use a dry lint-free cloth to clean the machine. • Turn the machine off and unplug the power cord. Wait for the machine to cool down. If your machine has a power switch, turn the power switch off before cleaning the machine.
-
Page 74: Cleaning The Scan Unit
Cleaning the machine Cleaning the scan unit Keeping the scan unit clean helps ensure the best possible copies. We suggest that you clean the scan unit at the start of each day and during the day as needed. 3. Maintenance... - Page 75 Cleaning the machine • Turn the machine off and unplug the power cord. Wait for the machine to cool down. If your machine has a power switch, turn the power switch off before cleaning the machine. • If the document feeder output tray is inserted, remove the document feeder output tray. 3.
- Page 76 Cleaning the machine 3. Maintenance...
-
Page 77: Tips For Moving & Storing Your Machine
Tips for moving & storing your machine • When moving the machine, do not tilt or turn it upside down. Otherwise, the inside of the machine may be contaminated by toner, which can cause damage to the machine or reduce print quality. •... -
Page 78: Troubleshooting
4. Troubleshooting This chapter gives helpful information for what to do if you encounter an error. • Tips for avoiding paper jams • Clearing original document jams • Clearing paper jams • Understanding the status LED • Understanding display messages This chapter gives helpful information for what to do if you encounter an error. -
Page 79: Tips For Avoiding Paper Jams
Tips for avoiding paper jams By selecting the correct media s, most paper jams can be avoided. To avoid paper jams, refer to the following guidelines: • Ensure that the adjustable guides are positioned correctly (see "Tray overview" on page 36). •... -
Page 80: Clearing Original Document Jams
Clearing original document jams When an original document jams in the document feeder, a warning message appears on the display. To avoid tearing the document, remove the jammed document slowly and carefully. To prevent document jams, do not use thick, thin or mixed documents. Input Misfeed Remove any remaining pages from the document feeder. -
Page 81: Exit Misfeed
Clearing original document jams Exit Misfeed Remove any remaining pages from the document feeder. Open the control panel by gripping it on the bottom edge and pulling it. Pull the document gently out of the document feeder. Close the control panel. Then load the documents back into the document feeder. -
Page 82: Clearing Paper Jams
Clearing paper jams To avoid tearing the paper, pull the jammed paper out slowly and gently. In tray 4. Troubleshooting... - Page 83 Clearing paper jams Inside the machine • The fuser area is hot. Take care when removing paper from the machine. • Before opening the top cover, close the output tray first. 4. Troubleshooting...
- Page 84 Clearing paper jams If you do not see the paper in this area, stop and go to next step: 4. Troubleshooting...
-
Page 85: Understanding The Status Led
• The machine has stopped due to a major error. Check the display message (see "Understanding display messages" on page 87). • A paper jam has occurred (see "Clearing paper jams" on page 82). (see"Using Samsung Printer Status" on Description of toner is close. Prepare a new cartridge for . - Page 86 Understanding the status LED Status Blue Power LED a. Estimated cartridge life means the expected or estimated toner cartridge life, which indicates the average capacity of print-outs and is designed pursuant to ISO/IEC 19752. The number of pages may be affected by operating environment, percentage of image area, printing interval, graphics, media and media size. Some amount of toner may remain in the cartridge even when red LED is on and the printer stops printing.
-
Page 87: Understanding Display Messages
Understanding display messages Messages appear on the control panel display to indicate the machine’s status or errors. Refer to the tables below to understand the messages’ and their meaning, and correct the problem, if necessary. • If a message is not in the table, reboot the power and try the printing job again. -
Page 88: Toner-Related Messages
Meaning Install a toner cartridge. Install a Samsung-genuine toner cartridge, designed for your machine. Prepare a new cartridge for a replacement. You may temporarily increase the printing quality by redistributing the toner (see "Redistributing toner"... - Page 89 (see "Replacing the toner cartridge" on page 66). Samsung does not recommend using a non-genuine Samsung toner cartridge such as refilled or remanufactured. Samsung cannot guarantee a non-genuine Samsung toner cartridge's quality. Service or repair required as a result of using non-genuine Samsung toner cartridges will not be covered under the machine warranty.
-
Page 90: Misc. Messages
Understanding display messages Tray-related messages Message Meaning Jam or Empty • Paper has jammed in the paper feed area. Door Open&Close • There is no paper in tray or manual feeder. Misc. messages Message Meaning Door Open The cover is not securely latched. - Page 91 5. Appendix This chapter provides product specifications and information concerning applicable regulations. • Specifications • Regulatory information • Copyright...
-
Page 92: General Specifications
Specifications General specifications The specification values listed below are subject to change without notice. See www.samsung.com for possible changes in information. Items Width x Length x Height Dimension Machine with consumables Weight Ready mode Noise Level Print mode Copy mode... - Page 93 Specifications Items Power consumption Average operating mode Ready mode Power save mode Power off mode a. Not included Handset. b. Sound Pressure Level, ISO 7779. Configuration tested: basic machine installation, A4 paper, simplex printing. c. See the rating label on the machine for the correct voltage (V), frequency (hertz) and of current (A) for your machine. d.
-
Page 94: Print Media Specifications
Specifications Print media specifications Type Size Letter 216 x 279 mm (8.5 x 11 inches) Legal 216 x 356 mm (8.5 x 14 inches) US Folio 216 x 330 mm (8.5 x 13 inches) 210 x 297 mm (8.27 x 11.69 inches) Plain paper Oficio 216 x 343 mm (8.5 x 13.5 inches) - Page 95 Specifications Type Size Refer to the Plain paper section Refer to the Plain Thick paper paper section Refer to the Plain paper section Refer to the Plain Thin paper paper section Refer to the Plain paper section Refer to the Plain Cotton paper section Refer to the Plain paper section...
- Page 96 Specifications Type Size Letter, Legal, Oficio, Refer to the Plain paper section US Folio, A4, JIS B5, Labels ISO B5, Executive, Letter, Legal, Oficio, Refer to the Plain paper section US Folio, A4, JIS B5, ISO B5, Executive, Card stock Postcard 4x6 Refer to the Plain Refer to the Plain paper section...
- Page 97 Specifications System requirements Microsoft® Windows® Operating system Windows® 2000 Intel® Pentium® II 400 MHz (Pentium III 933 MHz) Windows® XP Intel® Pentium® III 933 MHz (Pentium IV 1 GHz) Windows Server® 2003 Intel® Pentium® III 933 MHz (Pentium IV 1 GHz) Windows Server®...
- Page 98 Specifications • Windows Terminal Services is compatible with your machine. • For Windows 2000, Services Pack 4 Macintosh Operating system Mac OS X 10.4 • Intel® processors • PowerPC G4/G5 Mac OS X 10.5 • Intel® processors • 867 MHz or faster Power PC G4/ Mac OS X 10.6 •...
- Page 99 Specifications Linux Items Operating system Redhat® Enterprise Linux WS 4, 5 (32/64 bit) Fedora 5 ~ 13 (32/64 bit) SuSE Linux 10.1 (32 bit) OpenSuSE® 10.2, 10.3, 11.0, 11.1, 11.2 (32/64 bit) Mandriva 2007, 2008, 2009, 2009.1, 2010 (32/64 bit) Ubuntu 6.06, 6.10, 7.04, 7.10, 8.04, 8.10, 9.04, 9.10, 10.04 (32/64 bit) SuSE Linux Enterprise Desktop 10, 11 (32/64 bit) Debian 4.0, 5.0 (32/64 bit)
-
Page 100: Regulatory Information
Regulatory information This machine is designed for a normal work environment and certified with several regulatory statements. Laser safety statement The printer is certified in the U.S. to conform to the requirements of DHHS 21 CFR, chapter 1 Subchapter J for Class I(1) laser products, and elsewhere is certified as a Class I laser product conforming to the requirements of IEC 60825- 1 : 2007. -
Page 101: Mercury Safety
Regulatory information Mercury Safety Contains Mercury, Dispose According to Local, State or Federal Laws.(U.S.A. only) Power saver This printer contains advanced energy conservation technology that reduces power consumption when it is not in active use. When the printer does not receive data for an extended period of time, power consumption is automatically lowered. - Page 102 (The United States of America only) Dispose unwanted electronics through an approved recycler. To find the nearest recycling location, go to our website: www.samsung.com/recyclingdirect Or call, (877) 278 - 0799 Taiwan only Radio frequency emissions FCC information to the user This device complies with Part 15 of the FCC Rules.
- Page 103 Regulatory information This equipment has been tested and found to comply with the limits for a Class B digital device, pursuant to Part 15 of the FCC Rules. These limits are designed to provide reasonable protection against harmful interference in a residential installation.
- Page 104 Regulatory information The FCC has set a general guideline of 20 cm (8 inches) separation between the device and the body, for use of a wireless device near the body (this does not include extremities). This device should be used more than 20 cm (8 inches) from the body when wireless devices are on.
- Page 105 Regulatory information Germany only Turkey only Canada only This product meets the applicable Industry Canada technical specifications. / Le present materiel est conforme aux specifications techniques applicables d’Industrie Canada. The Ringer Equivalence Number (REN) is an indication of the maximum number of devices allowed to be connected to a telephone interface.
-
Page 106: Ringer Equivalence Number
Regulatory information The Telephone Company may make changes in its communications facilities, equipment operations or procedures where such action is reasonably required in the operation of its business and is not inconsistent with the rules and regulations in FCC Part 68. If such changes can be reasonably expected to render any customer terminal equipment incompatible with telephone company communications facilities, or require modification or alteration of such terminal equipment, or otherwise materially affect its use or performance, the customer... -
Page 107: Replacing The Fitted Plug (For Uk Only)
Regulatory information • If your area experiences a high incidence of lightning or power surges, we recommend that you install surge protectors for both the power and the telephone lines. Surge protectors can be purchased from your dealer or telephone and electronic specialty stores. •... - Page 108 PSTNs and compatible PBXs of the European countries: In the event of problems, you should contact the Euro QA Lab of Samsung Electronics Co., Ltd. in the first instance. The product has been tested against TBR21. To assist in the use and application...
- Page 109 Regulatory information China only 5. Appendix...
-
Page 110: Copyright
This user’s guide is provided for information purposes only. All information included herein is subject to change without notice. Samsung Electronics is not responsible for any direct or indirect damages, arising from or related to use of this user’s guide. - Page 111 User’s Guide User’s Guide SF-76xP Series ADVANCED ADVANCED This guide provides information about installation, advanced configuration, operation and troubleshooting on various OS environments. Some features may not be available depending on models or countries. BASIC This guide provides information concerning installation, basic operation and troubleshooting on windows.
- Page 112 Scan features Fax features 4. Useful Management Tools Easy Capture Manager Samsung AnyWeb Print Easy Eco Driver Using Samsung Easy Printer Manager Using Samsung Printer Status Using Smart Panel Using the Linux Unified Driver Configurator 5. Troubleshooting Paper feeding problems...
-
Page 113: Software Installation
1. Software Installation This chapter provides instructions for installing essential and helpful software for use in an environment where the machine is connected via a cable. A locally connected machine is a machine directly attached to your computer using the cable. •... -
Page 114: Installation For Macintosh
Click Default Browser and find the USB connection. • For Mac OS X 10.5-10.7, click Default and find the USB connection. For Mac OS X 10.4, if Auto Select does not work properly, select Samsung in Print Using and your machine name in Model. •... -
Page 115: Reinstallation For Macintosh
Reinstallation for Macintosh If the printer driver does not work properly, uninstall the driver and reinstall it. Make sure that the machine is connected to your computer and powered on. Insert the supplied software CD into your CD-ROM drive. Double-click the CD-ROM icon that appears on your Macintosh desktop. Double-click the MAC_Installer folder >... -
Page 116: Installation For Linux
Installation for Linux You need to download Linux software packages from the Samsung website to install the printer software (http://www.samsung.com > find your product > Support or Downloads). Installing the Unified Linux Driver Make sure that the machine is connected to your computer and powered on. - Page 117 You must log in as a super user (root) to install the machine software. If you are not a super user, ask your system administrator. From the Samsung website, download the Printer Settings Utility package to your computer. Right-click the Printer Settings Utility package and extract the package.
-
Page 118: Reinstallation For Linux
You must log in as a super user (root) to uninstall the printer driver. If you are not a super user, ask your system administrator. Click the icon at the bottom of the desktop. When the Terminal screen appears, type in the following. [root@localhost root]#cd /opt/Samsung/mfp/uninstall/ [root@localhost uninstall]#./uninstall.sh Click Uninstall. Click Next. -
Page 119: Useful Setting Menus
2. Useful Setting Menus This chapter explains how to browse the current status of your machine, and the method of setting for advanced machine setup. • Before you begin reading a chapter • Fax menu • Copy menu • System setup... -
Page 120: Before You Begin Reading A Chapter
Before you begin reading a chapter This chapter explains all the features available for this series' models to help users easily understand the features. You can check the features available for each model in the Basic Guide (see "Menu overview" on page 29). The following are tips for using this chapter •... -
Page 121: Fax Menu
Fax menu Fax Feature Some menus may not appear in the display depending on options or models. If so, it is not applicable to your machine (see "Menu overview" on page 29). To change the menu options: • Press (fax) > (Menu) >... -
Page 122: Sending Setup
Fax menu Item Stores the received fax in memory without printing out. To print received documents, you need to enter the Secure Receive password. You can prevent your received faxes from being accessed by unauthorized people (see "Receiving in secure receiving mode" on page 164). Adds additional documents to a reserved delay fax job Add Page (see "Adding documents to a reserved fax"... -
Page 123: Receiving Setup
Fax menu Receiving Setup Some menus may not appear in the display depending on options or models. If so, it is not applicable to your machine (see "Menu overview" on page 29). To change the menu options: • Press (fax) > (Menu)>... -
Page 124: Copy Menu
Copy menu Copy Feature Some menus may not appear in the display depending on options or models. If so, it is not applicable to your machine (see "Menu overview" on page 29). To change the menu options: • Press (copy) > (Menu) >... -
Page 125: Copy Setup
Copy menu Copy Setup Some menus may not appear in the display depending on options or models. If so, it is not applicable to your machine (see "Menu overview" on page 29). To change the menu options: • Press (copy) > (Menu) >... -
Page 126: System Setup
System setup Machine Setup Some menus may not appear in the display depending on options or models. If so, it is not applicable to your machine (see "Menu overview" on page 29). To change the menu options: • Press (Menu) > System Setup > Machine Setup on the control panel. Item Sets the machine ID which will be printed at the top of Machine ID... -
Page 127: Paper Setup
System setup Item Determine whether or not the machine continues printing when it detects the paper does not match the paper settings. • Off: If a paper mismatch occurs, the machine waits Auto Continue until you insert the correct paper. •... -
Page 128: Sound Volume
System setup Sound / Volume Some menus may not appear in the display depending on options or models. If so, it is not applicable to your machine (see "Menu overview" on page 29). To change the menu options: • Press (Menu) >... - Page 129 System setup Report Some menus may not appear in the display depending on options or models. If so, it is not applicable to your machine (see "Menu overview" on page 29). To change the menu options: • Press (Menu) > System Setup > Report on the control panel. Item All Report Prints all kinds of reports that this machine provides.
-
Page 130: Clear Setting
68). Shows the machine’s serial number. When you call for Serial No. service or register as a user on the Samsung website, you can find this. Customizes the level to alert toner low or toner empty TonerLow Alert (see "Setting the toner low alert"... - Page 131 System setup To change the menu options: • Press (Menu) > System Setup > Clear Setting on the control panel. Item Clears all of the data stored in memory and resets all of All Settings your settings to the factory default. Fax Setup Restores all of the fax options to the factory default.
-
Page 132: Special Features
3. Special Features This chapter explains special copying, scanning, faxing, and printing features. • Altitude adjustment • Entering various characters • Setting up the address book • Printing features • Scan features • Fax features • The procedures in this chapter are mainly based on Windows 7. •... -
Page 133: Altitude Adjustment
Altitude adjustment Print quality is affected by atmospheric pressure, which is determined by the height of the machine above sea level. The following information will guide you on how to set your machine for the best print quality. Before you set the altitude value, determine the altitude where you are. 4,000 m (13,123 ft) 3,000 m... -
Page 134: Entering Various Characters
Entering various characters As you perform various tasks, you may need to enter names and numbers. For example, when you set up your machine, you enter your name or your company’s name, and the fax number. When you store fax numbers or email addresses in memory, you may also enter the corresponding names. -
Page 135: Setting Up The Address Book
Setting up the address book Registering a speed dial number Select (fax) > (Address Book) > New&Edit > Speed Dial on the control panel. Enter a speed dial number and press OK. If an entry is already stored in the number you choose, the display shows the message to allow you to change it. -
Page 136: Registering A Group Dial Number
Setting up the address book Registering a group dial number Select (fax) > (Address Book)> New&Edit > Group Dial on the control panel. Enter a group dial number and press OK. If an entry is already stored in the number you choose, the display shows the message to allow you to change it. - Page 137 Setting up the address book Storing a number for One-touch dialing Press (fax) on the control panel. Press and hold one of the one-touch dial buttons for more than 2 seconds. If a number is already stored in the location you chose, the display shows the number to allow you to change it and press OK.
- Page 138 Setting up the address book Select (fax) > (Address Book) > Print on the control panel. Press OK. The machine begins printing. 3. Special Features...
-
Page 139: Printing Features
Printing features • For basic printing features, refer to the Basic Guide (see "Basic printing" on page 46). • This feature may not be available depending on model or optional goods (see "Key benefits" on page 5). Changing the default print settings Click the Windows Start menu. -
Page 140: Understanding Special Printer Features
Software and Utilities to Install window. • For models that provide XPS driver from the www.samsung.com > find your product> Support or Downloads. Printing to a file (PRN) You will sometimes need to save the print data as a file. - Page 141 Printing features To take advantage of the printer features provided by your printer driver, click Properties or Preferences in the application’s Print window to change the print settings. The machine name, that appears in the printer properties window may differ depending on the machine in use. •...
- Page 142 Printing features Item Prints your document on both sides of a sheet of paper and arranges the pages so that the paper can be folded in half after printing to produce a booklet. Booklet Printing • If you want to make a booklet, you need to print on Letter, Legal, A4, US Folio, or Oficio sized print media. •...
- Page 143 Printing features Item • Printer Default: If you select this option, this feature is determined by the settings you have selected on the control panel of the machine. This option is available only when you use the PCL/ XPS printer driver. •...
- Page 144 Printing features Item Watermark a To change the print settings from your software application, access Printing Preferences. b Click the Advanced tab, select Edit from the Watermark drop-down list. The Edit Watermarks window appears. (Creating a watermark) c Enter a text message in the Watermark Message box. d You can enter up to 256 characters.
- Page 145 Printing features Item Overlay a To save the document as an overlay, access Printing Preferences. b Click the Advanced tab, and select Edit from the Text drop-down list. Edit Overlay window appears. (Creating a new page c In the Edit Overlay window, click Create. overlay) d In the Save As window, type a name up to eight characters in the File name box.
- Page 146 Printing features Item • This feature is available only if you have installed the optional memory or mass storage device (HDD) (see "Variety feature" on page 9). • Some menus may not appear on the display depending on options or models. If so, it is not applicable to your machine. •...
-
Page 147: Printing Multiple Pages On One Sheet
Printing features Macintosh printing Some features may not be available depending on models or options. It means that the features are not supported. Printing a document When you print with a Macintosh, you need to check the printer driver settings in each application you use. -
Page 148: Printing On Both Sides Of The Paper
Printing features Printing on both sides of the paper Some features may not be available depending on models or options. It means that the features are not supported (see "Variety feature" on page 9). Before printing in the duplex mode, decide on which edge you will be binding your finished document. -
Page 149: Printing From Applications
Printing features Printing from applications There are a lot of Linux applications that allow you to print using Common UNIX Printing System (CUPS). You can print on your machine from any such application. Open an application, and select Print from the File menu Select Print directly using lpr. - Page 150 Printing features Configuring Printer Properties Using the Printer Properties window provided by the Printers configuration, you can change the various properties for your machine as a printer. Open the Unified Driver Configurator. If necessary, switch to Printers configuration. Select your machine on the available printers list and click Properties. The Printer Properties window appears.
-
Page 151: Scan Features
This feature can be used via the local connection (see "Scanning from image editing program" on page 152). • Samsung Scan Assistant/ SmarThru Office: You can use this program to scan images or documents. See "Scanning with Samsung Scan Assistant" on page 153. -
Page 152: Scanning Using The Wia Driver
Scan features Open Samsung Easy Printer Manager. Select the appropriate machine from the Printer List. Select Scan to PC Settings menu. Select the option you want. • Scan Activation: Determines whether or not scanning is enabled on the device. •... - Page 153 Load originals face down into the document feeder (see "Loading originals" on page 44). Click Start > All programs > Samsung Printers, and start Samsung Scan Assistant. Select the Help menu or click the any option you want to know about.
-
Page 154: Scanning From Usb Connected Machine
Scan features Make sure that the machine is connected to your computer and powered on. Load originals face down into the document feeder (see "Loading originals" on page 44). Double-click the SmarThru Office icon. The SmarThru Office appears. Select the Help menu or click the button from the window and click on any option you want to know about. -
Page 155: Linux Scanning
Scan features Linux scanning Scanning Make sure that the machine is connected to your computer and powered on. Double-click the Unified Driver Configurator on your desktop. Click the button to switch to Scanners Configuration. Select the scanner on the list. Click Properties. - Page 156 Scan features Scan and save your scanned image. For later use, you can save as your scan settings and add it to the Job Type drop-down list. Editing an image with Image Manager The Image Manager application provides you with menu commands and tools to edit your scanned image.
-
Page 157: Fax Features
Fax features • For basic scanning features, refer to the Basic Guide (see "Basic faxing" on page 68). • This feature may not be available depending on model or optional goods (see "Features by models" on page 7). Automatic redialing When the number you have dialed is busy or there is no answer when you send a fax, the machine automatically redials the number. -
Page 158: Sending A Fax In The Computer
(see "Features by models" on page 7). You can send a fax from your computer without going to the machine. To send a fax from your computer, the Samsung Network PC Fax program must be installed. This program will be installed when you installed the printer driver. -
Page 159: Canceling A Reserved Fax Job
Fax features Load the documents face down into the document feeder. Press (fax) on the control panel. Adjust the resolution and the darkness to suit your fax needs. Press (Menu) > Fax Feature > Delay Send on the control panel. You also can use Delay Send button directly on the control panel. -
Page 160: Forwarding A Sent Fax To Another Destination
Fax features Press OK when Yes highlights. The selected fax is deleted from memory. Press (Stop/Clear) to return to ready mode. Sending a priority fax This function is used when a high priority fax need to be sent ahead of reserved operations. -
Page 161: Receiving A Fax In The Computer
Subsequent received faxes will be forwarded to the specified fax machine. Receiving a fax in the computer • Samsung Easy Printer Manager is Available for Windows and Macintosh OS users only. • To use this feature, set the option on the control panel: Press >... -
Page 162: Changing The Receive Modes
Fax features • Open with default application: After receiving the fax, open it with default application. • None: After receiving a fax, the machine does not notify the user or opens the application. Press Save > OK. Changing the receive modes Press (fax) >... -
Page 163: Receiving In Answering Machine/Fax Mode
Fax features Receiving in Answering Machine/Fax mode To use this mode, you must attach an answering machine to the EXT socket on the back of your machine. If the caller leaves a message, the answering machine stores the message. If your machine detects a fax tone on the line, it automatically starts to receive the fax. -
Page 164: Printing Received Faxes
Fax features When your machine begins to ring, do not answer the call. The machine requires several rings to learn the pattern. When the machine completes learning, the display shows Completed DRPD Setup. If the DRPD setup fails, Error DRPD Ring appears. Press OK when DRPD appears and start over from step 2. -
Page 165: Printing Sent Fax Report Automatically
Fax features Printing sent fax report automatically You can set the machine to print a report with detailed information about the previous 50 communication operations, including time and dates. Press (fax) > (Menu) > Fax Setup > Auto Report > On on the control panel. -
Page 166: Useful Management Tools
This chapter introduces management tools provided to help you make full use of your machine. • Easy Capture Manager • Samsung AnyWeb Print • Easy Eco Driver • Using Samsung Easy Printer Manager • Using Samsung Printer Status • Using Smart Panel • Using the Linux Unified Driver Configurator... -
Page 167: Easy Capture Manager
Easy Capture Manager • Available for Windows OS users only. • This feature may not be available depending on model or optional goods (see "Features by models" on page 7). Capture your screen and launch Easy Capture Manager by simply pressing the Print Screen key. Now you can easily print your captured screen as captured or edited. 4. -
Page 168: Samsung Anyweb Print
This tool helps you screen-capture, preview, scrap, and print Windows Internet Explorer pages more easily, than when you use an ordinary program. Click Start > All programs > Samsung Printers > Samsung AnyWeb Print > Download the latest version to link to the website where the tool is available for download. -
Page 169: Easy Eco Driver
Easy Eco Driver • Available for Windows OS users only. • This feature may not be available depending on model or optional goods (see "Features by models" on page 7). With the Easy Eco Driver, you can apply Eco features to save paper and toner before printing. To use this application, Start Easy Eco Driver before printing job checkbox in the printer properties should be checked. -
Page 170: Using Samsung Easy Printer Manager
Understanding Samsung Easy Printer Manager To open the program: For Windows, Select Start > Programs or All Programs > Samsung Printers > Samsung Easy Printer Manager > Samsung Easy Printer Manager. For Macintosh, Open the Applications folder > Samsung folder > Samsung Easy Printer Manager. -
Page 171: Advanced Settings User Interface Overview
Using Samsung Easy Printer Manager Printer This area gives you general information about your information machine. You can check information, such as the machine’s model name, IP address (or Port name), and machine status. You can view the online User’s Guide. -
Page 172: Device Settings
Using Samsung Easy Printer Manager Device Settings You can configure various machine settings such as machine setup, paper option, layout, Copy, Fax setting, Address book and print information. Scan to PC Settings This menu includes settings to create or delete scan to PC profiles. -
Page 173: Using Samsung Printer Status
Using Samsung Printer Status The Samsung Printer Status is a program that monitors and informs you of the machine status. • Available for Windows OS users only (see "Features by models" on page • The Samsung Printer Status window and its contents shown in this user’s guide may differ depending on the machine or operating system in use. - Page 174 Using Samsung Printer Status Order Supplies You can order replacement toner cartridge(s) from online. User’s Guide You can view the online User’s Guide. This button opens the Troubleshooting Guide when an error occurs. You can directly open the troubleshooting section in the user’s guide.
-
Page 175: Using Smart Panel
Smart Panel is a program that monitors and informs you of the machine’s status, and allows you to customize the machine’s settings. You can download Smart Panel from the Samsung website (see "Installing the Smart Panel" on page 116). • Available for Linux OS users only (see "Features by models" on page 7). - Page 176 Using Smart Panel Changing Smart Panel’s settings Right-click in Linux on the Smart Panel icon and select Configure smart panel. Select the settings you want from the Configure smart panel window. 4. Useful Management Tools...
-
Page 177: Using The Linux Unified Driver Configurator
Opening Unified Driver Configurator Double-click the Unified Driver Configurator on the desktop. You can also click the Startup Menu icon and select Samsung Unified Driver > Unified Driver Configurator. Click each button on the left to switch to the corresponding configuration window. - Page 178 Using the Linux Unified Driver Configurator After changing the configurations, click Exit to close the Unified Driver Configurator. Printers configuration Printers configuration has the two tabs: Printers and Classes. Printers tab View the current system’s printer configuration by clicking on the machine icon button on the left side of the Unified Driver Configurator window.
-
Page 179: Ports Configuration
Using the Linux Unified Driver Configurator Classes tab The Classes tab shows a list of available machine classes. Shows all of the machine classes. Shows the status of the class and the number of machines in the class. • Refresh: Renews the classes list. •... -
Page 180: Troubleshooting
5. Troubleshooting This chapter gives helpful information for what to do if you encounter an error. • Paper feeding problems • Power and cable connecting problems • Printing problems • Printing quality problems • Copying problems • Scanning problems • Faxing problems •... -
Page 181: Paper Feeding Problems
Paper feeding problems Condition Paper jams during printing. Paper sticks together. Multiple sheets of paper do not feed. Paper does not feed into the machine. The paper keeps jamming. Envelopes skew or fail to feed correctly. Clear the paper jam. •... -
Page 182: Power And Cable Connecting Problems
Power and cable connecting problems Condition The machine is not receiving power, or the connection cable between the computer and the machine is not connected properly. • Connect the machine to the electricity supply first. If the machine has a •... -
Page 183: Printing Problems
Printing problems Condition The machine does not The machine is not receiving power. print. The machine is not selected as the default machine. Check the machine for the following: • The cover is not closed. Close the cover. • Paper is jammed. Clear the paper jam. •... - Page 184 Printing problems Condition The machine does not The printer driver may be incorrectly installed. print. The machine is malfunctioning. The document size is so big that the hard disk space of the computer is insufficient to access the print job. The output tray is full.
- Page 185 Printing problems Condition The machine prints, but The machine cable is loose or defective. the text is wrong, garbled, or incomplete. The wrong printer driver was selected. The software application is malfunctioning. The operating system is malfunctioning. Pages print, but they are The toner cartridge is defective or out of toner.
- Page 186 Printing problems Condition Before printing, the Using damp paper can cause vapor during machine emits vapor near printing. the output tray. The machine does not Paper size and paper size setting do not match. print special-sized paper, such as billing paper. The printed billing paper The paper type setting does not match.
-
Page 187: Printing Quality Problems
Printing quality problems If the inside of the machine is dirty or paper has been loaded improperly, there might be a reduction in print quality. See the table below to clear the problem. Condition Light or faded print • If a vertical white streak or faded area appears on the page, the toner supply is low. Install a new toner cartridge (see "Replacing the toner cartridge"... - Page 188 Printing quality problems Condition Toner specks • The paper may not meet specifications; for example, the paper may be too moist or rough. • The transfer roller may be dirty. Clean the inside of your machine (see "Cleaning the machine" on page 70). •...
- Page 189 Printing quality problems Condition Vertical lines If black vertical streaks appear on the page: • The surface (drum part) of the toner cartridge inside the machine has probably been scratched. Remove the toner cartridge and install a new one (see "Replacing the toner cartridge" on page 66). If white vertical streaks appear on the page: •...
- Page 190 Printing quality problems Condition Vertical repetitive If marks repeatedly appear on the printed side of the page at even intervals: defects • The toner cartridge may be damaged. If you still have the same problem, remove the toner cartridge and, install a new one (see "Replacing the toner cartridge"...
- Page 191 Printing quality problems Condition Toner particles are The toner might not adhere properly to this type of paper. around bold • Change the printer option and try again. Go to Printing Preferences, click the Paper tab, and set the paper type to Recycled (see characters or pictures "Opening printing preferences"...
- Page 192 Printing quality problems Condition Curl or wave • Ensure that the paper is loaded properly. • Check the paper type and quality. Both high temperature and humidity can cause paper curl. • Turn the stack of paper over in the tray. Also try rotating the paper 180° in the tray. Wrinkles or creases •...
- Page 193 Printing quality problems Condition Solid color or black • The toner cartridge may not be installed properly. Remove the cartridge and reinsert it. pages • The toner cartridge may be defective. Remove the toner cartridge and install a new one (see "Replacing the toner cartridge" on page 66).
- Page 194 Printing quality problems Condition Horizontal stripes If horizontally aligned black streaks or smears appear: • The toner cartridge may be installed improperly. Remove the cartridge and reinsert it. • The toner cartridge may be defective. Remove the toner cartridge and install a new one (see "Replacing the toner cartridge" on page 66).
-
Page 195: Copying Problems
Copying problems Condition Copies are too light or too dark. Adjust the darkness in copy feature to lighten or darken the backgrounds of copies (see "Changing the settings for each copy" on page 50). Smears, lines, marks, or spots • If the defects are on the original, adjust darkness in copy feature to lighten the background of your copies. appear on copies. -
Page 196: Scanning Problems
Scanning problems Condition The scanner does not work. • Make sure that you place the original to be scanned face down in the document feeder (see "Loading originals" on page 44). • There may not be enough available memory to hold the document you want to scan. Try the Prescan function to see if that works. Try lowering the scan resolution rate. - Page 197 Scanning problems Condition Message appears on your • There may be a copying or printing job in progress. Try your job again when that job is finished. computer screen: • The selected port is currently being used. Restart your computer and try again. •...
-
Page 198: Faxing Problems
Faxing problems Condition The machine is not working, • Unplug the power cord and plug it in again. there is no display, or the • Ensure that there is power being supplied to the electrical outlet. buttons are not working. •... - Page 199 Faxing problems Condition Some of the words on an The fax machine sending the fax had a temporary document jam. incoming fax are stretched. There are lines on the originals Check your scan unit for marks and clean it (see "Cleaning the scan unit" on page 74). you sent.
-
Page 200: Operating System Problems
Operating system problems Common Windows problems Condition “File in Use” message appears Exit all software applications. Remove all software from the startup group, then restart Windows. Reinstall the printer driver. during installation. “General Protection Fault”, Close all other applications, reboot Windows and try printing again. “Exception OE”, “Spool 32”, or “Illegal Operation”... -
Page 201: Common Macintosh Problems
Operating system problems Common Macintosh problems Condition The machine does not print PDF files correctly. Some parts of graphics, text, or illustrations are missing. Some letters are not displayed normally during cover page printing. When printing a document in Macintosh with Acrobat Reader 6.0 or higher, colors print incorrectly. -
Page 202: Common Linux Problems
Operating system problems Common Linux problems Condition The machine does not print. • Check if the printer driver is installed in your system. Open Unified Driver Configurator and switch to the Printers tab in the Printers configuration window to look at the list of available machines. Make sure that your machine is displayed on the list. If not, open Add new printer wizard to set up your device. - Page 203 Operating system problems Condition I cannot scan via Gimp Front- Check if Gimp Front-end has Xsane:Device dialog. on the Acquire menu. If not, you should install Xsane plug-in for Gimp on the your end. computer. You can find Xsane plug-in package for Gimp on Linux distribution CD or Gimp home page. For the detailed information, refer to the Help for Linux distribution CD or Gimp Front-end application.
-
Page 204: Common Postscript Problems
Operating system problems Refer to the Linux User’s Guide that came with your computer for further information on Linux error messages. Common PostScript problems The following situations are PS language specific and may occur when several printer languages are used. Problem The PostScript file cannot be The PostScript driver may not be installed... -
Page 205: Contact Samsung Worldwide
Contact SAMSUNG worldwide If you have any comments or questions regarding Samsung products, contact the Samsung customer care center. Country/Region Customer Care Center ALBANIA 42 27 5755 ARGENTINE 0800-333-3733 ARMENIA 0-800-05-555 AUSTRALIA 1300 362 603 0810-SAMSUNG (7267864, € AUSTRIA 0.07/min) - Page 206 Customer Care Center EIRE 0818 717100 EL SALVADOR 800-6225 ESTONIA 800-7267 FINLAND 030-6227 515 FRANCE 01 48 63 00 00 01805 - SAMSUNG (726-7864 € GERMANY 0,14/min) GEORGIA 8-800-555-555 0800-10077 GHANA 0302-200077 80111-SAMSUNG (80111 726 7864) only from land line GREECE...
- Page 207 MOLDOVA 00-800-500-55-500 MONGOLIA MONTENEGRO 020 405 888 MOROCCO 080 100 2255 NIGERIA 0800-726-7864 0900-SAMSUNG (0900-7267864) NETHERLANDS (€ 0,10/min) NEW ZEALAND 0800 SAMSUNG (0800 726 786) NICARAGUA 00-1800-5077267 NORWAY 815-56 480 OMAN 800-SAMSUNG (726-7864) PANAMA 800-7267 PERU 0-800-777-08 Web Site Country/Region www.samsung.com...
- Page 208 Contact SAMSUNG worldwide Country/Region Customer Care Center SOUTH AFRICA 0860-SAMSUNG (726-7864) SPAIN 902-1-SAMSUNG(902 172 678) SWEDEN 0771 726 7864 (SAMSUNG) 0848-SAMSUNG (7267864, CHF 0.08/min) SWITZERLAND TADJIKISTAN 8-10-800-500-55-500 0800-329-999 TAIWAN 0266-026-066 TANZANIA 0685 88 99 00 1800-29-3232 THAILAND 02-689-3232 TRINIDAD &...
- Page 209 Glossary The following glossary helps you get familiar with the product by understanding the terminologies commonly used with printing as well as mentioned in this user’s guide. 802.11 802.11 is a set of standards for wireless local area network (WLAN) communication, developed by the IEEE LAN/MAN Standards Committee (IEEE 802).
-
Page 210: Control Panel
Glossary BOOTP Bootstrap Protocol. A network protocol used by a network client to obtain its IP address automatically. This is usually done in the bootstrap process of computers or operating systems running on them. The BOOTP servers assign the IP address from a pool of addresses to each client. BOOTP enables 'diskless workstation' computers to obtain an IP address prior to loading any advanced operating system. -
Page 211: Duty Cycle
Glossary DHCP A Dynamic Host Configuration Protocol (DHCP) is a client-server networking protocol. A DHCP server provides configuration parameters specific to the DHCP client host requesting, generally, information required by the client host to participate on an IP network. DHCP also provides a mechanism for allocation of IP addresses to client hosts. -
Page 212: Fuser Unit
Glossary Error Correction Mode (ECM) is an optional transmission mode built into Class 1 fax machines or fax modems. It automatically detects and corrects errors in the fax transmission process that are sometimes caused by telephone line noise. Emulation Emulation is a technique of one machine obtaining the same results as another. An emulator duplicates the functions of one system with a different system, so that the second system behaves like the first system. -
Page 213: Ieee 1284
Glossary Gateway A connection between computer networks, or between a computer network and a telephone line. It is very popular, as it is a computer or a network that allows access to another computer or network. Grayscale A shades of gray that represent light and dark portions of an image when color images are converted to grayscale;... - Page 214 Glossary The Images Per Minute (IPM) is a way of measuring the speed of a printer. An IPM rate indicates the number of single-sided sheets a printer can complete within one minute. The Internet Printing Protocol (IPP) defines a standard protocol for printing as well as managing print jobs, media size, resolution, and so forth.
-
Page 215: Mac Address
Glossary LDAP The Lightweight Directory Access Protocol (LDAP) is a networking protocol for querying and modifying directory services running over TCP/IP. A Light-Emitting Diode (LED) is a semiconductor device that indicates the status of a machine. MAC address Media Access Control (MAC) address is a unique identifier associated with a network adapter. - Page 216 Glossary NetWare A network operating system developed by Novell, Inc. It initially used cooperative multitasking to run various services on a PC, and the network protocols were based on the archetypal Xerox XNS stack. Today NetWare supports TCP/IP as well as IPX/SPX. Organic Photo Conductor (OPC) is a mechanism that makes a virtual image for print using a laser beam emitted from a laser printer, and it is usually green or rust colored and has a cylinder shape.
-
Page 217: Printer Driver
Glossary PostScript PostScript (PS) is a page description language and programming language used primarily in the electronic and desktop publishing areas. - that is run in an interpreter to generate an image. Printer Driver A program used to send commands and transfer data from the computer to the printer. -
Page 218: Toner Cartridge
Glossary Server Message Block (SMB) is a network protocol mainly applied to share files, printers, serial ports, and miscellaneous communications between nodes on a network. It also provides an authenticated Inter-process communication mechanism. SMTP Simple Mail Transfer Protocol (SMTP) is the standard for e-mail transmissions across the Internet. - Page 219 Glossary TWAIN An industry standard for scanners and software. By using a TWAIN-compliant scanner with a TWAIN-compliant program, a scan can be initiated from within the program. It is an image capture API for Microsoft Windows and Apple Macintosh operating systems. UNC Path Uniform Naming Convention (UNC) is a standard way to access network shares in Window NT and other Microsoft products.
- Page 220 Glossary WPA-PSK WPA-PSK (WPA Pre-Shared Key) is special mode of WPA for small business or home users. A shared key, or password, is configured in the wireless access point (WAP) and any wireless laptop or desktop devices. WPA-PSK generates a unique key for each session between a wireless client and the associated WAP for more advanced security.
- Page 221 Index address book editing group editing group registering registering using address book setup AnyWeb Print cleaning inside outside pickup roller scan unit cleaning a machine Confirming control panel convention copy general setup copying basic copying reducing or enlarging copies default settings tray setting eco printing entering character...
- Page 222 Index general icons general settings glossary clearing original document clearing paper tips for avoiding paper jams LCD display browsing the machine status 121 Linux common Linux problems driver installation for USB cable connected driver reinstallation for USB cable connected printer properties printing scanning unifled driver configurator...
- Page 223 Samsung Printer Status Scan Assitant scan feature Scanning Scanning with Samsung Scan Assitant 153 scanning basic information Linux scanning Macintosh scanning Scanning from image editing program 152 Scanning using the WIA driver Scanning with SmarThru Office...
- Page 224 feeding...
Need help?
Do you have a question about the SF-760P and is the answer not in the manual?
Questions and answers