Table of Contents
Advertisement
Advertisement
Table of Contents

Related Manuals for Bresser Goto-Kit


Summary of Contents for Bresser Goto-Kit
- Page 1 Instruction Manual Bresser Goto-Kit for equatorial EQ-5 Mounts Art.-Nr. 49-51750...
-
Page 2: W A R N I N G ! Telescope Assemblies
Instruction Manual Telescope assemblies The Mount 1& Fig. 1a: The Mount; detail shows opposite side of mount. Legend 7. Counterweight Safety Cap 14. Polar Alignment Reticle, LED 8. Computer Control Panel 15. R.A. Setting Circle 1. Dec. Lock 9. R.A. Motor Drive 16. -
Page 3: Parts Overview Mount
Instruction Manual Parts overview Declination (Dec.): Controls the manual movement of the telescope. Turning the Dec. lock counter- clockwise unlocks the telescope enabling it to be freely rotated by hand about the Dec. axis. Turning the Dec. lock clockwise (to a firm feel only) tightens the lock and prevents the telescope from being moved manually, but engages the Dec. -
Page 4: Telescope Assemblies
Instruction Manual Telescope assemblies The Motor Drive Systems Fig. 1b: Control-Panel of RA motor Fig. 1c: Control-Panel of DEC Motor... -
Page 5: Installing The Motors
Instruction Manual Installing the motors Warranty The period of warranty is 2 years, beginning on the day Your dealer: of purchase. Please keep the cash receipt as evidence of purchase. Devices which become defective during the warranty period can be returned to the dealer where the device was bought. -
Page 6: Table Of Contents
Instruction Manual Index Telescope assemblies ............2 W A R N I N G ! The Mount ..............2 Never use a Telescope to look The Handbox ..............2 at the Sun! Looking Parts overview Mount ............3 at or near the Sun will cause Telescope assemblies ............ -
Page 7: Telescope Setup
Instruction Manual Telescope setup Balancing the telescope In order for the telescope to be stable on the tripod and also for it to move smoothly, it must be balanced. To balance the telescope, unlock the Right Ascension or R.A. lock (17, Fig. 1a). When this axis is unlocked, the telescope pivots on the R.A. -
Page 8: Automatic Tracking
Instruction Manual Automatic Tracking As the Earth rotates under the night sky, the stars seem to move from east to west. The speed at which the stars carry out this movement, is called „Siderial Speed“. You can now set up your telescope so that it moves in con- junction with sidereal speed. -
Page 9: Observing By Moving The Telescope Manually
Instruction Manual Observing by Moving the Telescope Manually After the telescope is assembled and balanced as described previously, you are ready to begin manual observations. View easy-to-find terrestrial objects such as street signs or traffic lights to become accustomed to the functions and operations of the telescope. -
Page 10: Using Go To Capabilities
Instruction Manual Using GO TO capabilities Before you can use GO TO capabilities, you must first: Tip: • Learn how the keys move through the menus When multiple choices are • Initialize the computer control available within a menu • Place the telescope in the polar home position, if you have not already done so. option, the current option is •... -
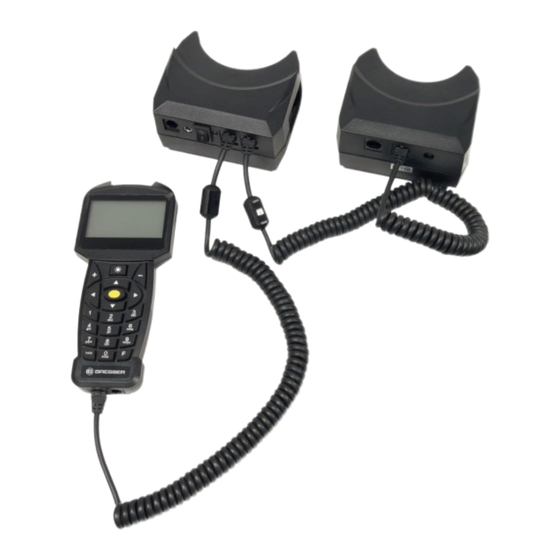
Page 11: The Handbox
Instruction Manual The Handbox The Handbox Legend LCD-Display ENTER Key MODE Key + Key Arrow Keys Number Keys Stop Key Help Key Coil Cord Port 10. Coil Cord 11. Key for the Utility Light 12. Utility Light 13. RS-232-Interface Fig. 2: Handbox Features of the Handbox 1. - Page 12 Please use only the optional Bresser PC-connecting set part No. 07-45910. Never attempt to connect a PC connection cable, not released by the Bresser company, with this interface. This can lead to serious damage of the electronics! Date...
-
Page 13: Main Menu Of The Telescope Control
Instruction Manual Main menu of the Telescope control Main Menu Overview: • Telescope Align • One Star Align Aligns the telescope with a single star • Two Star Align Aligns the telescope with two stars • Three Star Align Aligns the telescope with three stars •... -
Page 14: Initializing The Handbox
Instruction Manual Initializing the handbox This exercise describes how to initialize the handbox. Normally, you will enter the Time and Date at the beginning of each observing session, but you will only perform the full Initialization procedure (i.e., entering the Location information and selecting the model number as well as entering the Time and Date) the first time you use the handbox or after performing a Reset. -
Page 15: Two- And Three-Star Align
Instruction Manual After completion of the “One Star” alignment procedure, the motor drive traverses for the tracking. The telescope is now aligned for an observation night. All objects should retain their position in the eyepiece, even though the earth continues to NOTE As soon as the telescope is rotate under the stars. -
Page 16: Navigation To The Target Objects
Instruction Manual Navigation to the Target Objects “Go To” Saturn This exercise shows you how to choose a celestial object, namely Saturn, for observation from the basic data of the hand box. After alignment of the telescope, the main screen appears on the LCD of the hand box. -
Page 17: Utility Menu
Instruction Manual Select the “Navigation” menu option and press ENTER. Select the “Input Coordinates” menu option. Press ENTER. You can now enter the object name as well as the object coordinates in the hours / minutes / seconds format for the right ascension axis (Ra) and in the degrees / minutes / seconds format for the declination axis (DEC). -
Page 18: Eyepiece Field Of View
Instruction Manual menu upon pressing of the MODE button. If you want to deactivate the alarm prematurely, select the “Alarm” menu item again and confirm “Close Alarm?” with ENTER. Eyepiece Field of View The eyepiece FOV (Field of view) function can calculate the field of view of a particular eyepiece. -
Page 19: Observing Site
Instruction Manual Observing Site Here you can set your observation loca- tion. You have two different options for entering: 1. You can select a town in your vicin- ity, located in the database (select „Country & City“). The countries are listed in alphabetical order in the database. -
Page 20: Astronomical/Terrestrial
Instruction Manual Astronomical / Terrestrial This function is not yet available in the software version 2.2! Tracking Mode This function is not yet available in the software version 2.2! Telescope Mount This function is not yet available in the software version 2.2! Tracking Rate Here, you are able to adjust the speed of the automatic tracking. -
Page 21: Polar Alignment
Instruction Manual Polar Alignment The Polar Alignment Viewfinder Normally, a rough alignment with the celestial pole is sufficient for visual pur- Reticle LED poses. However, for those observers who need to meet the more demanding knob requirements of astrophotography, the polar alignment viewfinder allows the telescope mount to be more precisely aligned with true North. -
Page 22: Polar Alignment By Using The Polar Viewfinder
Instruction Manual Observers on the northern hemishere: N- 7 a) Determine the rough longitude of your observing site (example: Munich is 12° E). Now determine the longitude of the time meridian according to your local time. For the central european time, this is 15° E (do not use daylight sav- ings). - Page 23 Instruction Manual Observers on the southern hemisphere: S- 7 a) Look at the trapezoid association in the polar viewfinder’s reticle. They build the stars Sigma, Tau, Chi and Ypsilon Octantis. Turn the RA axis until the “real” stars roughly cover the edge points in the trapezoid figure. S- 7 b) Probably both trapezoids may still be parallel shifted.
-
Page 24: How To Find Polaris
Instruction Manual How to find the polar star Based on both „pointer stars“ - the two rear stars of the bowl of the Big Dipper - draw a line, between these two stars and extend it out about 5 times till you reach the polar star. -
Page 25: Distances In Space
Instruction Manual Distances in space Distance between Earth and Moon 383.000 km / 240’000 mi Earth Moon Diameter = 12’664 km Diameter = 3’456 km Distance between Planets The distance between the Sun and our Earth is 150’000’000 km / 93’750’000 mi or 1 AU (Astronomical unit) Mercury Venus Earth... -
Page 26: Possible Observation Targets
Instruction Manual Possible observation targets The following section details several interesting and easy-to-find celestial objects you may want to observe through your telescope. The moon The moon is Earth’s only natural satellite. Diameter: 3,476 km Distance: 384,400 km from Earth (average) The moon has been known to humans since prehistoric times. -
Page 27: Technical Data
Technical Data Article Description: Bresser Goto Set Article Number: 49-51750 Suitable mountings: Bresser EXOS II and EQ-5 compatible model series Required ratio of the worm gear 144:1 Number of stored objects: < 100.000 Max. speed of the drive: 2° / second Auto-Guider Port: Yes / ST-4 compatible LCD Display: 36 x 63mm ;... - Page 28 Bresser GmbH Gutenbergstr. 2 DE-46414 Rhede Germany www.bresser.de service@bresser.de...
Need help?
Do you have a question about the Goto-Kit and is the answer not in the manual?
Questions and answers