Table of Contents
Advertisement
Quick Links
Manual_4964130_PM-100-Astro-Photo-Mount_en_BRESSER_v102021a.indd 1
Manual_4964130_PM-100-Astro-Photo-Mount_en_BRESSER_v102021a.indd 1
Instruction Manual
Instruction manual and additional information
Bedienungsanleitung und weitere Informationen
Manuel d'instruction et informations complémentaires
Manual de instrucciones e información adicional
Handleiding en aanvullende informtie
www.bresser.de/P4964130
Art. No. 4964130
12.10.2021 15:23:26
12.10.2021 15:23:26
Advertisement
Table of Contents

Related Manuals for Bresser PM-100


Summary of Contents for Bresser PM-100
- Page 1 Art. No. 4964130 Instruction Manual Instruction manual and additional information Bedienungsanleitung und weitere Informationen Manuel d’instruction et informations complémentaires Manual de instrucciones e información adicional Handleiding en aanvullende informtie www.bresser.de/P4964130 Manual_4964130_PM-100-Astro-Photo-Mount_en_BRESSER_v102021a.indd 1 Manual_4964130_PM-100-Astro-Photo-Mount_en_BRESSER_v102021a.indd 1 12.10.2021 15:23:26 12.10.2021 15:23:26...
-
Page 2: Safety Precautions
Safety Precautions To ensure your safety, please read the following instructions carefully before use. To prevent bodily injuries or property damage,this instruction provides important safety information. Caution! Incorrect handling may cause injury to body or property. Max. Load Capacity: at Astronomical Mode : 5kg (C.O.G. height of 10cm from the turntable / less than 20kg •... -
Page 3: Table Of Contents
Contents Safety Precautions ......................2 Contents ..........................3 Parts Descriptions ......................4 Before Use ........................5 Necessary Equipment for Shooting Useful Items ........................6 Install batteries Brightness Setting for Display Light ................7 Illumination Time Setting Optional Equipment Shoot Astronomy ......................8 Install to the head Find Polaris How to align Polar Axis (use peep holes) -
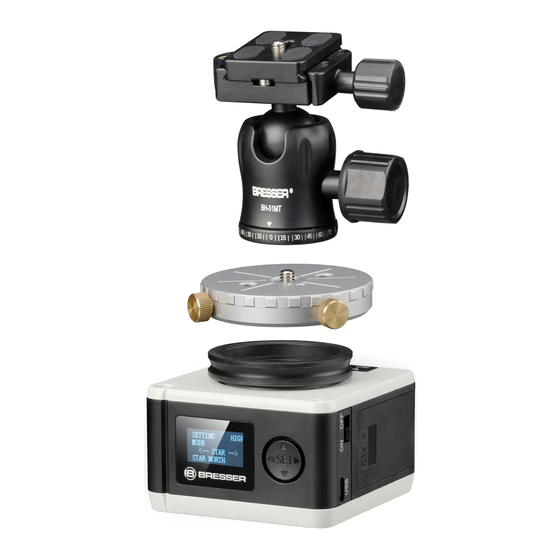
Page 4: Parts Descriptions
Parts Descriptions Turntable Head Mount Screw (U 1/4") Turntable Lock Screw Indicator Groove Battery Case Power Switch Display Window Setting Button Double Screw Adapter Tripod Mounting Screw Micro USB Socket (power supply only) Peep Hole (L) Peep Hole (S) Bottom Turntable Screw Hole for Turntable Battery Case... -
Page 5: Before Use
Before Use About Test Shooting It is important that you test the unit with your equipment prior to an impor- tant project. Review the instruction manual thoroughly and ensure the unit is operating properly. About Shooting Contents Even if the results of using this product were not satisfactory, we are not compensate the recorded contents and expense related to the event. -
Page 6: Useful Items
Useful Items Cable shutter release Pressing shutter button by finger may cause shaky image. A release with the timer function is useful. Headlight or flashlight Red light headlight or flashlight will reduce irritation to the eyes during astronomical photography. Turn off light during exposure to avoid reflections. -
Page 7: Brightness Setting For Display Light
Brightness Setting for Display Light On the setting screen upon powering up, press [▲] once to access the brightness setting. Brightness can be set from 1 to 20 when pressing [◀] [▶] buttons. Press [SET] button to confirm the setting. (The command will not execute without pressing [SET] button) S E T T I N G U S B... -
Page 8: Shoot Astronomy
Shoot Astronomy (from page 8 to 12) ★ Install to the head North Option Micro Motion Head [MH-100] Install the unit to the head firmly. When setting up the tripod, please make sure one tripod leg and the unit face north. Also, to prevent the tripod from falling over do no extend the tripod legs more than you need. -
Page 9: (Use Compass And Protoractor)
★ Polaris How to align Polar Axis (use compass and protractor) Angle = Latitude Move the direction of the magnetic needle Orientation of the Match by about 7 degrees. indicator groove Face with display window Polar axis can be easily matched with commercially available compass and protoractor. When aligning direction, align the direction of N with the orientation of the indicator groove of the main body when the direction of the magnetic needle is shifted to the deviation angle. -
Page 10: Camera Setting
★ Camera Setting At first, set up the camera settings. (shooting mode, shutter speed, aperture, ISO sensitivity and etc...) ◆ Shooting Mode, Shutter Speed Set the camera to Bulb mode. When the camera does not have a bulb mode, set shutter speed to more than 15 sec and try several test shots to find the optimum shutter speed. -
Page 11: About Display Window
★ Power Indication About Display Window Battery Voltage(HIGH, MID, LOW)/ External Power Supply (USB) ↓ Opening Screen 3 Sec. Current Status → S E T T I N G H I G H Setting → M O D E Selecting →... -
Page 12: Switch Setting Screen
★ Display is an example Main Unit Setting S E T T I N G H I G H Press [◀] [▶]setting button and select M O D E [STAR] Star Tracking Mode < − − − − > S T A R S T A R N O R T H Press [SET] button... -
Page 13: Time-Lapse Shooting
Time-Lapse Shooting (from Page 13 to 17) ◎ Mounting on the Tripod Head Mount Screw Tripod Mounting Screw Mount the unit firmly to the tripod. To mount the unit to the tripod with U3/8 mounting screw, remove the double screw adapter out from the screw hole with a coin, screwdriver, etc. -
Page 14: About Time-Lapse Mode
◎ About Time-Lapse Mode SWING This product can rotate at a constant speed for time-lapse shooting. ONE WAY ONE WAY Several settings can be done with the unit will be explained below; ONE WAY ......Rotates in the selected direction (choose from continuous rotation or stop at a set angle) SWING ......... -
Page 15: About Display Window
◎ Battery Voltage(HIGH, MID, LOW)/ About Display Window External Power Supply(USB) Power Indication ↓ Opening Screen 3 Sec. Current Status → S E T T I N G H I G H Setting → M O D E Selection → <... -
Page 16: About Setting Screen Display Of Time-Lapse Mode
◎ About Setting Screen Display of Time-Lapse Mode The display contents of the setting screen for the last time-lapse mode differ from the one of astronomical photography mode. ◎ Set the unit referring following figure and the [ Main Unit Setting] column. S E T T I N G H I G H Rotation Angle... -
Page 17: About Running Screen
Then, turn on the power switch and change setting. UKCA Declaration of Conformity Bresser UK Ltd. has issued a „Declaration of Conformity“ in accordance with applicable guidelines and corresponding standards. The full text of the UKCA declaration of conformity is available at the following internet address: www. -
Page 18: Data Sheet
Data Sheet A Table for Latitude and Deviation Angle for Major Cities of the World MAGNETIC MAGNETIC CITY LATITUDE CITY LATITUDE DECLINATION DECLINATION Abidjan 5.336° N 4.72° W London 51.509° N 0.46° W Addis Ababa 9.023° N 2.28° E Los Angeles 34.052°... -
Page 19: Faq
Symptom Cause Solution Batteries do not get in Battery exhausted Replace with new battery ... when using batteries Battery is inserted upsi- Check the polarity (+ and –) of the battery de down and insert batteries again in right direction Lack of remaining Charge external power supply battery... -
Page 20: Product Specifications
Telephone*: +44 1342 837 098 questions regarding the product or claims, www.bresser.de preferably by e-mail. Bresser UK Ltd Suite G3, Eden House * Number charged at local rates in the UK (the amount you will be Enterprise Way charged per phone call will depend on the tariff of your phone Edenbridge, Kent TN8 6HF provider);...
Need help?
Do you have a question about the PM-100 and is the answer not in the manual?
Questions and answers