Table of Contents
Advertisement
Advertisement
Table of Contents

Related Manuals for FRENCH FITNESS FSR90


Summary of Contents for FRENCH FITNESS FSR90
- Page 1 FF-FSR90 MULTI FUNCTIONAL TRAINER SMITH & RACK SYSTEM ASSEMBLY MANUAL...
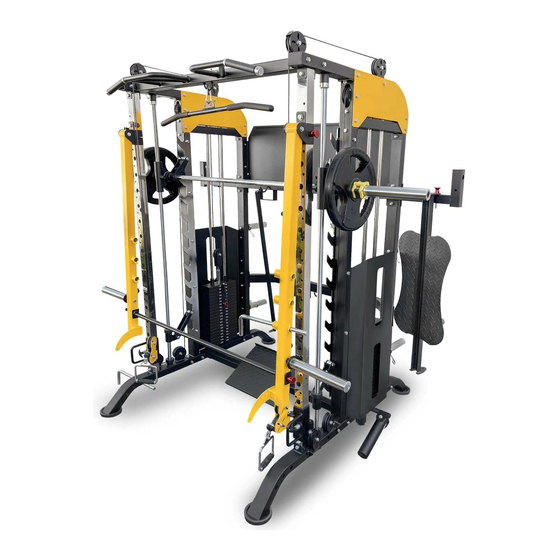
- Page 2 FEATURES Thick steel barbell hooks with quick and easy height adjustment • Counter balance system for smith bar • Slanted at a angle for smith which allow more natural movements • Chrome/stainless steel used for most contact points (more scratches- •...
- Page 3 Overview The French Fitness FSR90 Functional Trainer Smith & Squat Rack Machine is a strength training equipment newly developed by French Fitness, combining the international and domestic markets. It has a smooth structure, beautiful appearance, firm connection and small footprint. The various configured functions can achieve the effect of the whole body being exercised through comprehensive use of training.
- Page 4 Recommended Stretching Exercises The pictures below show the correct postures for several types of basic stretching exercises. Move slowly when doing stretching exercises - don't move suddenly. 1. When standing during the toe-touching stretching exercise, bend your knees slightly and let the part above your hips lean forward slowly. When touching your toes down, stretch as much as possible to relax your back and shoulders.
- Page 5 Recommended Stretching Exercises Fitness Skills Before you start the exercise It is strongly recommended that you consult your doctor before starting any nutrition or exercise program. In order to avoid injury during exercise, please warm up and relax before exercise and after exercise. Each exercise time must be at least 60 s econds.
- Page 6 Area occupied: 61" Depth x 86.61"W x 86.61"H Net weight: 1146 lbs Cable cross Parts placement slide assembly Smith hook Squat (J) Hook Pull-up handle Ground barrel exercising assembly assembly Reverse pedal group Lat pull knee cushion Arm exercising with weight plates Cantilever connecting rod...
- Page 7 Upper cross beam tube weldment*1 Back supporting tube weldment*2 Bottom bending tube (right welding)*1 Bottom bending tube (left welding)*1 Hanging tube weldment*1 Middle riser (left welding)*1 Connecting rod weldment*1 Middle riser [(right welding)*1 Rear riser weldment*2 Cantilever connecting rod weldment*1 Upper supporting tube (left Upper supporting tube (right Counterweight upper supporting tube*2 welding)*1...
- Page 8 Connecting rod connectting plates*2 Small guard plate*4 Shield*2 Sign board plate*1 Adjustable foot tube right welding*1 Adjustable foot tube left welding*1 Pulley piece weldment*2 Linear bearing sleeve weldiment*2 Adjusting sleeve tube weldment*2 Termination hook sleeve weldment, Termination hook plate 2*4 Drop bar*1 1 on each side Pulling bar 1 weldment*1...
- Page 9 Cantilever left weldment*1 Inverse pedal weldment*1 Foot pedal weldment*1 Cantilever right weldment*1 Olympic rod training rack Olympic rod training rack tube 1 weldment*1 Olympic rod protection frame Olympic rod hook weldment*2 tube 2 weldment*1 tube left weldment*1 Olympic rod protection frame tube right weldment*1 Barbell rod connecting Adaptable connecting...
- Page 10 Cantilever handle weldment (chrome-plated)*2 Elastic rope hanging hook (chrome-plated)*2 Hook plate (chrome plated)*2 F50 stainless steel left adjustment tube*1, length: 1880 F50 stainless steel right adjustment tube*1, length: 1880 φ19 guiding rod weldment*4, length: 1775 Olympic barbell sleeve*2 6010 Olympic Bar*1 Lifting rod*2 (with 15 holes) (length: 415) Bearing steel*2...
- Page 11 Installing Step 1 Exploded Diagram...
- Page 12 Installing Step 1 Assembling Diagram Installing Instruction Connect the left riser (11) to the left bottom tube (1) using M10*90 outer hexagonal bolts, and fasten with M10 lock nuts. Connect the right riser (12) to the right bottom tube (2) using M10*90 outer hexagonal bolts, and fasten with M10 lock nuts.
- Page 13 Installing Step 2 Exploded Diagram...
- Page 14 Installing Step 2 Assembling Diagram Installation Instruction Connect the adjusting sleeve tube (19) to the adjusting tube (18). Install the adjusting tube (18) on the left bottom tube (1) and right bottom tube (2) with M10*70 outer hexagonal bolts, and fasten them with M10 lock nuts. Connect the adjusting tube (18) with the upper horizontal tube (14) with M10*70 hexagonal bolts, and tighten with M10 lock nuts.
- Page 15 Installing Step 3 Exploded Diagram...
- Page 16 Installing Step 3 Assembling Diagram Installation Instruction Connect the Olympic barbell hook (26) to the Olympic barbell (25) and fasten with M8 inner hexagonal bolts. Insert the sliding rod (27) into the shock-absorbing pad (6), safety hook (29), shock-absorbing pad (6), Olympic barbell fixing sleeve (28), and sliding rod fixing sleeve (30) successively.
- Page 17 Installing Step 4 Exploded Diagram Installing Step 4 Exploded Diagram...
- Page 18 Installing Step 4 Assembling Diagram Installation Instruction Connect the bolt end of the steel rope (32) to the adjusting sleeve (19). Disassemble the ball end (34) of the steel rope (32), and pass it through pulley (33) B, C, D, E, F, G, H, I, J in turn, and install the ball end (34) of the steel rope at point J.
- Page 19 Installing Step 5 Exploded Diagram...
- Page 20 Installing Step 5 Assembling Diagram Installation Instruction Pass the M10*90 outer hexagonal bolts through the connecting decorative plate (37), upper corss tube (14), rear riser (15), and connecting decorative plate (37) respectively and fasten with M10 lock nuts. Pass the M8*20 outer hexagonal bolts through the guard (35) and fix them on the left riser (11) and rear riser (15) respectively.
- Page 21 Installing Step 6 Exploded Diagram...
- Page 22 Installing Step 6 Assembling Diagram Installation Instruction Install the parallel bars-left (38) and parallel bars-right (39) to the adjusting tube (18). Install the Olympic barbell hook-left (40) and the Olympic barbell hook-right (41) on the adjusting tube (18) respectively. Install the supine support (42) on the Olympic barbell hook-right (41), and install the foam tube (43) through the foam inner cap (44), foam (45), and foam outer cap in turn (46), and fasten with M8*20 inner hexagonal bolts.
- Page 23 Installing Step 7 Exploded Diagram...
- Page 24 Installing Step 7 Assembling Diagram Installation Instruction Connect the reverse pedal (49) to the Olympic barbell fixing sleeve (28), and fix it with the bolt (50)
- Page 25 Installing Step 8 Exploded Diagram...
- Page 26 Installing Step 8 Assembling Diagram Installation Instruction Connect the auxiliary foot pedal (51) to the left bottom tube (1) and the right bottom tube (2), and fix with the bolt (50).
- Page 27 Installing Step 9 Exploded Diagram...
- Page 28 Installing Step 9 Assembling Diagram Installation Instruction Connect the arm swinging connecting block (52) with the adjusting tube (18), and fix it with the bolt (50). Install the arm swinging connecting shaft (55) on the arm swinging-left (53), arm swinging-right (54) and the arm swinging connecting block (52) respectively, and fasten them with M10*20 inner hexagonal bolts.
Need help?
Do you have a question about the FSR90 and is the answer not in the manual?
Questions and answers