Table of Contents
Advertisement
Advertisement
Table of Contents

Related Manuals for Carrier TruVu EQT2


Summary of Contents for Carrier TruVu EQT2
- Page 1 ™ ™ CARRIER CORPORATION ©2020 · Catalog No. 11-808-687-01 · 11/4/2020...
- Page 2 Important changes are listed in Document revision history at the end of this document. CARRIER CORPORATION ©2020. All rights reserved throughout the world. i-Vu is a registered trademark of Carrier Corporation. All other trademarks are the property of their respective owners.
-
Page 3: Table Of Contents
Contents What is the TruVu™ ET display? ......................1 Specifications ................................1 Mounting the TruVu™ ET display ......................3 Wiring the TruVu™ ET display........................ 5 Wiring for power..............................5 Wiring for Communication - Rnet configuration ....................6 Wiring for Communication - Ethernet port connection ...................7 Interface selection ..............................7 Setting up the TruVu™... -
Page 5: What Is The Truvu™ Et Display
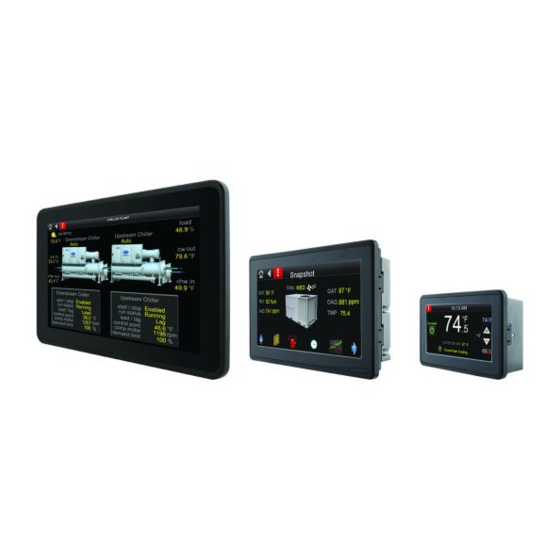
What is the TruVu™ ET display? The TruVu™ ET display is a touchscreen device that you can attach to all Carrier Open controllers to view or change its property values, schedule equipment, view trends and alarms, and more, without having to access the system's server. - Page 6 72 hours after loss of power (at room temperature) Device identification The serial number is found on a label on the back of the TruVu™ ET display TruVu™ ET Display (part# EQT2) CARRIER CORPORATION ©2020 Installation and Start-up Guide All rights reserved...
-
Page 7: Mounting The Truvu™ Et Display
6.9 x 4.646 in. (17.5 x 11.8 cm) TruVu™ ET display-10 9.607 x 6.26 in. (24.4 x 15.9 cm) Mount the TruVu™ ET display securing with the clips provided. TruVu™ ET Display (part# EQT2) CARRIER CORPORATION ©2020 Installation and Start-up Guide All rights reserved... - Page 8 NOTE The TruVu™ ET display-4 does not use the standard VESA mounting holes. Use the screws provided to mount the backplate or to the VESA bracket. TruVu™ ET Display (part# EQT2) CARRIER CORPORATION ©2020 Installation and Start-up Guide All rights reserved...
-
Page 9: Wiring The Truvu™ Et Display
24 VAC power supply using a NSA-A/PS24-24V-S low voltage power supply NOTE Must be within 100 feet (30 meters). WARNING Do not apply line voltage (main). CAUTION The TruVu™ ET display can share a power supply with the Carrier controller as long as: • The power supply is DC power. -
Page 10: Wiring For Communication - Rnet Configuration
• The same polarity is maintained. • The power source is used only for Carrier Corporation® controllers. CAUTION If the equipment is used in a manner not specified by the manufacturer, the protection provided by the equipment may be impaired. -
Page 11: Wiring For Communication - Ethernet Port Connection
The TruVu™ ET display remembers this selection the next time the interface is powered on. To change the connection type, wait until the interface is attempting to connect and tap Cancel. TruVu™ ET Display (part# EQT2) CARRIER CORPORATION ©2020 Installation and Start-up Guide All rights reserved... -
Page 12: Setting Up The Truvu™ Et Display
Touch to access the Application Settings without connecting to the controller. See TruVu™ ET display screens (page 13) for information on the Application Settings screen. TruVu™ ET Display (part# EQT2) CARRIER CORPORATION ©2020 Installation and Start-up Guide All rights reserved... -
Page 13: To Edit The Touchscreen Settings
When the device has been inactive for the time set, the screen darkens and the user is logged out. NOTE Use the Extended Screen Timeout to set longer screen timeouts. See TruVu™ ET display screens (page 13). TruVu™ ET Display (part# EQT2) CARRIER CORPORATION ©2020 Installation and Start-up Guide All rights reserved... - Page 14 Setting up the TruVu™ ET display App Restart Restart the TruVu™ ET display application on the device. TruVu™ ET Display (part# EQT2) CARRIER CORPORATION ©2020 Installation and Start-up Guide All rights reserved...
-
Page 15: Working With Files
To open the .pdf viewer, click the PDF Viewer icon. Browse to the desired file either on the USB drive or that have been copied to the TruVu™ ET display using Copy Files. TruVu™ ET Display (part# EQT2) CARRIER CORPORATION ©2020 Installation and Start-up Guide All rights reserved... -
Page 16: Copying Files
Display the Quick Settings pane by swiping down from the top of the touchscreen. Click the File Copy icon. Browse to the desired file on the USB drive and click OK. TruVu™ ET Display (part# EQT2) CARRIER CORPORATION ©2020 Installation and Start-up Guide All rights reserved... -
Page 17: Truvu™ Et Display Screens
User, Admin, or Factory password Admin A user logged in with the Admin or Factory password Factory A user logged in with the Factory password No password Anyone TruVu™ ET Display (part# EQT2) CARRIER CORPORATION ©2020 Installation and Start-up Guide All rights reserved... - Page 18 Module Status, Schedule, Browser, Trends, or Alarms screen. Touch the camera ( ) to capture a screenshot (page 11). Settings Touch an option to jump to Module Settings, Application Settings, or to change the current user. TruVu™ ET Display (part# EQT2) CARRIER CORPORATION ©2020 Installation and Start-up Guide All rights reserved...
- Page 19 Touch an option to jump to the Set Time and Date, Communication, Router, IP, or Time Master screen. Set Time and Date Touch the time or date field to edit it. TruVu™ ET Display (part# EQT2) CARRIER CORPORATION ©2020 Installation and Start-up Guide All rights reserved...
- Page 20 For example, if the network has 15 devices at 19200 baud, Max Info Frames would be 4. NOTE You may need to increase the result of the formula for controllers that need to communicate many values to other devices. TruVu™ ET Display (part# EQT2) CARRIER CORPORATION ©2020 Installation and Start-up Guide All rights reserved...
- Page 21 Lets you view or edit the router's ARC156 or MS/TP network number. Touch a field to tap in the new number on the keypad. NOTE BACnet Ethernet network support will be added in a future release. TruVu™ ET Display (part# EQT2) CARRIER CORPORATION ©2020 Installation and Start-up Guide All rights reserved...
- Page 22 TruVu™ ET display screens Screen name Description ExecB Controllers TruVu™ ET Display (part# EQT2) CARRIER CORPORATION ©2020 Installation and Start-up Guide All rights reserved...
- Page 23 NextGen Controllers Lets you view or edit network addresses and the UDP Port. Touch a field to tap in the new number on the keypad. TruVu™ ET Display (part# EQT2) CARRIER CORPORATION ©2020 Installation and Start-up Guide All rights reserved...
- Page 24 If such an entry is found, the BACnet Time Master mode is set for Local Broadcast. Otherwise, the mode defaults to Disabled/None. TruVu™ ET Display (part# EQT2) CARRIER CORPORATION ©2020 Installation and Start-up Guide All rights reserved...
- Page 25 Lets you access information about the app, select which language to use for the TruVu™ ET display system screens, and adjust your timeout settings. About Displays information about the TruVu™ ET display. TruVu™ ET Display (part# EQT2) CARRIER CORPORATION ©2020 Installation and Start-up Guide All rights reserved...
- Page 26 Extended Screen Timeout Allows you to select the time until the TruVu™ ET display screen powers off, and the user is logged out. TruVu™ ET Display (part# EQT2) CARRIER CORPORATION ©2020 Installation and Start-up Guide All rights reserved...
- Page 27 Screen name Description Update Interval Carrier Corporation recommends leaving these values at the default settings that appear in the image above. Inactivity Timeout Allows you to select the number of minutes of inactivity until the Standby screen appears and the user is logged out.
- Page 28 TruVu™ ET display screens Screen name Description Module Status Module Status provides information about the controller, its firmware, and network information and communication status, and error conditions. TruVu™ ET Display (part# EQT2) CARRIER CORPORATION ©2020 Installation and Start-up Guide All rights reserved...
- Page 29 TruVu™ ET display screens Screen name Description Schedule Lets you view, add, edit, or delete BACnet schedules in the controller. See Viewing or creating schedules (page 34). TruVu™ ET Display (part# EQT2) CARRIER CORPORATION ©2020 Installation and Start-up Guide All rights reserved...
- Page 30 Touch any of the above options to see that type of BACnet objects found in the controller. Or, you can touch View All Objects to see them all. TruVu™ ET Display (part# EQT2) CARRIER CORPORATION ©2020 Installation and Start-up Guide All rights reserved...
- Page 31 Below is an example of the AI BACnet objects in the controller. The screen shows the BACnet object name, current value, and BACnet object instance number. Touch an object in the above screen to see the details shown below. TruVu™ ET Display (part# EQT2) CARRIER CORPORATION ©2020 Installation and Start-up Guide All rights reserved...
- Page 32 TruVu™ ET display screens Screen name Description TruVu™ ET Display (part# EQT2) CARRIER CORPORATION ©2020 Installation and Start-up Guide All rights reserved...
- Page 33 Lets you view trends for points that have trending enabled. See Viewing trends (page 33). Alarms Lets you view alarms from the controller. See Viewing alarms (page 31). TruVu™ ET Display (part# EQT2) CARRIER CORPORATION ©2020 Installation and Start-up Guide All rights reserved...
-
Page 34: Setting Timeouts
NOTE If the Inactivity Timeout is set for a shorter time than Screen Timeout, the user is logged out before the device goes to sleep. TruVu™ ET Display (part# EQT2) CARRIER CORPORATION ©2020 Installation and Start-up Guide All rights reserved... -
Page 35: Viewing Alarms
The alarm is added to the Active Alarms or Active Faults screen. See the table in the second bullet below. To view alarms • Touch to see Active Alarms. • Touch on the System screen to see current alarms. TruVu™ ET Display (part# EQT2) CARRIER CORPORATION ©2020 Installation and Start-up Guide All rights reserved... - Page 36 See alarms that you cleared using the Clear Active button. Delete all active alarms. NOTE The TruVu™ ET display can hold up to 100 alarms. TruVu™ ET Display (part# EQT2) CARRIER CORPORATION ©2020 Installation and Start-up Guide All rights reserved...
-
Page 37: Viewing Trends
(up to 4 points). Touch View Trends. Pinch-zoom the graph to zoom in and out. Touch Reset zoom to restore the graph to its original state. TruVu™ ET Display (part# EQT2) CARRIER CORPORATION ©2020 Installation and Start-up Guide All rights reserved... -
Page 38: Creating Or Viewing Schedules
ON Schedule only–Select one of the following: • Normal for a typical occupied period • Override for a occupied period that is to override an OFF schedule. TruVu™ ET Display (part# EQT2) CARRIER CORPORATION ©2020 Installation and Start-up Guide All rights reserved... - Page 39 Following the instructions above, create a weekly schedule for the first period. The schedule name is saved as Weekly Schedule. In the Daily view, touch Weekly Schedule or the green bar beside it. Touch Add Period. TruVu™ ET Display (part# EQT2) CARRIER CORPORATION ©2020 Installation and Start-up Guide All rights reserved...
- Page 40 NOTE You can also add a period to a Weekly Schedule by touching Add Schedule and adding another weekly schedule. When you save it, it is appended to the existing weekly schedule as a separate period. TruVu™ ET Display (part# EQT2) CARRIER CORPORATION ©2020 Installation and Start-up Guide All rights reserved...
-
Page 41: To View Schedules
TIP Quickly tap the screen 3 times with one finger to zoom in. Select... To see... Monthly Which days in the current month have schedules (indicated by green boxes). (default view) TruVu™ ET Display (part# EQT2) CARRIER CORPORATION ©2020 Installation and Start-up Guide All rights reserved... - Page 42 Which days of the week shown have schedules (indicated by green bars). Daily The Effective Schedule is the combined result of the day's schedule(s). See To create a schedule (page 34) for field descriptions. TruVu™ ET Display (part# EQT2) CARRIER CORPORATION ©2020 Installation and Start-up Guide All rights reserved...
- Page 43 ON Schedule or Off Schedule. If you need to change any of these settings, delete the schedule and then make a new one. TruVu™ ET Display (part# EQT2) CARRIER CORPORATION ©2020 Installation and Start-up Guide All rights reserved...
-
Page 44: Forcing Values (Ccn Points Only)
NOTE When editing a numerical value, Auto releases the force back to the systems automatic setting. • Binary values such as check boxes or text toggles TruVu™ ET Display (part# EQT2) CARRIER CORPORATION ©2020 Installation and Start-up Guide All rights reserved... -
Page 45: Compliance
Connect the equipment into an outlet on a circuit different from that to which the receiver is connected. • Consult the dealer or an experienced radio/TV technician for help. TruVu™ ET Display (part# EQT2) CARRIER CORPORATION ©2020 Installation and Start-up Guide All rights reserved... -
Page 46: Document Revision History
Added LED callout to diagram A-D-KK Specifications Added Specifications section Screens Added Login row to table Compliance Added Compliance section * For internal use only TruVu™ ET Display (part# EQT2) CARRIER CORPORATION ©2020 Installation and Start-up Guide All rights reserved... - Page 48 CARRIER CORPORATION ©2020 · Catalog No. 11-808-687-01 · 11/4/2020...
Need help?
Do you have a question about the TruVu EQT2 and is the answer not in the manual?
Questions and answers