Advertisement
Assembling Toroidal
Thanks for choosing Toroidal. This file is developed to assist you in assembling and aligning
Toroidal Dish.
With Toroidal dish, you are aiming for more than 1 satellite and therefore this process will
require more time for assembling and aligning the dish. If you follow this process carefully, you
will cut down the installation time and achieve optimal signal strength for all satellites you are
aiming for.
Before You Begin
You will find two pouches including bolts and nuts. One pouch is to assemble the dish and the
other is for the pole mount. (Pole mount assembly is not illustrated here. Use the diagram in
the box.)
•
Print out (if you have not) the part list. Sort and group the bolts and nuts according to
the part list. This will save a lot of time and confusion.
•
You will need Phillips Screw Driver and 10, 11, 12, 13 mm Wrenches for the assembly.
•
Begin the process on flat surface.
•
Make sure your location is not blocked from building or a huge tree. Remember you are
installing more than one satellite, thus you need a wider clear view of the sky.
Now let's go ahead and start assembling.
American Wavefrontier Corp
100 Pacifica Suite 260
Irvine, CA 92618
TIP: Assemble and align Toroidal at ground level with
small TV and receiver right next to you. This will
save you a tremendous time. (If you have a sat
finder equipment, maybe not.) After the alignment,
you can put the assembled dish on your roof and
adjust azimuth only, take a minute and reducing the
risk and sweat!
- 1 -
Advertisement
Table of Contents

Subscribe to Our Youtube Channel
Related Manuals for WaveFrontier Toroidal


Summary of Contents for WaveFrontier Toroidal
- Page 1 Thanks for choosing Toroidal. This file is developed to assist you in assembling and aligning Toroidal Dish. With Toroidal dish, you are aiming for more than 1 satellite and therefore this process will require more time for assembling and aligning the dish. If you follow this process carefully, you will cut down the installation time and achieve optimal signal strength for all satellites you are aiming for.
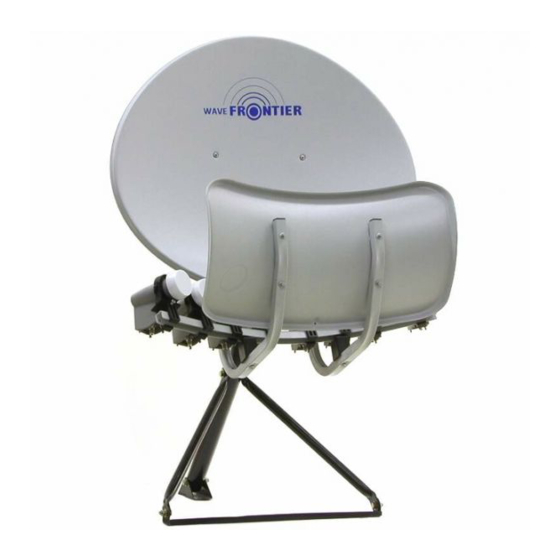
- Page 2 Step 1: Assembling the Toroidal Start with Weaving tube. Do not tighten since you will need to put this over the pole mount later on. Parts: B11, B13 Tools: Place Enduring tube across weaving tube and Back Mount Elevation. Tighten with bolt and nut.
- Page 3 Attach LNBF Guide using B5. Pay attention the orientation of LNBF Guide. Parts: A4, B4 Tools: Phillips Attach Main Reflector using B1, B12. Parts: B1, B12 Tools: Phillips, Wrench American Wavefrontier Corp 100 Pacifica Suite 260 Irvine, CA 92618 - 3 -...
- Page 4 Wavefrontier (www.multilnbdish.com). If you have not received one from Wavefrontier or cannot find one for your location on the website, contact Wavefrontier by send email to support@multilnbdish.com. We will forward information to you.
- Page 5 You will find that surface of LNBF and Sub Reflectors are symmetrically aligned. Parts: Tools: Phillips Install other LNBF Units as you require using same method. Parts: Tools: American Wavefrontier Corp 100 Pacifica Suite 260 Irvine, CA 92618 - 5 -...
- Page 6 Step 3: Aligning Toroidal We will use the same setting used before for illustration purpose. First, makes sure that your pole mount is absolutely vertical. Without vertical pole, all other setting angles are almost meaningless. Parts: Tools: Without any skew adjustment, adjust elevation. You can use an angle locator as shown or use elevation reading on the bracket.
Need help?
Do you have a question about the Toroidal and is the answer not in the manual?
Questions and answers