Table of Contents
Advertisement
Version 1.1 January 2020
GT4 Terminal
User Guide
Disclaimer
Copyright © 2019, Grosvenor Technology. All rights reserved.
All brands, names, or trademarks appearing in this document are acknowledged as the trademarks of their
respective owners.
No part of this document may be reproduced in any form or by any means for any purpose without the
written permission of Grosvenor Technology.
Whilst we make every effort to ensure the accuracy of our publications, Grosvenor Technology assumes no
responsibility or liability for any errors or inaccuracies that may appear in this document.
www.grosvenortechnology.com
Page 1
Advertisement
Table of Contents

Related Manuals for Grosvenor GT4


Summary of Contents for Grosvenor GT4
- Page 1 No part of this document may be reproduced in any form or by any means for any purpose without the written permission of Grosvenor Technology. Whilst we make every effort to ensure the accuracy of our publications, Grosvenor Technology assumes no responsibility or liability for any errors or inaccuracies that may appear in this document.
-
Page 2: Table Of Contents
About the GT4 Terminal About this Guide Related Documents Technical Support Features Hardware Software System Start-up Terminal Setup Accessing the GT4 Terminal Setup Application Menu Firmware Menu Services Menu Settings Menu Date and Time Region and Language Sound Network Display... - Page 3 Contents Remote Connections Using SSH Using AssistIT Using Telnet Using VNC Security and Passwords The Terminal PIN The Login Password Special Key Shortcuts Key Combinations To terminate the current application Application Deployment Deploying/Configuring Terminal with a USB Memory Stick Deploying a Terminal Using a Network Connection Hardware Options Main System Unit Reader Modules (only popular assemblies listed)
-
Page 4: Preface
About this Guide This GT4 Terminal is intended for users who will be responsible for installing and configuring the GT4 terminal. It is aimed at users who need to understand how to configure the terminal, remotely connect to the terminal and how to install applications onto the terminal. -
Page 5: Features
Features This section summarises the hardware and software features of the GT4 terminal, shown below: Important Note: Menus and options will vary depending on the hardware options supplied and software version installed. Please refer to additional instructions supplied with your terminal for additional information. -
Page 6: Hardware
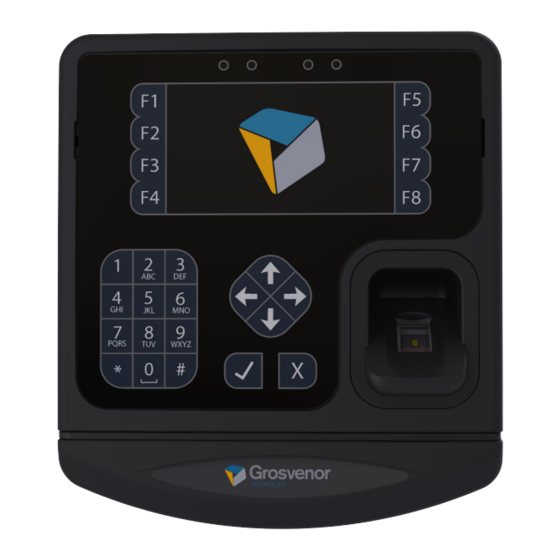
Features Hardware Fast, low power imx287 processor Biometric reader interface 256 MB RAM Reader interface (Wiegand, Clock and Data, Barcode, i-Class, Mifare) 512 MB Flash memory Battery backed real time clock 4.3” High resolution colour display (480 x 272) Internal sound system Durable keypad with numeric, function and navigation keys Internal microphone... -
Page 7: System Start-Up
System Start-up When the GT4 system is powered on, a bootloader runs which loads the Linux operating system. This runs start-up scripts to set up and configure the terminal and to start enabled services. When an application is installed and once the unit is fully booted, the initial screen gives you the opportunity to enter the Terminal Setup by pressing the F8 key. -
Page 8: Terminal Setup
Terminal Setup Accessing the GT4 Terminal Setup When accessing the terminal’s set-up, you are The available Terminal Setup menus are as prompted to enter a PIN before the set-up menus can follows: be accessed: PIN Entry Screen Terminal Setup Screen The default PIN is 1905. -
Page 9: Application Menu
Terminal Setup Application Menu Application Menu Options on the Application set-up menu are used to manage the installed application. Info Select this option to display the currently configured application parameters: Name The name of the installed application Version The version of the installed application. The application’s update URL, used to check and download newer versions of the application Problem Report... -
Page 10: Firmware Menu
Terminal Setup Firmware Menu Firmware Screen Options on the Firmware set-up menu are used to manage the terminal firmware. Info Select this option to display firmware and terminal information: Firmware The current firmware version, e.g. IT3200.x.x.x1.0.0 Build Date The current build date of the firmware The firmware’s update URL, used to check for newer firmware versions Bootloader... -
Page 11: Services Menu
AssistIT Enable this for Grosvenor’s comprehensive remote support feature. The AssistIT service uses port 5222/TCP to connect to the server and port 7777/TCP for VNC, Shell and LogView data. For AssistIT to work fully, these ports must not be blocked. -
Page 12: Settings Menu
Terminal Setup Settings Menu Settings Setup Screen Options on the Settings menu can be used to configure a variety of terminal settings. Date and Time These values set the terminal’s time, date and time zone: Set Time Enter the current time. It is recommended that NTP is used Set Date Enter the current date (dd/mm/yyyy) Timezone... -
Page 13: Region And Language
Terminal Setup Region and Language Region and Language Setup Screen These values control the terminal’s language and location. This information is used by the application to display translated text and show dates, times, numbers, etc. according the configured region: Language Languages that are supported include: Bulgarian, Chinese, Croatian, Czech, Danish, Dutch, English, Finnish, French, German, Greek, Hungarian, Italian, Japanese, Korean,... -
Page 14: Network
Terminal Setup Network Network Setup Screen These values configure the terminal’s network settings: Info Selecting this option displays the current network settings. An example of the information provided is shown below: Interface: On-Board LAN Netmask : 255.255.252.000 Status: Connected Gateway : 172.016.044.255 Mode: DHCP DNS1 : 172.016.047.001 MAC: 00:01:ce:01:d6:2a... -
Page 15: Reader
Terminal Setup Reader Reader Setup Screen These settings configure the type of reader fitted and defines how data from the reader is decoded. Internal Reader Info Decoder Details of the internal reader detected/configured. This determines how the terminal treats the data generated by the reader. -
Page 16: Biometric
Terminal Setup Internal reader Special Decoders Type 1 – Passthrough. This causes the data stream generated by the reader to be passed directly to the application as an ASCII bit stream. This allows the application to decode the data in situations where the reader encoding is not yet supported by the firmware. -
Page 17: Io-Boards
Terminal Setup IO-Boards Options will vary dependant on the IO board(s) fitted. Please refer to relevant hardware guide for options. USB Menu When you select this option and plug in a memory stick you will be presented with the following options: Install firmware image (IT3200-fw-*.bin) Install application (*.app) Restore backup (*.itbackup) -
Page 18: Diagnostics Menu
Terminal Setup Diagnostics Menu Diagnostics Menu Options on this menu can be used to perform the following diagnostic functions: Test Network Link status of Ethernet cable Gateway reachable (via ping) Gateway and Nameserver working by pinging Internet address (google.com) HTTP requests on port 80 working by connecting to http://google.com Firmware update URL working This option runs a number of network tests to check... -
Page 19: Remote Connections
Remote Connections The recommended method for remotely connecting to a command line shell in the terminal is to use SSH. Using SSH On Windows platforms the free program PuTTY can be used. To connect, specify the IP address of the terminal e.g. 172.16.3.49 (Note: Omit any leading zeros). Once a connection has been initiated, you are prompted to log into the terminal and are prompted for a login name and a password. -
Page 20: Using Vnc
Remote Connections Using VNC If the VNC service is enabled on the terminal it is Once connected, the remote terminal’s live display is possible to control the keyboard remotely by using a shown in a window on the computer’s desktop. The VNC Client viewer program on the remote computer. -
Page 21: Security And Passwords
Security and Passwords The GT4 terminal uses three passwords, the PIN (Personal Identification Number), the remote Login password and the VNC password. This section explains their purpose and how you can change them. The Terminal PIN You need to enter the PIN at the terminal to access the set-up menus (see “Accessing the GT4 Terminal... -
Page 22: Special Key Shortcuts
Special Key Shortcuts This section explains various shortcut key combinations supported by the GT4 terminal. Key Combinations To terminate the current application Hold down the F1, F5 and Enter keys (‘tick’ button) at the same time. The current application will terminate and the default application launcher will be displayed. -
Page 23: Application Deployment
Application Deployment One of the strengths of the GT4 terminal is its ability to deploy an application using either a USB memory stick or a network connection. The GT4 terminal comes with the FactoryApp application pre-installed, which makes it very easy to install and configure a terminal via USB or network. -
Page 24: Hardware Options
Hardware Options The tables below list some of the common modules that can be fitted to the GT4 terminal. For installation details, refer to the hardware Installation Guide provided with the module. Main System Unit Code Number Description FP-GT4 GT4 front panel (processor board + display) -
Page 25: Reader Modules (Only Popular Assemblies Listed)
RMK-12VPRX-IT/RS Generic 12V reader mounting plate The RM-SP-4750-GT4 biometric finger reader operates in both Verify and Identify modes with 4750 finger template capacity and may be fitted in conjunction with card readers. The module fits directly into the front panel:... -
Page 26: Communications Modules
Power over Ethernet Module CM-WIFI-I-USB-IT USB WI-FI Dongle (Internal) The CM-POE-IT is an optional plug-in module to the GT4 Front Panel which enables the terminal to be powered via the Ethernet connection from a IEEE802.3af or IEEE802.at standard PoE switch. CM-WIFI-I-USB-IT... -
Page 27: Expansion Modules
The EM-BB-HC-IT/RS is a power supply back-up battery module capable of running the terminal under power supply fail conditions. Based on a lithium-polymer battery the module will typically run the GT4 for 2 hours and is compatible with all power options including PoE. Advanced diagnostics allow charge state, voltage current and temperature to be remotely monitored. -
Page 28: Ancillary Equipment
Hardware Options Ancillary Equipment Code Number Description AE-BP-ISRT-KIT01 Back panel insert kit AE-INJ-POE-PHI01 POE injector with integral PSU AE-PSU-PT-12VDC 12VDC plug top PSU AE-PSU-WM-12VDC 12VDC wall mount PSU Page 28... -
Page 29: Connection Guide
Connection Guide Real Time Clock Coin Cell USB Connector Power over Ethernet (PoE) Maintains the RTC during power off USB 2 x 4 Module Position situations. Under normal operating Supports Flash memory stick conditions the coin cell will have a Optional module enables terminal to be service life of up to 10 years. - Page 30 Email: HCM-EMEAsupport@grosvenortechnology.com Telephone: +44 (0)1202 621711 Web: www.grosvenortechnology.com Page 30...
Need help?
Do you have a question about the GT4 and is the answer not in the manual?
Questions and answers