Table of Contents
Advertisement
Advertisement
Table of Contents

Related Manuals for RaySafe X2


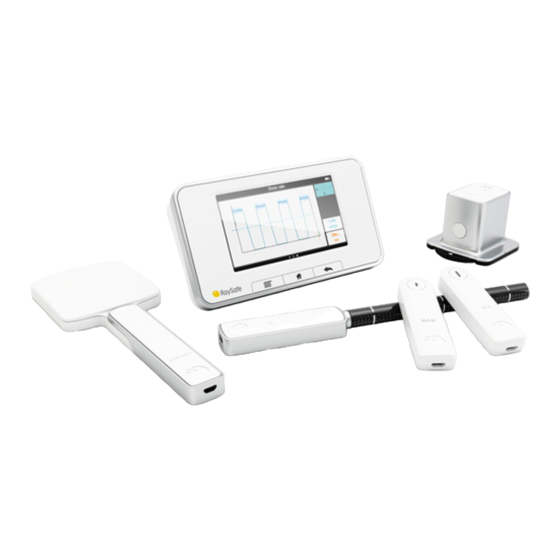
Summary of Contents for RaySafe X2
- Page 1 USER MANUAL RaySafe X2 RaySafe X2 Solo...
- Page 2 Please consult the built-in help in your base unit to ensure that you read a version corresponding to your specific instrument setup. © 2020.09 Unfors RaySafe 5001083-8.00 All rights are reserved. Reproduction or transmission in whole or in part, in any form or by any means, electronic, mechanical or otherwise, is prohibited without the prior written consent of the copyright owner.
-
Page 3: Table Of Contents
About the X2 system ........ - Page 4 RaySafe X2 – CONTENTS ..........31 Measure with CT Sensor .
-
Page 5: General
ˆ Volt, for voltage measurements on X-ray equipment. ˆ mAs, an integrated tube current meter. RaySafe View is a PC software for use with the X2 instruments. In RaySafe View, you can view measurements and waveforms on a larger display, store measurements, transfer data to Excel or other software and get software updates for the base unit. -
Page 6: Navigate The Base Unit
On the back side of the base unit are: ˆ Reset switch, for forced reboot of the base unit ˆ Charger/PC connector, for charging or using with a PC with RaySafe View ˆ mAs connector, for tube current measurements ˆ Two sensor connectors ˆ... -
Page 7: Analyze Waveforms
RaySafe X2 – GENERAL Via RaySafe View To access archived measurements via RaySafe View, connect the base unit to a computer running RaySafe View and select Import from base unit under the File menu. ANALYZE WAVEFORMS View a single parameter by tapping on that parameter on the home screen. Swipe left to go to the waveform screen. -
Page 8: Connect The Base Unit To A Computer
CONNECT THE BASE UNIT TO A COMPUTER Connect the base unit to a computer running RaySafe View using a USB cable (recommended length: max 2 m). RaySafe View can be installed from the installation media that came with the system or be downloaded from raysafe.com. -
Page 9: Upgrade The Base Unit Software
Connect the base unit to a computer running RaySafe View and make sure that the computer is connected to internet. If there are any updates available, the ”Updates available” symbol will show up in RaySafe View. Click on that symbol and follow the instructions to upgrade the soft- ware. -
Page 10: X2 Base Unit: Specifications
RaySafe X2 – GENERAL X2 BASE UNIT: SPECIFICATIONS Dimensions: 154 mm (1.3 6.1 in) Weight: 521 g (18.4 oz) Power source: Rechargeable Li-ion battery Battery time: About 10 hours of intensive usage Connector: USB micro (5 V DC, 1.3 A), for PC communication and... - Page 11 Unfors RaySafe supports users in: ˆ Recovering reusable parts. ˆ Recycling of useful materials by competent disposal companies. ˆ Safe and effective disposal of product. For advice and information, contact your Unfors RaySafe Service Organization first, or otherwise the manufacturer.
-
Page 12: R/F
RaySafe X2 – R/F MEASURE WITH R/F SENSOR Place the connected sensor centered in the field with the crosshair towards the X-ray source. The angle of the sensor in the horizontal plane has no impact on the measurement result. Expose. -
Page 13: Measure On Dental Panoramic Machines
RaySafe X2 – R/F MEASURE ON DENTAL PANORAMIC MACHINES Position the panoramic holder with the X2 sensor centered, with the whole sensor rectangle inside the direct beam. Adjust the position by exposing radiochromic or fluorescent film. You can also search for the high- est dose value. -
Page 14: R/F Sensor: Specifications
RaySafe calibration lab as well as data from PTB type testing. The combined uncertainty is less than 5 %. -
Page 15: Setting: Units
Select displayed unit for dose and dose rate. 1 Gy = 114.1 R Note! X2 systems subject to legal calibration (Eichung) in Germany or Austria do not have the possibility to change dose unit to R¨ o ntgen (R). SETTING: STOP DELAY The stop delay setting defines for how long the instrument will wait for more radiation to include... -
Page 16: Setting: Ignore Prepulses
RaySafe X2 – R/F Use a longer stop delay when measuring on a pulsed fluoroscopy system or to get a prepulse recorded into the same measurement as the following ordinary exposure. Stop delay setting longer than the time between pulses (t T), will result in one long measure- ment. -
Page 17: Setting: Ac Pulse Counting
RaySafe X2 – R/F Ignore prepulses = 1, the (first) prepulse is excluded from the measurement. Note! This setting will affect all parameters, including the dose measurement. SETTING: AC PULSE COUNTING The AC pulse counting method can help in certain situations, but should normally be turned Off. - Page 18 RaySafe X2 – R/F GE CT 7 ° Bipolar When measuring kV on a GE CT machine with 7 ° anode angle and bipolar tube, select GE CT ° Bipolar to use a correction factor specifically adapted for maximum kV accuracy on such ma- chines.
-
Page 19: Dent
RaySafe X2 – DENT DENT MEASURE WITH DENT SENSOR Place the connected sensor centered in the field with the crosshair towards the X-ray source. Make sure that the whole sensor rectangle is inside the direct beam. Expose. Read the result. -
Page 20: Measure On Dental Panoramic Machines
RaySafe X2 – DENT MEASURE ON DENTAL PANORAMIC MACHINES Position the panoramic holder with the X2 sensor centered, with the whole sensor rectangle inside the direct beam. Adjust the position by exposing radiochromic or fluorescent film. You can also search for the high- est dose value. -
Page 21: Dent Sensor: Specifications
RaySafe calibration lab as well as data from PTB type testing. The combined uncertainty is less than 5 %. -
Page 22: Setting: Units
Select displayed unit for dose and dose rate. 1 Gy = 114.1 R Note! X2 systems subject to legal calibration (Eichung) in Germany or Austria do not have the possibility to change dose unit to R¨ o ntgen (R). SETTING: STOP DELAY The stop delay setting defines for how long the instrument will wait for more radiation to include... -
Page 23: Setting: Ignore Prepulses
RaySafe X2 – DENT Use a longer stop delay when measuring on a pulsed fluoroscopy system or to get a prepulse recorded into the same measurement as the following ordinary exposure. Stop delay setting longer than the time between pulses (t T), will result in one long measure- ment. - Page 24 RaySafe X2 – DENT Ignore prepulses = 1, the (first) prepulse is excluded from the measurement. Note! This setting will affect all parameters, including the dose measurement.
-
Page 25: Mam
RaySafe X2 – MAM MEASURE WITH MAM SENSOR The MAM sensor is ready to measure dose and HVL for all anode/filter combinations without changing any settings. Place the connected sensor centered in the field, with the crosshair 6 cm (4 cm in the US) from the examination table front edge (A). The angle in the horizontal plane has neglectable impact on the measurement result. -
Page 26: Mo/Rh Kv With Mam Sensor
RaySafe X2 – MAM Read the result. Tip! Tap a parameter to get large digits, parameter information, and, if applicable, waveform. Switch between these by swiping sideways. Note! The dark line centered in the circle represents the active area of the sensor. The lines on the side of the housing marks the vertical position. -
Page 27: Mam Sensor: Measurement Parameter Definitions
RaySafe X2 – MAM Mount the X2 MAM sensor in the holder. Place the holder centered on the table, tight to the chest wall. Settings: Philips MicroDose: Stop delay: 2 s. W/Al Philips, if kVp is desired. Fischer SenoScan: Stop delay: 2 s. W/Al, if kVp is desired. - Page 28 RaySafe X2 – MAM Parameters in dose rate waveform T: Time P1, P2, P3: Pulses DR: Dose rate : Dose Parameters in tube voltage waveform T: Time P1, P2, P3: Pulses kVp: Peak tube voltage Note! If measurements are made simultaneously with the MAM sensor and mAs cable, any shared...
-
Page 29: Mam Sensor: Specifications
SETTING: UNITS Select displayed unit for dose and dose rate. 1 Gy = 114.1 R Note! X2 systems subject to legal calibration (Eichung) in Germany or Austria do not have the possibility to change dose unit to R¨ o ntgen (R). -
Page 30: Setting: Stop Delay
RaySafe X2 – MAM SETTING: STOP DELAY The stop delay setting defines for how long the instrument will wait for more radiation to include in the same measurement. Use a longer stop delay when measuring on a pulsed fluoroscopy system or to get a prepulse recorded into the same measurement as the following ordinary exposure. - Page 31 RaySafe X2 – MAM Ignore prepulses = 1, the (first) prepulse is excluded from the measurement. Note! This setting will affect all parameters, including the dose measurement.
-
Page 32: Measure With Ct Sensor
RaySafe X2 – CT MEASURE WITH CT SENSOR Push the connected sensor tight into the phantom ..or use the flexi stand for positioning free in air. Expose. -
Page 33: Measure Kvp On Ct
Dose rate is the average dose rate, calculated as dose/time. For measurements longer than 3 s, intermediate readings are moving averages. Note! X2 systems subject to legal calibration (Eichung) in Germany or Austria do not show dose or dose rate on the base unit display. -
Page 34: Ct Sensor: Specifications
Select displayed unit for dose and dose rate. 1 Gy = 114.1 R Note! X2 systems subject to legal calibration (Eichung) in Germany or Austria do not have the possibility to change dose unit to R¨ o ntgen (R). SETTING: STOP DELAY The stop delay setting defines for how long the instrument will wait for more radiation to include... - Page 35 RaySafe X2 – CT Stop delay (t) setting longer than the time between pulses (t T), will result in one long mea- surement. Note that you have to wait as long as the stop delay setting (t) after the last exposure before the measurement ends and values will be displayed.
-
Page 36: Light
RaySafe X2 – LIGHT LIGHT MEASURE WITH LIGHT SENSOR Luminance: Place the connected sensor with the aperture centered on the area you want to measure, and with luminance selected on the sensor wheel. Illuminance: Place the connected sensor with the diffuser in the direction you want to measure, and with illuminance selected on the sensor wheel. -
Page 37: Light Sensor: Measurement Parameter Definitions
RaySafe X2 – LIGHT Tip! Tap a parameter to get large digits and parameter information. Switch between these by swiping sideways. Zero adjust: If prompted to make a zero adjust, select zero adjust (0) on the sensor wheel. The zero adjust will take approximately 10 s. -
Page 38: Survey
RaySafe X2 – SURVEY SURVEY MEASURE WITH SURVEY SENSOR Position the sensor with the dark side towards the radiation source. If you measure in manual trig mode, press Start or Stop whenever you want to begin or end mea- suring. -
Page 39: Survey Sensor: Specifications
RaySafe X2 – SURVEY Tip! Tap a parameter to get large digits, parameter information, and, if applicable, waveform. Switch between these by swiping sideways. Note! The dark entrance window represents the active area of the sensor. The lines on the side of the housing marks the vertical position. -
Page 40: Setting: Units
, is measured in Gy or R, where 1 Gy = 114.1 R. Ambient dose equivalent, (10), is measured in Sv. Typical response: Note! X2 systems approved by PTB do not have the possibility to change dose unit to R¨ o ntgen (R). -
Page 41: Setting: Stop Delay
RaySafe X2 – SURVEY SETTING: STOP DELAY The stop delay setting defines for how long the instrument will wait for more radiation to include in the same measurement. Use a longer stop delay when measuring on a pulsed fluoroscopy system or to get a prepulse recorded into the same measurement as the following ordinary exposure. -
Page 42: Volt
A live value is displayed in the lower left corner of the screen. The live value is the average volt- age, recalculated and updated four times per second. Note! To ensure functionality and safety, only use Volt cables provided by RaySafe. To get other measurement parameters, in addition to voltage (V) and time (s), select an appli- cable conversion factor. - Page 43 RaySafe X2 – VOLT Press Activate to make the instrument ready for measurements. The instrument will automatically perform a zero adjustment, which means that a new zero level is set, based on the voltage measured during activation. The voltage must be stable during the activation.
-
Page 44: Volt Sensor: Specifications
RaySafe X2 – VOLT disconnection. Caution! Connection of the RaySafe X2 Volt directly to test points on generators shall only be done by personnel authorized in calibration and repair of X-ray equipment. The user may be ex- posed to electrical hazards if the equipment is damaged or improperly connected, or if the input voltage to the Volt sensor is more than the specified maximum of... -
Page 45: Setting: Stop Delay
RaySafe X2 – VOLT T: Time Q: Voltage (V), Tube voltage (kV) or Tube current (mA) SETTING: STOP DELAY The stop delay setting defines for how long the instrument will wait for signal to include in the same measurement. Use a longer stop delay when measuring on a pulsed fluoroscopy system or to get a prepulse recorded into the same measurement as the following ordinary exposure. - Page 46 RaySafe X2 – VOLT Use 2 mV when the signal is too low to trig a new measurement otherwise. Bandwith is reduced from 10 kHz to 1.5 kHz. Recommended for measurements with the PROVA 15 Current probe.
-
Page 47: Mas
RaySafe X2 – MAS MEASURE MAS Switch off the X-ray generator. Remove the jumper. Connect the mAs cable to the base unit and to the generator. -
Page 48: Mas: Measurement Parameter Definitions
Switch on the X-ray generator. Make an exposure and read the result. Note! Users of RaySafe X2 mAs must be aware of the potential damage to generators and of electrical human hazards in case of improper connection or damaged equipment. RaySafe X2 mAs is intended for use only by personnel authorized in performing calibration and repair of X-ray equipment. -
Page 49: Setting: Stop Delay
RaySafe X2 – MAS Pulses are counted every time the signal reaches trig. Pulse rate and mAs per pulse are averages for the last 6 pulses. Parameters in mA waveform T: Time P1, P2, P3: Pulses mA: mA mA avg: mA value if the setting mA mode is mA avg : Displayed mAs value. -
Page 50: Setting: Ignore Prepulses
RaySafe X2 – MAS Stop delay setting shorter than the time between pulses (t T), will result in many short measure- ments (one for each pulse). SETTING: IGNORE PREPULSES Use the ignore prepulses setting to remove one or many unwanted prepulses from the measure- ment. - Page 51 RaySafe X2 – MAS Example of the difference between mA and mA avg.
Need help?
Do you have a question about the X2 and is the answer not in the manual?
Questions and answers