Table of Contents
Advertisement
Quick Links
00054891
(DIR3505MSCBT)
Digital Radio
Digitalradio
Operating Instructions / Bedienungsanleitung / Mode d'emploi / Instrucciones de uso /
Руководство по эксплуатации / Istruzioni per l'uso / Gebruiksaanwijzing / Οδηγίες χρήσης / Instrukcja obsługi /
Használati útmutató / Návod k použití / Návod na použitie / Manual de instruções / Kullanma kılavuzu /
Manual de utilizare / Bruksanvisning / Käyttöohje / Работна инструкция / Betjeningsvejledning / Manuelt stasjonssøk
Advertisement
Table of Contents

Subscribe to Our Youtube Channel
Related Manuals for Hama DIR3505MSCBT


Summary of Contents for Hama DIR3505MSCBT
- Page 1 00054891 (DIR3505MSCBT) Digital Radio Digitalradio Operating Instructions / Bedienungsanleitung / Mode d‘emploi / Instrucciones de uso / Руководство по эксплуатации / Istruzioni per l‘uso / Gebruiksaanwijzing / Οδηγίες χρήσης / Instrukcja obsługi / Használati útmutató / Návod k použití / Návod na použitie / Manual de instruções / Kullanma kılavuzu /...
- Page 2 UI Languages/ English, German, Danish, Dutch, Finnish, French, Italian, Norwegian, Polish, Portuguese, Spanish, Swedish,Turkish, Czech, Slovak UI Sprachen Package Content/ DIR3505MSCBT, Power Supply, Remote Control, Batteries, Short Manual, Telescope Verpackungsinhalt Antenna Dimension (WxHxD)/ 370 x 175 x 250 mm Größe (BxHxT)
- Page 3 Listen out loud with Spotify Connect Connect your DIR3505MSCBT to your wifi network Open up the DIR3505MSCBT app on your phone, tablet or laptop using the same wifi network Play a song and select Devices Available . Select your XYZ and start listening.
- Page 4 10 11 12 15 16 AUTO DIMMER...
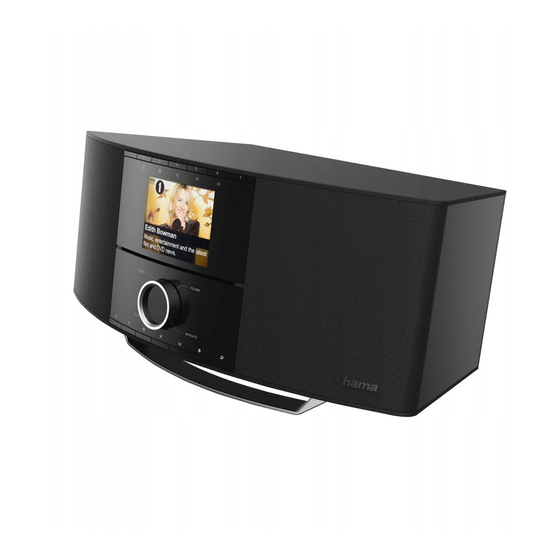
- Page 6 Controls and Displays A: Front B: Rear Direct access to the menu Power switch Mains power supply List/save favourites LAN connection Display additional information Optical output Mute USB connection [POWER]/ Rotate: Volume control/ Select [VOLUME]/ AUX IN socket [ENTER] / Headphone socket Press: On/off switch/ Confirm [NAVIGATE]...
- Page 7 C: Remote Control Confirm ≙ Press [POWER]/ [OK] [VOLUME]/ [ENTER] / On/off switch [NAVIGATE] ≙ Press [POWER]/ [VOLUME]/ Rewind (operating mode: [ENTER] / [NAVIGATE] [◄ ◄] Spotify Connect, Mute Music player) Fast forward (operating Direct access to operating [IR] [► ► ] mode: Spotify Connect, mode Internet radio ≙...
-
Page 8: Table Of Contents
Content 1. Explanation of Warning Symbols and Notes ... 9 9. Amazon Music ........20 2. - Page 9 19. System settings ....... . 31 19.1 Equaliser ........32 19.2 Network .
- Page 10 Icon overwiew Icon Meaning Icon Meaning Application failed Operating mode: Aux in See display for further information Operating mode: Muted Internet radio Operating mode: Shared Media Playback Spotify Connect Playback: POffe Operating mode: Music player Playback: Stop Operating mode: DAB RDS (Radio Data System) ...
- Page 11 Menu structure MAIN MENU* INTERNET RADIO Last listened Station list System settings** Main menu* AMAZON MUSIC SPOTIFY System settings** Main menu* MUSIC PLAYER Shared media USB playback My playlist Repeat play Shuffle play Clear My playlist Prune servers System settings** Main menu* Station list Scan...
- Page 12 SYSTEM SETTINGS** Equaliser Normal Jazz Rock Movie Classic News My EQ My EQ profile setup Bass Treble Network Network wizard PBC Wlan setup View settings Manual settings Wired Wireless NetRemote PIN Setup Network profile Keep network connected Time/Date Set Time/Date Auto update Update from DAB Update from FM...
- Page 13 Setup wizard Info Backlight Operation Mode High Medium Standby Mode Timeout 10 sec 30 sec 60 sec Standby Level High Medium Slumber Mode High Medium Multi-room View details State Group Create new group Add to group List current clients Leave group Dissolve group Colour theme Auto-Standby...
-
Page 14: Explanation Of Warning Symbols And Notes
Thank you for choosing a Hama product. Risk of electric shock Take your time and read the following instructions and information completely. Please keep these instructions in a • Do not open the device or continue to operate it if it safe place for future reference. -
Page 15: Lan Connection (Wired Network)
4.2 WLAN connection (wireless network) Note – Optimal reception • Ensure that the router is switched on, is functioning correctly and that there is a connection to the internet. • This product is equipped with an antenna connection • Activate the WLAN function of your router. which allows the use of an active or passive antenna. -
Page 16: Navigation And Controls
5.1 Navigation and controls 5.4 Additional information • Select among menu items by turning [ENTER/ Press [ ] / [INFO] to display context-dependent additional NAVIGATE]. information. The information shown depends on the • Confirm the selection by pressing [ENTER/NAVIGATE]. operating mode as well as the current selection of radio station, music file,etc. -
Page 17: Function Buttons 1-7
The power supply unit is suitable for mains voltages between 100 and 240 V, and is thus operable on almost any AC power grid. Please note that a country-specific adapter may be necessary. You can find an appropriate selection of Hama products at www.hama.com. -
Page 18: Initial Setup
Note Note – Starting up with or without the setup wizard? • Only connect the product to a socket that has been approved for the device. • We recommend using the setup wizard (YES) to quickly and easily confi gure the time, date, internet •... -
Page 19: Main Menu / Modes
Keep network connected 7. Main menu / modes This setting is a radio energy-saving function. If this feature Access the main menu as follows: is disabled (NO#), the network module will be switched off whenever the radio is not actively using the network connection (such as in standby mode). -
Page 20: Internet Radio
8. Internet radio 8.1.1 Search by country or region To search for a station by continent, country and region, Note proceed as follows: * If necessary, it is possible to switch providers in order to make all features and functions of the product available. -
Page 21: Search By Name
8.1.3 Search by name 8.1.5 New stations If you know the name of the desired station, you can Stations that have recently been added to the database search for it directly. can be found as follows: Station list Station list ... -
Page 22: Podcasts
8.2 Podcasts 8.2.3 Search by name Podcasts are programs on various topics and include, If you know the name of the desired Podcasts, you can for example, talk shows, news and much more. Podcasts search for it directly. can be downloaded from the Internet. There are normally approximately 10,000 programs available. -
Page 23: Favourites (Local)
8.4 Favourites (local) 8.4.3 Management of favourites with the remote control You can save up to 30 of your favourite stations for quick and direct access. Favourites 1-10 The remote control enclosed has number keys 1-0 (0 ≙ 10). A favourite can be assigned to each of these number key. 8.4.1 Save favourites •... -
Page 24: Favourites
8.5 Favourites • During registration, the radio’s ID is associated with your e-mail address and saved in the web interface. (airable - http://www.wifiradio-frontier.com) • If multiple radios are registered to you and you wish to In addition to the local favourite memory slots, you can delete one of those registrations or just compare them, also create your own lists of favourites. -
Page 25: My Added Stations
8.5.4 My Added Stations 9. Amazon Music If a station you desire is not yet available, you can add it Amazon Music gives you access to millions of songs. You manually to the portal, or suggest a station be added to can listen to them on your radio, on the go using your the database (Recommend station). -
Page 26: Music Player (Upnp, Usb)
Use: • In the Spotify app, start playback of a playlist or title as usual. • The usual playback information is displayed, such as the album cover, title, etc. • At the bottom edge of the screen, the Spotify Connect logo is shown next to Available devices. -
Page 27: Playback From The Network - Accessing Files Using The Radio.22
Requirements: • Choose the correct device (home server, PC, etc.) and • The radio and the computer must be on the same press [ENTER/NAVIGATE] to open the list of shared network. folders on that device. • The radio must be authorised as a playback device on the computer. -
Page 28: General Playback Options
• To go directly to the playlist, do as follows: If this function is activated (Repeat play: On) the current track is repeated. Shuffle play: On / Shuffle play: Off To turn the function On and Off, press [ENTER/ NAVIGATE] repeatedly. If this function is activated (Shuffle play: On) the radio Main menu plays all tracks in random order. -
Page 29: Dab
• Press to skip to the previous track. Pressing and 13.3 Station list holding the button initiates rewind. You can access the station list in DAB mode at any time via two methods: The corresponding function buttons on the remote control a) If a station is already playing, simply turn [ENTER/ are described at the start of these instructions, in the NAVIGATE]. -
Page 30: Edit Station List
13.5 Edit station list 13.6.2 Access favourites To remove stations that are not currently in the reception Press [ ] / [MEMORY] to open the overview window with area, from your station list, proceed as follows: the list of saved stations. Use [ENTER/NAVIGATE] to select one of your favourites. -
Page 31: Drc (Dynamic Range Control)
13.7 DRC (Dynamic Range Control) 14. FM Some radio stations in the DAB network support an audio From the main menu or after pressing [ ] / [MODE] level control that is activated at varying volumes during repeatedly, activate operating mode FM (FM Radio): playback. -
Page 32: Automatic Station Search
14.2 Automatic station search 14.4.2 Access favourites • Press and hold [ENTER/NAVIGATE] until the automatic Press [ ] / [MEMORY] to open the overview window with station search starts. the list of saved stations. • The radio stops the search and starts playback when it finds a station. -
Page 33: Audio Setting
Favourites 1-30 (alternative to number keys) • Press and hold [FAVORITES] approx. 3 seconds to save a station on one of the 1-30 favourite station presets. An overview window with the station presets should open after approx. 2 seconds. • You can switch between the station presets (1 to 30) by pressing the favourite keys [+]/[-] (by turning Main menu [ENTER/NAVIGATE]). -
Page 34: Biuetooth ® Pairing
® • If necessary, start searching for Bluetooth devices on ® your terminal device. • Select DIR3505MSCBT and wait until the radio is listed as connected in the Bluetooth settings on your terminal ® device. • Your terminal device is also shown as connected on the Main menu radio display. -
Page 35: Sleep
17. Sleep 18. Alarms The radio has a sleep function, after a defined time the The Radio has two individually adjustable alarm times. radio switches to standby mode. • Repeatedly press [SLEEP] on the remote control to set 18.1 Alarm settings the desired time interval (Sleep OFF/15/30/45/60/90/120 minutes). -
Page 36: Activating/ Deactivating The Alarm
Preset: 18.3 Stopping the alarm/ Snooze function If you selected Internet radio/ DAB/ FM, choose which Alarm tone (Buzz) station or podcast you wish to be woken with. You can • When the alarm activates, press [VOLUME/POWER], to choose any of the 30 favourite station slots or the Last stop the alarm. -
Page 37: Equaliser
19.1 Equaliser 19.2 Network The equaliser allows you to adjust the sound of the radio 19.2.1 Network wizard – Configuration of internet to suit your preferences by amplifying or reducing the connection / Automatic search amount of bass or treble in the audio . The Network wizard supports you to set up a You can choose from preconfigured profiles, adjusted to connection between the radio and internet. -
Page 38: Wireless Network Connection (Wlan)
19.2.2 Wireless network connection (WLAN) • Alternatively, PBC setup can be initiated from the internet settings of the radio: Depending on the network, there are a number of ways to connect to it. Networks that support connection via WPS (Wi-Fi Protected Setup) are identified in the list as [WPS]. -
Page 39: Wired Network Connection (Lan)
Open network Manual configuration wired (LAN) – DHCP enable • Select the option Wired. Note • Select the option DHCP enable. • The connection is now established. No further setting • We recommend against establishing unsecured adjustments are required. connections and advise you to always protect your network against unauthorised access. -
Page 40: View Settings
Manual configuration wireless (WLAN) – DHCP 19.2.6 Network profile disable The radio automatically saves all successfully connected The method described here assumes the DHCP server network profiles.This means that re-establishing these is active (manual wireless configuration (WLAN) – connections (for example, after the radio was disconnected DHCP enable). -
Page 41: Keep Network Connected
19.2.7 Keep network connected Update from DAB/ FM If automatic time and date adjustment is activated, the This setting is a radio energy-saving function. device receives time and date information from the station over the FM/DAB/DAB+ radio network. This is the best way to ensure that the clock will run accurately and the alarm will trigger at the correct time, even after power outages. -
Page 42: Factory Reset
19.5 Factory Reset 19.6 Software update To reset the radio to the factory default settings, proceed We are constantly developing new software features as follows: and improvements for our radios to fix problems, add functionality, etc. We recommend that you keep your radio’s software up to date. -
Page 43: Setup Wizard
19.7 Setup wizard 19.9 Backlight You can restart the setup wizard (Setup wizard) at any Brightness sensor activated time by proceeding as follows: • Move the sliding switch (10) to the ON position. • The brightness of the display is now automatically adjusted according to the ambient brightness. -
Page 44: Auto-Standby
19.10 Auto-Standby 20.1 Interface/layout of the UNDOK home screen Note • For reasons of environmental protection and to save valuable resources, the radio automatically switches to standby mode after 15 minutes once playback is at a very low volume or the radio has been muted. To activate or deactivate this function, proceed as follows: System settings ... -
Page 45: First-Time Setup Of The Device With Undok
The first time you switch on an UNDOK-enabled product • Open the UNDOK app on your tablet or smartphone. from Hama, or when you have set it to the factory settings, • Tap the Set up audio system menu item. -
Page 46: General Control Of A Device Or Group
20.3 General control of a device or group Open the home page (all audio systems) To control a configured device, tap the relevant device/ Selection of the various sources (dependent on group in the selection list on the UNDOK home page. the active device/the devices in the group) This takes you to the product’s playback screen;... -
Page 47: Multi-Room Setup On The Radio
In this window, you can also delete an existing group and 20.5 Multi-room setup on the radio thereby dissolve it, or give the group a new name. (See 20.5.1 General information Figure 3 – Group name) • All radios must be connected to the same network via Please note that it is sufficient if one device in the group LAN cable or Wi-Fi. -
Page 48: Creating A Group
Netherlands, Austria, Poland, Portugal, Romania, Slovenia, Slovakia, Finland, Sweden, United Kingdom 22. Warranty Disclaimer Hama GmbH & Co KG assumes no liability and provides no Note warranty for damage resulting from improper installation/ If channels 36–64 (frequency 5.150–5.350 GHz) are mounting, improper use of the product or from failure to observe the operating instructions and/ or safety notes. - Page 49 Bluetooth SIG, Inc. and ® any use of such marks by Hama GmbH & Co KG is under license. Other trademarks and trade names are those of their respective owners. All listed brands are trademarks of the corresponding companies. Errors and omissions excepted,...
Need help?
Do you have a question about the DIR3505MSCBT and is the answer not in the manual?
Questions and answers