Table of Contents
Advertisement
Quick Links
G413 User Guide
-------------------------------------------------------------------------------------------------------------------------------------------
Quad channel creative video wall controller
25 editable preset display modes
Custom modes with LCD at any angle and position
PIP/POP
Multi-unit cascade
Flexible aspect ratio and display region adjustment
Seamless looping playback with different display modes
The absolute opposite of ordinary
G-413 User Guide
1
Document: G41302
RC-400
Advertisement
Table of Contents
Troubleshooting

Related Manuals for VNS G-413


Summary of Contents for VNS G-413
- Page 1 G413 User Guide Document: G41302 ------------------------------------------------------------------------------------------------------------------------------------------- The absolute opposite of ordinary G-413 User Guide Quad channel creative video wall controller 25 editable preset display modes Custom modes with LCD at any angle and position PIP/POP Multi-unit cascade ...
-
Page 2: Table Of Contents
G413 User Guide Document: G41302 ------------------------------------------------------------------------------------------------------------------------------------------- Table of Contents Introduction……………………………………………………………..……………..…...…………. Features..…………………………………………………………..………….……..…………. Helpful tips for installation and operation…………………………………….…..…..... Outlook and main functions………………………………………..…..……………...………….. Function in remote controller…………………………………………………………………………. Basic concept for video wall configuration………………………………………………………… Preset display modes……………………………………………..…………….…..……....Introduction.…………………….……………………..……………..………………………. LCD (TV) selection for Preset Modes ...…….……………………...……….……..….. Select Preset Display Modes through OSD……….………..….………..……………….. - Page 3 G413 User Guide Document: G41302 ------------------------------------------------------------------------------------------------------------------------------------------- 13.5.1 Upload coordinates via remote controller……………………………………………... 44 13.5.2 Upload coordinates via Galign2 PC tool……………………………………………….. 45 14 Important technical issues and trouble shooting 14.1 Prevent LCD from burn-in mark………………………………………………………………… 46 14.2 How to increase portrait display mode resolution………………………………………….. 47 14.3 How to determine signal resolution for entire video wall ………………………………….
- Page 4 VNS Inc. is prohibited. VNS Inc. makes no warranty for the use of its products and bears no responsibility for any error of omission that may appear in this document.
-
Page 5: Introduction
------------------------------------------------------------------------------------------------------------------------------------------- 1 Introduction VNS creative video wall controller G413 is world unique and the first pure hardware solution that can create all kinds of display modes through IR remote controller or simple PC tool. 25 Preset Modes can be selected through OSD. These Preset Mode can be further edited to meet user’s different requirements. -
Page 6: Features
G413 User Guide Document: G41302 ------------------------------------------------------------------------------------------------------------------------------------------- 2 Features: Flexible video source connection 2x HDMI and 1x DP: support up to 8k/1k @30 Hz or 4k/2k @60Hz. 1x VGA: support up to WUXGA resolution. Quad channel outputs 4x FHD HDMI outputs for connecting with 4x LCD or conventional TV / monitor. System cascade One HDMI 2.0 loop out port for multiple unit cascade for large scale video wall. - Page 7 G413 User Guide Document: G41302 ------------------------------------------------------------------------------------------------------------------------------------------- 11) Programmable EDID: preset 13 EDID timing + programmable EDID setting to optimize input resolution. Programmable EDID has below resolution range: H: 1024-3840, V: 720-2400 12) LCD burn-in mark protection: Auto image position shift to prevent LCD from burn-in mark. 13) PIP function: Picture in Picture from two selected signal sources with flexible position and image size (320*180 up to 1920*1200).
-
Page 8: Helpful Tips For Installation And Operation
G413 User Guide Document: G41302 ------------------------------------------------------------------------------------------------------------------------------------------- 3 Helpful tips for installation and operation User can set Box ID for independent control among multiple GeoBox by remote controller. 851: control GeoBox ID No. 1 853: control GeoBox ID No. 3 850: simultaneous control for all GeoBox User will see flashing LED on front panel after press 85x number keys. -
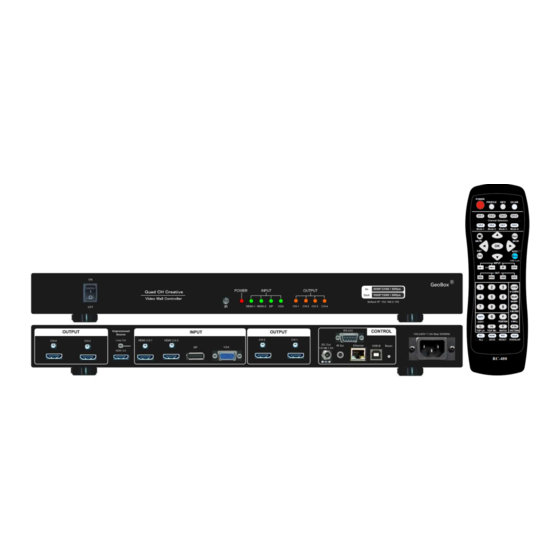
Page 9: Outlook And Main Functions
G413 User Guide Document: G41302 ------------------------------------------------------------------------------------------------------------------------------------------- 4 Outlook and main functions Input Status Input Status Output Ports Input Ports Output Ports Control ports TV3/TV4 TV1/TV2 USB, IR, IP Loop out 5 Functions in Remote controller Output port selection (TV1-TV4) Store location for Display modes Procedures for determine each LCD image position 1) Select display Mode #—Mode 1~Mode 4 (please select Mode 5 to Mode 10 through OSD) -
Page 10: Basic Concept For Video Wall Configuration
G413 User Guide Document: G41302 ------------------------------------------------------------------------------------------------------------------------------------------- 6 Basic concept for video wall configuration [Top RH] & [Top LH] X/Y coordinates determine the image position Image allocation for each LCD is based on [Top RH] & [Top LH] corner X&Y coordinate value in 1920*1080 coordinate system. -
Page 11: Preset Display Modes
G413 User Guide Document: G41302 ------------------------------------------------------------------------------------------------------------------------------------------- 7 Preset Display Modes Introduction LCD panel used in Preset Mode must have the same size and 16:9 aspect ratio. Preset mode doesn’t take LCD panel bezel size into consideration. It is good for slim bezel under 3.5mm active to active bezel size. - Page 12 G413 User Guide Document: G41302 ------------------------------------------------------------------------------------------------------------------------------------------- User can use remote controller to select preset display modes. [Video Wall] [Mode Type] select display mode 1 mode is to output 4 signals same as signal source. It is similar to 1x4 HDMI splitter. ...
-
Page 13: Preset Display Mode List
G413 User Guide Document: G41302 ------------------------------------------------------------------------------------------------------------------------------------------- Preset display mode list Mode 2 – 2x2 with top two TV upside down User can select Preset Mode as base (Ratio 16:9) to create customized display modes. Image aspect ratio can be adjusted through [Ratio] &... - Page 14 G413 User Guide Document: G41302 ------------------------------------------------------------------------------------------------------------------------------------------- Mode 4 – 3x1 (Ratio 1.69) Mode 6– 2x2 with TV2 & TV4 shift down 1/2 panel height (Ratio 1.42) (#4 output will show full screen image) Mode 4A – 1x3 Mode 7 – 2x2 with clockwise 15〫rotation (Ratio 1.7) Apply 90〫...
- Page 15 G413 User Guide Document: G41302 ------------------------------------------------------------------------------------------------------------------------------------------- Mode 12A Mode 9– 2x2 with TV3 & TV4 Right shift 1/2 panel width (Ratio 2.22) Apply 90〫 signal source or rotate image at 90〫 to get normal viewing angle from Mode #12. Mode 10– 2x2 with TV3 & TV4 Right shift 1/2 Mode 13 –TV2 &...
- Page 16 G413 User Guide Document: G41302 ------------------------------------------------------------------------------------------------------------------------------------------- Mode 18 – 45〫clockwise rotation (Ratio 1.0) Mode 15 – 75〫counterclockwise rotation (Ratio 1.77) (#4 output will show full screen image) Mode 16 – (Ratio 1.16) Mode 19 – 45〫clockwise rotation (Ratio 1.1) Panel top and bottom at the same height. Mode 17 –...
- Page 17 G413 User Guide Document: G41302 ------------------------------------------------------------------------------------------------------------------------------------------- Mode 21 – (Ratio 1.0) Mode 23 (Ratio 1.0) Mode 22 (Ratio 1.0) Mode 24 – 45 degrees rotation (Ratio 1.0)
-
Page 18: Galign2 Pc Tool
G413 User Guide Document: G41302 ------------------------------------------------------------------------------------------------------------------------------------------- 8 Galign2 PC tool Introduction Galign2 is specific PC tool for G413. User can input coordinates for [Top RH] & [Top LH] corners of the image in each LCD to get creative video wall. System setting, control and code update can also be executed through Galign2. - Page 19 G413 User Guide Document: G41302 ------------------------------------------------------------------------------------------------------------------------------------------- TV1-TV4 represents G413 output ports from CH-1 to CH-4. For Preset Mode, user needs to follow the sequence, location and direction in Preset Mode menu to install the video wall. If no PC for Galign2 PC tool operation, user can still use remote controller or WebGui to execute coordinate key-in, position fine-tune, aspect ratio and position adjustment...etc.
- Page 20 G413 User Guide Document: G41302 ------------------------------------------------------------------------------------------------------------------------------------------- After Read back parameters, user can select another Mode # and use [Write] (5) command to save to other Mode #. User can do further editing for Preset Mode and create customized display mode. If user saves the setting into display Mode (11), user can select the display Mode and click [Read] to read back the setting.
- Page 21 G413 User Guide Document: G41302 ------------------------------------------------------------------------------------------------------------------------------------------- [Shift Mode]: After check [Shift Mode], user can change [Top Left] X&Y value to shift image position in H&V directions for each TV without changing the image size and angle. Each channel is independent. While executing [shift] function, X&Y values must be also in the range 0-1920 for X direction and 0- 1080 for Y direction.
- Page 22 G413 User Guide Document: G41302 ------------------------------------------------------------------------------------------------------------------------------------------- (16) [Loop Range]: [Loop Range] is to select display Mode # for looping playback. It will start from Mode #1. If user selects [5], it means the system will execute looping playback for Mode #1 to Mode #5. The display Modes for looping playback shall be continuous.
-
Page 23: Preset Mode Editing Via Galign2 Pc Tool
G413 User Guide Document: G41302 ------------------------------------------------------------------------------------------------------------------------------------------- finds abnormal conditions, user can reset through OSD menu and it will keep the settings saved in Profile Indexes but will clean display Mode settings (mode #1-Mode #10) Preset Mode editing via Galign2 PC tool If user wants to create customized display mode, user has two ways: ... -
Page 24: Reset Preset Mode Setting
G413 User Guide Document: G41302 ------------------------------------------------------------------------------------------------------------------------------------------- Reset Preset Mode setting Galign2: [Reset] key will reset the settings in all channels to default. All outputs will have the same signal as signal source. It can be served as 1x4 HDMI splitter. ... -
Page 25: Preset Mode Editing Via Remote Controller
G413 User Guide Document: G41302 ------------------------------------------------------------------------------------------------------------------------------------------- 10 Preset Mode editing via remote controller Select Preset Mode via remote controller 10.1 Activate OSD [Video Wall] [Mode Type] select icon If user doesn’t select Display Mode #, it will save the select Preset Mode in Mode #1. ... - Page 26 G413 User Guide Document: G41302 ------------------------------------------------------------------------------------------------------------------------------------------- Profile Load hotkey Profile Load hotkey Output port selection (TV1~TV4) Output channel selection (TV1~TV4) Display Mode (#1~#4) Display Mode (#1~#4) OSD operation buttons OSD operation buttons [Position]: adjust entire image position after [Ratio] Adjustment Global Video Wall menu (for multiple unit cascade application [Shift]: Image position adjustment for each output Entire video wall aspect ratio adjustment...
-
Page 27: Preset Mode Application Case Study
G413 User Guide Document: G41302 ------------------------------------------------------------------------------------------------------------------------------------------- 11 Preset mode application case study Preset Mode: Mode 01 11.1 1) Connect G413 outputs to related LCD CH-1 to TV1 CH-2 to TV2 CH-3 to TV3 CH-4 to TV4 2) If bezel compensation is required, please apply GeoBox test pattern and change coordinates in each channel. -
Page 28: Preset Mode 18 With Two G413 Cascade
G413 User Guide Document: G41302 ------------------------------------------------------------------------------------------------------------------------------------------- Preset mode 18 with two G413 cascade 11.2 G413 can support multiple unit cascaded with Preset Mode. Maximum unit is 15x15=225. Connect signal to 1st G413 HDMI-1, then daisy chain to next G413 through Loop Out port. Maximum input resolution is 4K/2K @60Hz or 8k/1k @30Hz. - Page 29 G413 User Guide Document: G41302 ------------------------------------------------------------------------------------------------------------------------------------------- 11.2.2 Setup procedures Follow the instruction in Preset Mode 18 to do signal connection in both G413. One G413 control left four LCD and another one controls right four LCD. Global Video Wall settings in G413-A ...
-
Page 30: More Example For Preset Mode Cascade
G413 User Guide Document: G41302 ------------------------------------------------------------------------------------------------------------------------------------------- 11.2.4 Six monitor creative video wall User can use two units of G413 to achieve 5/6/7/8 TV video wall based on the system connection with the same Preset Mode. For 6 LCD creative display, user can also use Preset Mode 18 to create it. ... -
Page 31: Create Custom Display Mode Through Osd Menu
G413 User Guide Document: G41302 ------------------------------------------------------------------------------------------------------------------------------------------- 12 Create custom display mode through OSD menu The purpose for [Mode Index] is to save Preset mode parameters and let user create any type of display mode as he wants. Here is the structure and concept: ... -
Page 32: Image Position [Shift] In H&V Directions
G413 User Guide Document: G41302 ------------------------------------------------------------------------------------------------------------------------------------------- 1) Inside each [TV], user needs to input coordinates of [Top Left] and [Top Right] corners to decide the image location. 2) [Reset] will reset the coordinates to default settings in current [TV] setting. 3) User can manually input the coordinates for [Top Left] and [Top Right] corners by remote controller or Galign2 PC tool. - Page 33 G413 User Guide Document: G41302 ------------------------------------------------------------------------------------------------------------------------------------------- 1) [Ratio] and [Position] function will apply to entire video wall (4 LCD) at the same time. 2) The display aspect ratio adjust range is from 25% to 200%. The result is similar to image [Zoom In] &...
- Page 34 G413 User Guide Document: G41302 ------------------------------------------------------------------------------------------------------------------------------------------- (100% Horizontal Ratio) (50% Horizontal Ratio) (200% Horizontal Ratio) 12.4.2 Vertical [Ratio] adjustment 1) This function can execute Image Zoom In & Zoom Out to change the aspect ratio in vertical direction by Up/Down arrow keys. 2) The aspect ratio adjusting range is from 25% to 200%.
- Page 35 G413 User Guide Document: G41302 ------------------------------------------------------------------------------------------------------------------------------------------- 12.4.3 Horizontal [Position] adjustment 1) Image horizontal position shift can be executed by R/L arrow keys. 2) No image shift is possible if Horizontal [Ratio] doesn’t change. 3) Horizontal adjusting range is from 25% to 200%, depending on [Ratio] adjustment.
-
Page 36: Looping Playback With Different Display Modes
G413 User Guide Document: G41302 ------------------------------------------------------------------------------------------------------------------------------------------- (200% Vertical Ratio) (Max. shift to Top) (Max. shift to Bottom) (50% Vertical Ratio) (50%. shift to Top) (50% shift to Bottom) Note: By the combination of aspect ratio change and position shift, user can remove image black border or select special region of the image to highlight (pop up) specific content in the video wall. -
Page 37: Example For Looping Playback Settings
G413 User Guide Document: G41302 ------------------------------------------------------------------------------------------------------------------------------------------- User can create up to10 different Display Modes and looping playback under preset time interval. This function can be used to highlight different products from the same image content without PC system. For instance, if one photo consists of 4 products. User can display all products in Mode #1, then pop-up product A in Mode #2, product B in Mode #3, product C in Mode #4 and product D in Mode #5. -
Page 38: Procedures To Create Looping Playback Modes
G413 User Guide Document: G41302 ------------------------------------------------------------------------------------------------------------------------------------------- Mode 1: factory default settings, 4 independent images with the same content at different direction Mode 2: to put TV1 into 1/4 of the [All in One] image Mode 3: to put TV1 & TV2 into 2/4 of the [All in One] image Mode 4: to put TV1 &TV2 &... -
Page 39: Detailed Procedures To Create Custom Display Mode
G413 User Guide Document: G41302 ------------------------------------------------------------------------------------------------------------------------------------------- 13 Detailed procedures to create custom display mode Introduction 13.1 User can create all kinds of display modes for regular, portrait and irregular video wall with different size, resolution and bezel LCDs at any angle and position through input the coordinates of two corners (Top left and Top Right) in each LCD. - Page 40 G413 User Guide Document: G41302 ------------------------------------------------------------------------------------------------------------------------------------------- Galign2 tool to get the result. The Original Point for the coordinate system is set at Top Left corner as (0, 0). Please note that the coordinate system (1920*1080) in H&V directions should have the same scale.
-
Page 41: Collect Coordinates From Video Wall Picture
G413 User Guide Document: G41302 ------------------------------------------------------------------------------------------------------------------------------------------- Collect coordinates from video wall picture 13.4 User can also take picture of the LCD array and put this photo into a 1920x1080 coordinates system and collect 8 points of the coordinates for 4x LCD, then input these numbers into G413. Below are the processes: The photo shall be corrected without distortion. - Page 42 G413 User Guide Document: G41302 ------------------------------------------------------------------------------------------------------------------------------------------- 3) Resize the image in one edge to 1080 pixel height or 1920 pixel width and maintain aspect ratio. (It depends on the video wall aspect ratio. The final resolution should be under 1920x1080) 4) Open [File]...
- Page 43 G413 User Guide Document: G41302 ------------------------------------------------------------------------------------------------------------------------------------------- 5) Make sure the final resolution should be 1920*1080. Select [All], then move the image to the center of 1920x1080 coordinates by keyboard arrow key. Click Top Left and Top Right corner in each LCD to collect the coordinates for each LCD. User can enlarge the image to get more accurate result.
-
Page 44: How To Input Coordinates For Each Lcd
G413 User Guide Document: G41302 ------------------------------------------------------------------------------------------------------------------------------------------- If the video wall has more than 4 LCD, multiple units of G413 is required. User can connect the signal source to all G413 through daisy chain connection via loop out port. ... -
Page 45: Upload Coordinates Via Galign2 Pc Tool
G413 User Guide Document: G41302 ------------------------------------------------------------------------------------------------------------------------------------------- Output port selection Store location for manual setting display modes Procedures to key-in coordinates into G413: 1) Select manual display mode storage location—Mode1~Mode10 2) Select output port—TV1~TV4 (LCD) 3) Click Top LH to key-in Top Left X (horizontal) & Y (vertical) coordinates. -
Page 46: Important Technical Issues And Trouble Shooting
G413 User Guide Document: G41302 ------------------------------------------------------------------------------------------------------------------------------------------- Above is PC tool (Galign2) for user to load coordinates of each LCD through USB or Ethernet. Please key-in the coordinates for [Top Left] & [Top Right] corner in each TV (LCD) then select Mode # and press [Write] to save the settings and execute the result to G413. -
Page 47: How To Increase Portrait Display Mode Resolution
G413 User Guide Document: G41302 ------------------------------------------------------------------------------------------------------------------------------------------- How to increase portrait display resolution 14.2 If the display is at portrait position, user can apply the same procedures as above to build the video wall. User can also rotate the video wall at 90/270 degrees and collect the coordinates to build the system to get higher output resolution and better video quality. -
Page 48: How To Determine Signal Resolution For Entire Video Wall
G413 User Guide Document: G41302 ------------------------------------------------------------------------------------------------------------------------------------------- How to determine source resolution for a video wall 14.3 The feeling of the video image quality is related to many factors. The final display video pixel pitch and watching distance are two major factors in video wall. If user applies FHD signal source for a 5x5 video wall with 55”... -
Page 49: Osd Menu And Functions
G413 User Guide Document: G41302 ------------------------------------------------------------------------------------------------------------------------------------------- Press [Reset] key click RH or LH direction key once Enter. Under this condition, if click RH direction key, the system will execute [Reset All]. If click LH direction key, the system will reset [Video Wall] settings. -
Page 50: Image Setup] For Vga Input
G413 User Guide Document: G41302 ------------------------------------------------------------------------------------------------------------------------------------------- [Image Setup] for VGA input 15.2 [Image Setup] menu can only be activated when video input is VGA input signal. Automatic: It will do automatic image alignment inside the system Manual: manual setting for signal Phase and Clock to eliminate image noise in analog input ... -
Page 51: Scaling (Aspect Ratio Selection)
G413 User Guide Document: G41302 ------------------------------------------------------------------------------------------------------------------------------------------- 15.3.1 Scaling (aspect ratio selection) 1) [Full Screen]: To fit source image for full screen display 2) [Original AR] To display source image with the same aspect ratio as source image 3) The setting will also affect POP main image display with full screen or original aspect ratio. -
Page 52: Pip/Pop Setting
G413 User Guide Document: G41302 ------------------------------------------------------------------------------------------------------------------------------------------- Original preset Display Mode # 03 Display Mode #3 is preset in G413 When user rotate image at 90〫, a new display mode #03A can be achieved in G413 After 90〫rotation 4x G413 with Mode #3 with 90〫rotation, user Display Mode # 3A can get 4x4 video wall display. - Page 53 G413 User Guide Document: G41302 ------------------------------------------------------------------------------------------------------------------------------------------- POP2: Two images are at top/bottom position Limitation in PIP/POP functions: - When implement PIP/POP function, the main signal source can’t be rotated at 90/270° - Source: only one HDMI, DP & VGA source can be displayed on PIP/POP screen. PIP Overlap function is only available up to 4k/30 input resolution.
-
Page 54: Video Wall Setting
G413 User Guide Document: G41302 ------------------------------------------------------------------------------------------------------------------------------------------- Video Wall Setting 15.4 The purpose for Video Wall Setting allows user to crop source image, assign multiple unit image, select Preset display Mode, create custom display modes and cascade settings for multiple G413 to become one big video wall. -
Page 55: Zoom]-Split The Image For Cascade Application
G413 User Guide Document: G41302 ------------------------------------------------------------------------------------------------------------------------------------------- [Position]: to shift complete image in each G413 to let image match together in multiple unit cascade application. The maximum video wall can be up to 15x15=225 units of G413. If each G413 is connected with 4x LCDs, then theoretically maximum number of LCD displays can be up to 60x60=3600 LCDs from single signal source. -
Page 56: Overlap]-Adjust Image Location And Cropping Area
G413 User Guide Document: G41302 ------------------------------------------------------------------------------------------------------------------------------------------- 1) [Pan] is to assign the split image location for each Display Unit. 2) Horizontal value is calculated from LH to RH direction and Vertical value is calculated from top to bottom. 3) User needs to set H & V [Pan] value to assign the image location for each G413 to build a large video wall display. -
Page 57: Position]-Image Position Adjustment In Entire G413
G413 User Guide Document: G41302 ------------------------------------------------------------------------------------------------------------------------------------------- 15.4.4 [Position]: Position adjustment in entire G413 1. [Position] is to change the image location of each Display Unit (G413) in H&V direction without change image cropping range. 2. User can adjust the image location in H&V position up to +_1800 pixels. -
Page 58: System [Reset]
G413 User Guide Document: G41302 ------------------------------------------------------------------------------------------------------------------------------------------- Three OSD menu languages can be selected: English, Simplified Chinese and Traditional Chinese 15.5.3 System [Reset] Two types of Reset can be done: Reset All & reset Video Wall. 1) [Reset All] will reset all user settings but the settings stored in [Profile] Index will not be erased. -
Page 59: Logo Time Out]-Splash Screen Time
G413 User Guide Document: G41302 ------------------------------------------------------------------------------------------------------------------------------------------- OSD [Menu Time] 1) OSD menu will disappear from the screen based on time setting. 2) The default setting is “Off” and the OSD menu will remain in the screen until user activates other OSD function or input/output mode change. -
Page 60: Setting]
G413 User Guide Document: G41302 ------------------------------------------------------------------------------------------------------------------------------------------- Note: If user changes the aspect ratio through [Ratio] menu, it may create some no-image background. User can change this kind of background color to any color through [Video Wall] [Mode Index] [Mode #] [Ratio] [Background] 15.5.5 [Setting] Seven sub-menu under [Setting] menu: 1) [Mute] Audio mute or enable... -
Page 61: Frame Sync]-Frame Lock And Free-Run Synchronization Mode
G413 User Guide Document: G41302 ------------------------------------------------------------------------------------------------------------------------------------------- [Box ID] is identification # in each G413 for Ethernet, RS232 or IR remote control. 1) GeoBox ID No is from 1-99 2) After set Box ID, user can control GeoBox individually via IR Remote controller, RS232 &... -
Page 62: Network]
G413 User Guide Document: G41302 ------------------------------------------------------------------------------------------------------------------------------------------- 1) [Profile] is to save and load user settings 2) User can save all the settings into Profile and recall the settings by remote controller, RS232, USB or Ethernet. 3) When execute system reset, Profile settings will remain the same without change. - Page 63 G413 User Guide Document: G41302 ------------------------------------------------------------------------------------------------------------------------------------------- 2) User can controller G413 through Ethernet or WiFi through PC or mobile devices. A WebGui with virtual key icons will be showed in control devices for user to execute OSD function of G413. 3) G413 default IP address is 192.168.0.100 and can be changed in OSD, WebGui or Galign2 PC tool.
-
Page 64: Edid] Setting
G413 User Guide Document: G41302 ------------------------------------------------------------------------------------------------------------------------------------------- 15.5.5.7 [EDID] setting Selectable EDID setting is added into G413. The purpose are as follows: G413 can support big range of input signal timing— H=1024-3840, V= 720-2400. Different PC display cards have different setting and behavier. Many users may not be able to do the right settings Different display modes may show different final image aspect ratio. -
Page 65: Trouble Shooting
G413 User Guide Document: G41302 ------------------------------------------------------------------------------------------------------------------------------------------- 1) Some PC may not follow the EDID settings from G413 due to driver or setting issue and show different result. If it happens, please open PC resolution setting window and select desired output resolution from PC. - Page 66 G413 User Guide Document: G41302 ------------------------------------------------------------------------------------------------------------------------------------------- Usually, to swap with different cable, output channel, signal source and monitor can verify the root cause for the failure. When it is possible to have signal compatibility issue, user can add one HDMI splitter or switch in the middle to change signal impedance.
-
Page 67: Technical Support
Apart from what is detailed in User Guide, maintenance should be carried out by competent technician assigned by VNS. If G413 is physically damaged, it should be returned for repair using VNS RMA procedures. If the unit is opened by user, it will lose the right for warranty protection. -
Page 68: Specification
G413 User Guide Document: G41302 ------------------------------------------------------------------------------------------------------------------------------------------- Specifications Main items Functions Description 4 screen LCD video wall controller with preset General display modes and allow user to create all kinds of description irregular creative video wall Video processor 10-bits LCD to be controlled via one processing box Multiple unit cascade Yes (more than 10 boxes) Main function... - Page 69 G413 User Guide Document: G41302 ------------------------------------------------------------------------------------------------------------------------------------------- Each G413 can crop one full HD image from 4k/2k and achieve high quality 4k/2k/60Hz video wall. +_ 1800 pixels in horizontal and vertical directions Position shift in entire [Display Unit] for multiple [Display Unit] cascade alignment Irregular creative display modes created by user Through remote controller or Galign2 PC tool Overall video wall image aspect ratio adjustment...
- Page 70 G413 User Guide Document: G41302 ------------------------------------------------------------------------------------------------------------------------------------------- Cabled IR Receiver Extender Can be extended up to 20m via audio cable Ethernet control and operation via LAN or WiFi Setup and control through USB System control ASCII control protocol over RS-232 & Ethernet for easy use [Galign2] PC tool for easy image alignment Auto Shut off output signal when input is missing...
-
Page 71: Revision History
G413 User Guide Document: G41302 ------------------------------------------------------------------------------------------------------------------------------------------- Revision History Revision Date Originator Comments 019-09-26 irst version release Steve Wang...
Need help?
Do you have a question about the G-413 and is the answer not in the manual?
Questions and answers