Table of Contents
Advertisement
Advertisement
Table of Contents

Related Manuals for weintek cMT-FHDX


Summary of Contents for weintek cMT-FHDX
- Page 1 User Weintek USA, Inc. Manual www.WeintekUSA.com (425) 488-1100 cMT-FHDX Startup Guide The terms FHDXI, FHDXI High-Definition Multimedia Interface, and the FHDXI Logo are trademarks or registered trademarks of FHDXI Licensing Administrator, Inc. Rev. 24 SEP, 2020...
-
Page 2: Table Of Contents
How to Retrieve Historical Data via USB Drive................How to Delete All Historical Data....................OS Upgrade..........................10. How to Calibrate Resistive Touch Screen……………………………………………………………………………….. 11. How to Adjust the Resolution of cMT-FHDX……………………………………………………………………………. 12. cMT-Viewer.…………………………………………………………………………………………………………………………… 13. Monitor Mode………………………………………………………………………………………………………………………… 14. cMT-Viewer Limitations………………………………………………………………………………………………………….. cMT-FHDX Gestures Operation………………………………………………………………………………………………… 50... -
Page 3: Supported Touch Screen
1. Supported Touch Screen The following industrial touch screens are verified to be compatible with the cMT-FHDX. Brand Model Touch Screen Type Screen Requires OS Name Size Version (Inch) DM-F22A/PC-R11 USB projected 21.5" 20171208 or capacitive touch greater Aplex ARCDIS-121AP USB projected 21.5"... -
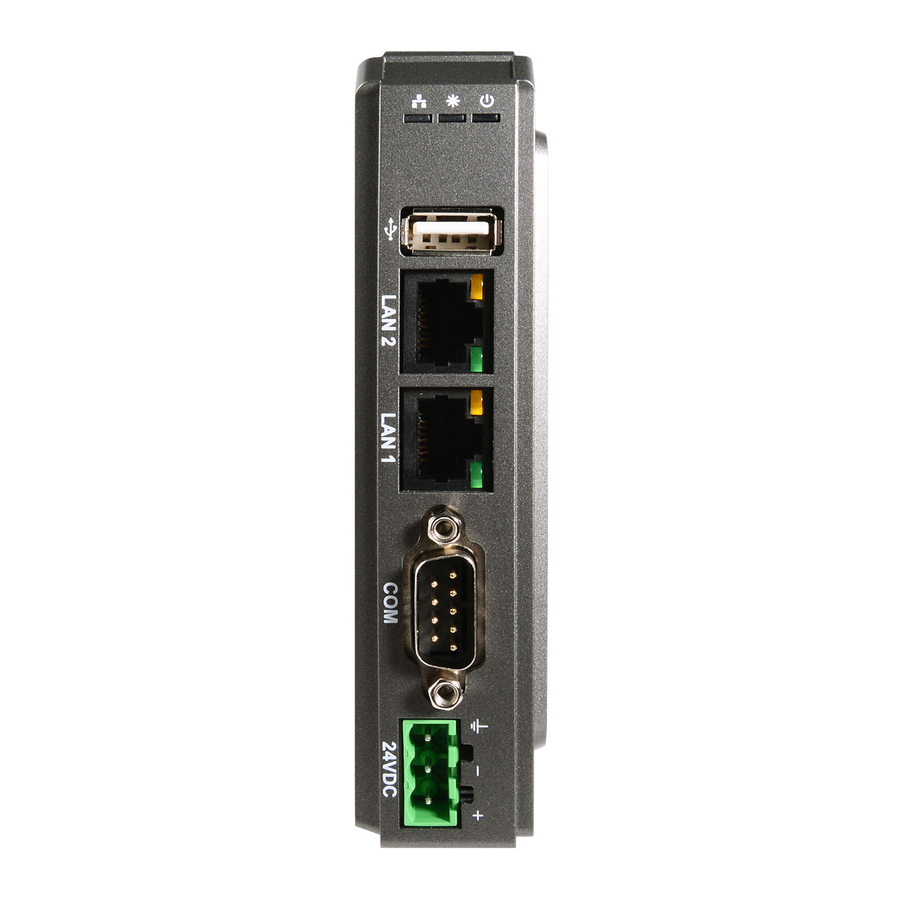
Page 4: Network Wiring Diagram
The default IP address of LAN 1 is DHCP. The default IP address of LAN 2 is static IP 192.168.100.1. The IP addresses of LAN 1 and LAN 2 must be configured to different subnets, except for the cMT-FHDX which have been activated with a Codesys license. -
Page 5: Setup
3. Setup Press the system toolbar button in the top left of the screen to open the Setup menu. Information This page shows general information about cMT-FHDX and network information. - Page 6 Adjust the brightness of the screen and audio volume. The Audio option will be available when the connected monitor display supports DDC /CI (Display Data Channel/Command Interface). Language Select a language for Setup. The language selected on the project of the cMT-FHDX won’t be changed by this setting.
- Page 7 Input Method Select languages for system keyboard input use.
- Page 8 After clicking on [OK], the icon will become unlocked. Codesys This is a page used to activate Codesys functionality. To activate this feature on a cMT-FHDX, a Codesys activation card is required and must be purchased separately. [Codesys Activation Code]- Enter the codes displayed on a Codesys activation card. Click [Active] to activate Codesys.
- Page 9 General [Direction]- Click on the button to change the direction of the screen display. [Popup download window]- If enabled, after inserting a USB drive to the USB port of the cMT-FHDX, the Upload/Download dialog window will pop up. [FTP Port]- Click the “>” button to change FTP port number.
- Page 10 IP address of Ethernet 2 is 192.168.100.1. The IP addresses of Ethernet 1 and Ethernet 2 must be on separate subnets, except for the cMT-FHDX with activated Codesys. Click on one of the “>” button. Enable [Obtain an IP address automatically] (DHCP) or set the IP address...
- Page 11 Time/Date Adjust cMT-FHDX RTC manually. HMI Name Change the name of cMT-FHDX to identify this HMI when retrieving historical data or loading a project on a PC. This saves time remembering the IP address of each cMT-FHDX.
- Page 12 Clear History This page is used to clear historical data, recipe, and database information stored in the internal memory of cMT-FHDX. Project Management Restarts the project of the cMT-FHDX and restores it to its initial state without cycling power.
- Page 13 System Password There are three different levels of password protection, User, Update Project, and System Setting. This page is used to change the passwords for operating a project via cMT viewer, loading a project to the HMI, accessing FTP server and so on. The default passwords of the three levels are 111111. [User]- This level can operate cMT projects via cMT viewer.
- Page 14 This function provides user passwords and security classes to prevent unauthorized operators from accessing objects that have the potential to cause damage or injury within your cMT-FHDX project. For more information, refer to section 5.6.2 Enhanced Security Mode in the Easybuilder pro user manual.
- Page 15 EasyAccess2.0 EasyAccess 2.0 is a tool that allows users to access and control a cMT-FHDX remotely from anywhere in the world. cMT-FHDX is NOT a pre-licensed model. To use this feature, an EasyAccess 2.0 activation card is required and must be purchased separately.
- Page 16 [URI]- Device URI (Uniform Resource Identifier). [Backup PPD file]- It is used to copy the PPD file (PostScript Printer Description) of printer. OS Upgrade This page is used to upgrade the OS version of cMT-FHDX.
- Page 17 Reset Options This page is used to reset a cMT-FHDX to its factory default settings. Press [Start] to reset if needed. Enter “yes” into the box and click on [OK] to start reset process.
-
Page 18: Web Interface
4. Web Interface A cMT-FHDX’s setting can also be accessed via a web browser. Before configuration, connect cMT- FHDX(LAN1) to a router via an Ethernet cable. Open a web browser (Edge, Chrome, or Firefox) and enter the IP address of the cMT-FHDX. For example, enter 192.168.1.15. - Page 19 [Update Project]- Loads a project and recipes from the PC to cMT-FHDX. [Backup Project]- Uploads a project from cMT-FHDX to the PC. [USB/SD Update]- Loads a project via a USB drive plugged into the USB slot of cMT-FHDX. Select the *.cxob file and click [Update].
- Page 20 [Update]- Select a button to transfer recipe files from the PC to the cMT-FHDX. [Backup] - Select a button to transfer recipe files from the cMT-FHDX to the PC. [Clear]- It is used to clear recipe and database information stored in the cMT-FHDX.
- Page 21 Data Log & Trend Display This page displays data log information via a data spreadsheet or a trend chart. Data within each spreadsheet can be backed up individually by clicking [Export to Spreadsheet] or [Backup database]. [Export to Spreadsheet]- This function generates a CSV file. [Backup database]- This function generates a compressed file of the .db files.
- Page 22 Event Log This page displays a data table in which operators can easily see important event information recorded on the HMI. Operation Log This page allows you to back up operation log information recorded on the HMI.
- Page 23 Webview Setting Webview offers direct control over HMI screen using a web browser. [Set as homepage] – If enabled, Webview will be the home page of the web interface. [Change password]- Set up a password that prevent unauthorized operators from accessing Webview. [Webview]- Go to the Webview page to control the HMI screen remotely.
- Page 24 [Status] - If activated, this tab shows Codesys network information and status information. [Project update](If activated) - Loads Codesys PLC project from the PC to the cMT-FHDX. Navigate to the folder containing *.app file and *.crc file and choose them.
- Page 25 Touch Calibration This page allows you to update a driver for the touch screen and calibrate the resistive touch screen.
-
Page 26: How To Use Webview
5. How to Use WebView Webview is used to monitor and control a CMT-FHDX on a web browser. It supports the following web browsers on a Windows PC, Chrome, FireFox, and Edge. Up to 4 users can access Webview simultaneously. - Page 27 The HMI screen will be displayed on the web browser. Use the “square” located in the bottom right corner to scroll around the screen when zoom level exceeds 100%. The toolbar located in the top left corner contains several menus. The first group of tools allow you to enable or disable the zoom function.
-
Page 28: How To Load A Project Via Usb Drive
Use [Build Download Files] function to build *.cxob file into a USB drive. Step 2. Plug the USB drive into to the USB slot of cMT-FHDX. When a pop-up window is displayed prompting you to download or upload to your device, click on [Download]. -
Page 29: How To Retrieve Historical Data Via Usb Drive
How to Retrieve Historical Data via USB Drive (HMI-> USB Drive) Step 1. Plug a USB drive to the USB port of cMT-FHDX. A pop-up window will display prompting you to download or upload to your device, and then click on [Upload]. -
Page 30: How To Delete All Historical Data
Step 4. Click on [Upload] to start. 8. How to Delete all Historical Data Step 1. Re-open the pop-up menu that will allow you to download or upload to your device and click on [Download]. Step 2. Enter the password and select logs you want to delete. The password requires the levels of Update Project or System Setting. -
Page 31: Os Upgrade
“OS_cMT_FHDX,” and place the OS image onto the folder. The OS image takes the form of a *.bin file. Step 2. Plug the USB drive into the USB port of cMT-FHDX. If a window pops up and prompts you to download or upload, click close to dismiss it. Step 3. - Page 32 OS upgrade will begin, which may take a some time. Do not unplug the power cable during OS upgrade. It may result in all data being lost. The progress bar indicates the progress of the OS upgrade. Reboot the HMI by following the instructions shown on the screen.
-
Page 33: How To Calibrate Resistive Touch Screen
10. How to Calibrate Resistive Touch Screen 1. Connect the touch screen to the USB port of the cMT-FHDX via USB cable. 2. Open a web browser on a laptop. Make sure the laptop and the cMT-FHDX have connected to the router via Ethernet cables. - Page 34 7. When the window pops up, drag the sign into [OK] box in ten seconds to finish the process.
-
Page 35: How To Adjust The Resolution Of Cmt-Fhdx
11. How to Adjust the Resolution of cMT-FHDX Note: The cMT-FHDX supports 1920x1080 and 1280x720. For other resolutions supported by the cMT- FHDX, please contact Weintek USA to get the latest supported resolutions for the CMT-FHDX. 1. Launch Easybuilder pro software. -
Page 36: Cmt-Viewer
App on a mobile devices or PC. When the cMT-Viewer App runs on a device and connects to the cMT-FHDX, only data is exchanged between the device and the cMT- FHDX. Three client devices can remotely view and control the project of a cMT-FHDX simultaneously by default. - Page 37 • Connect Menu- Click the Connect button and search for cMT-FHDXs in the [Search] tab. The available cMT-FHDXs will be shown as below when they exist on your local network. Tap an Add icon on the desired cMT-FHDX, and it will bring up a window requiring a password.
- Page 38 After that, the corresponding project will be loaded. If you want to go back to Connect menu, click on the Start (Home) button at the upper left corner.
- Page 39 Add a second project to the cMT-viewer App to switch and view different projects. The small pictures of the images as shown below are images of the cMT-FHDX projects before leaving the projects. On [History] tab, you can connect the recently accessed projects. If the cMT-FHDXs are configured to DHCP, the history records may not be usable anymore since the IP addresses are dynamic.
- Page 40 • Settings Menu - [Information] tab: Displays the current version of the cMT-Viewer application. [General] tab: Provides general settings. Change password- Allows users to change the password of “more settings” at the bottom left corner. Display datetime bar - Determines if the time bar will be displayed at the top of cMT-Viewer application.
- Page 41 [Language] tab: Select a language for cMT-Viewer menus. The language selected on the project of the cMT-FHDX won’t be changed by this setting. To enable Monitor Mode and use Password Protection functionalities, click on “more settings” icon and log in with the password set on “Change password.” The default password is 111111.
- Page 42 [Password Protection] - Accessing the protected actions will require a password if actions are selected below. Specify a password on [Change password] of this page. Open Project: The action to connect to cMT-FHDX and load its project. Close Project: The action to close projects on cMT-Viewer.
- Page 43 In Password Protection mode, protected actions are locked. To access them, click on the Password Protect icon and enter the corresponding password. The protected actions are accessible to users with knowledge of assigned password. There is a countdown timer displayed as shown below. When the time runs out, the Password Protection mode will be activated.
-
Page 44: Monitor Mode
13. Monitor Mode The small images of the cMT-FHDX project as shown below will be updated automatically, so users will see the latest data without entering each cMT-FHDX project. Click on the Auto Play button. cMT-Viewer will automatically go to the next page. - Page 45 When clicking on the Device Information button, the names of each cMT-FHDX, as well as their IP address, will be displayed as shown below. Tap the “Gear” (Setup) buttons to go to the web interface of each cMT- FHDX. Click the Edit button to configure the page layout.
- Page 46 [AutoPlay] - Set up the time interval for Auto Play mode to go to the next page after the given time interval. Note: To show real-time data for the project of a cMT-FHDX like below, you must enable Monitor Mode in Easybuilder pro and create a screen for visualization. Here are steps to configure.
- Page 47 10. Place Text object, Bit Lamp object, Word Lamp object, Numeric Display object, ASCII Display object, Bar Graph object or Alarm Display object to show up-to-date data on this screen, so you can see the data shown and updated on the cMT-Viewer App while in monitor mode. 8. Download this project to a cMT-FHDX.
-
Page 48: Cmt-Viewer Limitations
. cMT-Viewer Limitations Feature Limitation Some features do not work on a cMT Viewer client (PC, iOS, Android, cMT-iV5), even if they work on the local cMT HMI. Please take this into consideration when programming projects. Features (Objects) that do not work remotely on cMT Viewer App are listed below. •... - Page 49 Maximum Connect Count Three cMT-Viewer clients are allowed to remotely view and control the project of a cMT-FHDX simultaneously. When the fourth cMT-Viewer client connects to the cMT-FHDX, the warning message as shown below will pop up and reject the connection.
-
Page 50: Cmt-Fhdx Gestures Operation
15. cMT-FHDX Gestures Operation Tap: This is the most common gesture. Briefly touch HMI screen with fingertip. Drag: Move fingertip over HMI screen without losing contact. Press: Touch HMI screen for extended period of time. Pinch: Touch HMI screen with two fingers and bring them closer together. -
Page 51: Cmt-Im21 Touch Screen
The cMT-iM21 is a capacitive touch screen monitor exclusively designed for cMT-FHDX. The resolution of the cMT-iM21 supports up to 1920 x 1080. The USB client port is used to connect to the cMT-FHDX for touch signal transmission. The recommended length of USB cable and the HDMI cable are less than 5 meters for common practice. - Page 52 HMI-solutions that meet the needs of all industrial automation requirements while maintaining customer satisfaction by providing “on-demand” customer service. WEINTEK LABS brought their innovative technology to the United States in 2016, WEINTEK USA, INC., to provide quality and expedient solutions to the North American industrial market.
Need help?
Do you have a question about the cMT-FHDX and is the answer not in the manual?
Questions and answers