Advertisement
Available languages
Available languages
Quick Links
Advertisement

Subscribe to Our Youtube Channel
Related Manuals for Lionelo Babyline 5.1


Summary of Contents for Lionelo Babyline 5.1
- Page 3 Introduction Dear customer! Thank you for placing trust in us and choosing Lionelo Care. We provide you with a product perfect for everyday use thanks to the use of high-quality materials and modern solutions. We are sure that the product will satisfy your requirements as it has been designed with utmost care.
-
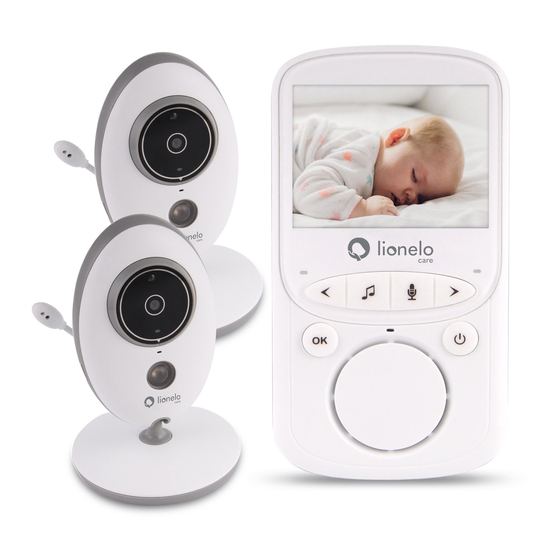
Page 4: Parent Unit Screen Icons
1. Power connector 2. LCD display 3. Power LED 4. Signal LED 5. Microphone 6. Volume key – (volume down) / „left” button / automatic unit switch 7. Music ON/OFF 8. Talk key/MENU navigation key 9. Volume key + (volume up / „right” button / manual unit switch 10. - Page 5 DESCRIPTION OF BABY UNITS (located near child) Light sensor Camera Power LED Microphone Infrared light Feeder connector Temperature sensor Steam key Speaker How to provide power supply and switch the unit on...
- Page 6 1. Connect a feeder plug to a baby unit and the other end to the socket. NOTE: Use the feeder cable supplied only. 2. The baby unit will activate automatically after you have provided power supply. 3. Blue LED suggests that the baby unit is active. How to provide power supply and switch the unit on It is advisable to charge the parent unit fully before you use it.
- Page 7 NOTE Do not place the baby unit or cables in the baby’s cot or within its reach (at least 1 meter of distance must be kept) because the child may get injured or be strangled! In the event of image or sound interference, change the location of the devices and make sure they are not close to other electric equipment.
- Page 8 Press „OK./Menu” key on the screen to enter the main menu. You can find 6 items there: Camera registration (pairing units) Alarm Settings Languages System info To move a cursor and select an item, press “left” or “right” button. Next press “OK/Menu” button to enter the item you have selected.
- Page 9 Enter alarm functions, press „right” button to activate, next press talk function button to move a cursor and “right/left” button to change value. SETTINGS Date and time This menu contains 2 options: Set time/date Set format Temperature unit Set the temperature in Celsius or Fahrenheit. Anti-flicker In this option you can set a frequency - 50/60Hz –...
- Page 10 LCD backlight It is possible to adjust the brightness of LCD and sleep mode time in menu. VOX mode This menu contains 2 items: Set working mode of the device: normal or VOX. Change VOX mode sensitivity. Language Here you can select language. System information It displays information on the system.
-
Page 11: Ważne Informacje
Wprowadzenie Drogi Kliencie! Dziękujemy za obdarzenie nas zaufaniem i wybranie marki Lionelo Care. Oddajemy w Twoje ręce produkt idealny do codziennego użytkowania dzięki wykorzystaniu wysokiej jakości materiałów i nowoczesnych rozwiązań technologicznych. Jesteśmy pewni, że dzięki ogromnej staranności wykonania spełni on Twoje wymagania. - Page 12 1. Złącze zasilania 2. Wyświetlacz LCD 3. Dioda zasilania 4. Dioda sygnału 5. Mikrofon 6. Przycisk głośności – (ciszej) / przycisk „w lewo” / automatyczny przełącznik między nadajnikami 7. Przycisk muzyki ON/OFF 8. Przycisk funkcji mówienia / przycisk przełączania w MENU 9.
- Page 13 OPIS NADAJNIKÓW (umieszczany przy dziecku) 1. Czujnik światła 2. Kamera 3. Dioda zasilania 4. Mikrofon 5. Dioda podczerwieni 6. Złącze zasilacza 7. Czujnik temperatury 8. Przycisk parowania 9. Głośnik UŻYCIE Zasilanie i włączenie nadajnika...
- Page 14 1. Podłącz wtyczkę zasilacza do nadajnika, a drugi koniec do gniazda zasilania. UWAGA: Korzystaj wyłącznie z zasilacza dostarczonego w zestawie. 2. Nadajnik uruchomi się automatycznie po podłączeniu zasilania. 3. Niebieska dioda wskazuje, że nadajnik jest aktywny. Zasilanie i włączenie odbiornika Zaleca się...
- Page 15 UWAGA Nie umieszczaj nadajnika lub przewodów w łóżeczku dziecka lub w jego zasięgu (min. 1 metr odle- głości), ponieważ istnieje ryzyko zranienia lub uduszenia dziecka! W przypadku zakłóceń obrazu lub dźwięku, należy umieścić urządzenia w innym miejscu oraz upew- nić się, że nie znajdują się w pobliżu innych urządzeń elektrycznych. Parowanie nadajników Nadajniki i odbiornik są...
- Page 16 Wciśnij przycisk “OK/Menu” na ekranie, aby wejść do głównego menu, znajduje się tam 6 pozycji: Rejestracja kamery (parowanie nadajników) Alarm Ustawienia Języki Informacje o systemie Aby przesunąć kursor i wybrać pozycję, wciśnij przycisk „w lewo” lub „w prawo”. Następnie wciśnij przycisk „OK / Menu”, aby wejść...
- Page 17 Wejdź do funkcji alarmu, wciśnij przycisk „w prawo”, aby aktywować, następnie wciśnij przycisk funkcji mówienia, aby przesunąć kursor oraz przycisk „w prawo/lewo”, aby zmienić wartość. USTAWIENIA Data i godzina W tym menu znajdują się 2 pozycje: Ustawienie czasu/daty Ustawienie formatu Jednostka temperatury Ustawienie wartości temperatury w stopniach Celsjusza lub Fahrenheita.
- Page 18 Podświetlenie LCD Istnieje możliwość dostosowania jasności ekranu LCD oraz czas po którym ekran się wygasza, będąc w opcjach menu. Tryb VOX W tym menu znajdują się 2 pozycje: Ustawienie trybu pracy urządzenia: normalny lub VOX. Zmiana czułości trybu VOX. Język Opcja umożliwia wybór języka.
- Page 19 EINLEITUNG Sehr geehrte Kunden! Wir bedanken uns für Ihr Vertrauen und Auswahl der Marke Lionelo Care. Wir geben zu Ihren Händen ein Produkt über, das dank hochwertigen Materialien und innovativen technologischen Lösungen perfekt für den täglichen Gebrauch ist. Wir sind sicher, dass dank einer sehr sorgfältigen Ausführung unser Produkt Ihre Anforderungen erfüllt.
- Page 20 1. Netzanschluss 2. LCD-Bildschirm 3. Power-Diode 4. Signaldiode 5. Mikrofon 6. Taste der Laustärke – (leiser) / Taste „nach links” / automatische Umschaltung zwischen den Sendern 7. Musik-Taste ON/OFF 8. Taste der Sprechen-Funktion / Umschaltung-Taste im MENU 9. Taste der Laustärke + (lauter) / Taste „nach rechts” / manuelle Umschaltung zwischen den Sendern 10.
- Page 21 BESCHREIBUNG DES SENDERS (neben dem Kind platziert) 1. Lichtsensor 2. Kamera 3. Power-Diode 4. Mikrofon 5. Infrarot-Diode 6. Stromversorgungsanschluss 7. Temperatursensor 8. Pairen-Taste 9. Lautsprecher VERWENDUNG Energieversorgung und Einschaltung des Senders...
- Page 22 1. Schließen Sie den Stecker an Sender des Kindes und das andere Ende an Netzstromanschluss an. ACHTUNG: Benutzen Sie ausschließlich das im Set mitgelieferte Netzteil. 2. Verschieben Sie den Schalter zur ON-Option. 3. Blaue Diode anzeigt, dass der Sender aktiv ist. Energieversorgung und Einschaltung des Empfängers Es ist zu empfehlen, den Sender völlig vor dem Gebrauch aufladen.
- Page 23 ACHTUNG Der Sender und die Leitungen sollen nicht im Kinderbettchen oder in der Nähe (min. 1 Meter der Ent- fernung) platziert werden, weil es ein Verletzungsrisiko oder Ersticken des Kindes besteht! Bei den Bild- und Tonstörungen soll das Gerät an einer anderen Stelle platziert werden. Sie sollen sich vergewissern, dass in der Nähe sich keine Elektrogeräte befinden.
- Page 24 Drücken Sie die Taste “OK/Menü” auf dem Bildschirm, um das Hauptmenü auszuwählen. Im Haupt- menü befinden sich 6 Positionen: 1. Registrierung der Kamera (Pairen der Sender) 2. Alarm 3. Einstellungen 4. VOX 5. Sprachen 6. Informationen über System Um den Zeiger zu verschieben und eine Position auszuwählen, drücken Sie die Taste „nach links” oder „nach rechts”.
- Page 25 Wählen Sie die Alarm-Funktion aus, drücken Sie die Taste der Sprechen-Funktion, um den Zeiger zu verschieben und die Taste „nach rechts/nach links”, um den Wert zu ändern. EINSTELLUNGEN Datum und Zeit In diesem Menü befinden sich 2 Funktionen: Einstellung von Zeit/Datum Einstellung von Format Temperatureinheit Einstellung der Temperaturwerte in Grad Celsius oder Fahrenheit.
- Page 26 LCD-Beleuchtung In Menü-Optionen besteht es eine Möglichkeit, die Bildhelligkeit des LCD-Bildschirmes und den Standby-Modus anzupassen. VOX-Modus In diesem Menü befinden sich 2 Positionen: Einstellungen des Arbeitsmodus des Gerätes: normal oder VOX. Änderung der Empfindlichkeit vom VOX-Modus Sprache Die Funktion ermöglicht, die Sprache auszuwählen. Informationen über System Diese Funktion zeigt die Informationen über System.
Need help?
Do you have a question about the Babyline 5.1 and is the answer not in the manual?
Questions and answers
Can i dosconect 1 camera am see olny one camera and how
To disconnect one camera and view only one camera on the Lionelo Babyline 5.1, follow these steps:
1. Press the “OK/Menu” button to access the main menu.
2. Navigate to the “Registrierung der Kamera” (Camera Registration) option using the left or right buttons.
3. Select the camera you want to disconnect.
4. Unpair the selected camera by following the pairing process but without pressing the pairing button on the sender.
5. Exit the menu and check if only one camera is displayed.
This will ensure that only one camera remains connected to the receiver.
This answer is automatically generated