
Related Manuals for FrontRow 940R


Summary of Contents for FrontRow 940R
- Page 1 USER GUIDE 940R Receiver ITM-02L Pendant Microphone ISM-02L Pass-Around Microphone IMC-01 Microphone Charger...
-
Page 2: Table Of Contents
Using a Second Microphone ............13 940R Pro Digital Receiver Features . -
Page 3: Important Safety Instructions
The FrontRow Pro Digital is manufactured to conform to the most stringent European guidelines for consumer products (RoHS) – it is produced using a process free of lead and other materials harmful to the environment. -
Page 4: Electrical Warnings
DO NOT disassemble the power sup- ELECTRICAL SAFETY ply. Return the apparatus to Phonic INFORMATION: Ear FrontRow for qualified service and repair if service or repair is required. PRECAUTIONS & SAFETY Incorrect reassembly may result in a risk RECOMMENDATIONS of electric shock or fire. -
Page 5: Itm-02L Pendant Microphone Features
FLASHING RED/GREEN ..Charge fault 7 Lithium Ion Battery 3-year life expectancy, lightweight, rechargeable lithium ion battery. 8 Charging / Programming Jack For charging via USB cable or for con- figuring settings using the FrontRow Microphone Settings application. -
Page 6: Ism-02L Pass-Around Microphone Features
OFF ....Battery Charged For charging via USB cable or for FLASHING RED ... .Battery Low configuring settings using the FrontRow When Charging Microphone Settings application. -
Page 7: Itm-02L Pendant Microphone Using
ITM-02L Pendant Microphone Using 1. Place the microphone around your neck and connect clasp. 2. Adjust the neck straps to position the microphone approximately 5in (13cm) from your mouth. 5in/13cm 3. Press the Smart Button to wake the micro- phone. The power indicator should be green. -
Page 8: Battery
Battery Installing the battery 1. Unscrew the battery door on the back of the microphone using the supplied Phillips screwdriver. 2. Locate the charge contacts on the battery and on the microphone. 3. Insert the battery into the compartment - battery contacts first, then push the battery into place. -
Page 9: Charging
USB port on your computer. The ITM-02L microphone will not charge unless you have first installed the software drivers as part of the FrontRow Desktop, Teacher Edition or Microphone Settings software application. To download the application, visit gofrontrow. com/guides-resources. -
Page 10: Ism-02L Pass-Around Microphone Using
ISM-02L Pass-Around Microphone Using 1. Turn the microphone on by sliding the Power Switch up. 2. Note Power Indicator (chair icon). Emitter diodes Power Green = On and transmitting indicator Off = Power is off NOTE: In order to conserve battery life, Power/ Battery Push-to-talk... -
Page 11: Labeling
Labeling Your Pass-Around Microphone includes a location for adding a name or room number clear window for easy identification. 1. Place the microphone on a stable surface with the battery door facing up. 2. Remove the battery door using the supplied Phillips screwdriver. -
Page 12: Battery
Battery Installing the battery 1. Unscrew the battery door on the back of the microphone using the supplied Phillips head screwdriver. 2. Locate the charge contacts on the battery Pass-Around and on the microphone. Microphone 3. Insert the battery into the compartment - battery contacts first, then push the battery into place. -
Page 13: Charging
IMPORTANT! To ensure top performance, FrontRow recommends replacing rechargeable batteries every three years. IMPORTANT! Store the battery properly if it will be unused for a period of more than 2 weeks. -
Page 14: Icm-01 Microphone Charger
IMC-01 Microphone Charger Charger setup 1. Insert microphones in either of the two charge pockets. 2. Find the power plug that is appropriate for the power outlet style in your country. 3. Slide power plug onto the power supply. 4. Plug the power supply into the power out- let and into the back of the charging base. -
Page 15: Using A Second Microphone
Using a Second Microphone Classroom 1 Your receiver is designed to receive two microphone signals at once. For example, two teachers (or a teacher and an aide) may each use a microphone. Or, one teacher can use a microphone and stu- dents can use a pass-around microphone. -
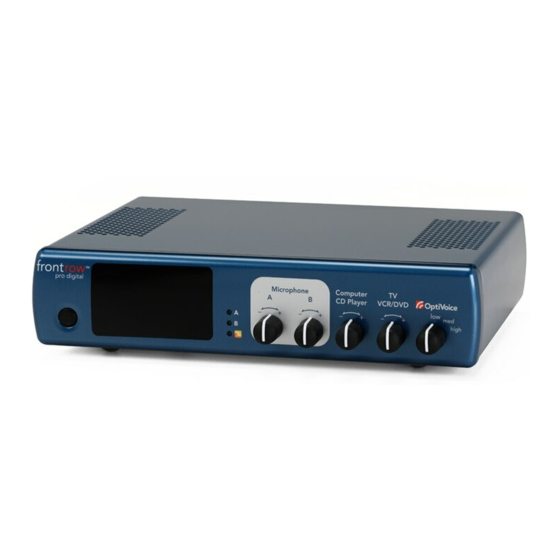
Page 16: 940R Pro Digital Receiver
940R Pro Digital Receiver Features front back 14 15 1. Power button 10. Transmitter charge output jack (Charges up to two microphones) 2. Internal infrared sensor 11. Infrared ceiling sensor input 3. Microphone A/B and feedback suppression status lights 12. Infrared wall sensor input 4. -
Page 17: Activate Receiver And Transmitter
The power indicator should be green. NOTE: Your microphone will go into NOTE: When the 940R is in standby mode standby mode (off) automatically after 10 the external sensor LED's will blink every minutes in mute mode or 10 minutes of two seconds. -
Page 18: Automatic Feedback Suppression And Optivoice
PMS 485 Red ™ The FrontRow Pro Digital features automatic feedback suppression. The Adapto platform analyzes the sound quality hundreds of times a second, looking for signs of feedback. When feedback is detected, it filters it out, allowing the teacher to have optimal volume settings AND complete freedom of movement around the classroom. -
Page 19: Connecting To Other Classroom Media
940R Pro Digital Receiver Connecting to other Classroom Media Your FrontRow Pro Digital can connect to other media to enhance the overall audio experi- ence in your classroom. Ideally, these connections were made during installation; however, they can easily be made after the unit is installed using the audio cords that came with the system or standard audio cords from your local electronics store. - Page 20 Some classrooms use a computer as the multi-media "hub", but it is connected to a TV instead of an LCD projector. They also occasionally use the TV/DVD/VCR as a stand alone media. For these classrooms, you may need to use both auxiliary audio input connections to the 940R. 940R (back)
-
Page 21: Auxiliary Output - Rebroadcasting To Personal Fm Receivers
940R Pro Digital Receiver Auxiliary Output - Rebroadcasting to Personal FM Receivers Allows rebroadcast of all voice and auxiliary audio directly to a hearing-impaired student's personal FM system. 1. Plug RCA cord into audio out port on back of Pro Digital receiver. Depending... -
Page 22: Cmbt Bluetooth ® Audio Receiver (Optional)
Installation with Pro Digital 940R 1. Attach the supplied rubber feet to the bottom of the CMBT receiver and select a stable space near the 940R 2. Provide a power source for the CMBT: Connect the supplied power supply to the 5VDC jack of the CMBT and plug the supply into an electrical outlet. -
Page 23: Troubleshooting
Sensor lights are blinking • Recharge or replace the microphone batteries • This is normal. When the 940R is in standby mode the sensor LED's will blink every two seconds No signal reception (channel indicator light... -
Page 24: Regulatory
FCC notes In developing and manufacturing your Phonic Ear product, we used high-quality materials The FrontRow Pro Digital active learning and components that can be reused. Thus, system is approved by the FCC (Federal when disposing of your waste electrical Communications Commission). - Page 25 © 2019 FrontRow Calypso LLC Phonic Ear, FrontRow, Calypso and the names of Phonic Ear, Calypso, and FrontRow products are trademarks or registered trademarks of FrontRow Calypso LLC in the U.S. and other countries. Bluetooth is a registered trademark of Bluetooth SIG, Inc.
Need help?
Do you have a question about the 940R and is the answer not in the manual?
Questions and answers