Advertisement
Quick Links
Advertisement

Related Manuals for BlueLine PowerCost Monitor

Summary of Contents for BlueLine PowerCost Monitor
- Page 1 Innovative Energy Solutions The PowerCost Monitor ™ Set Up Guide...
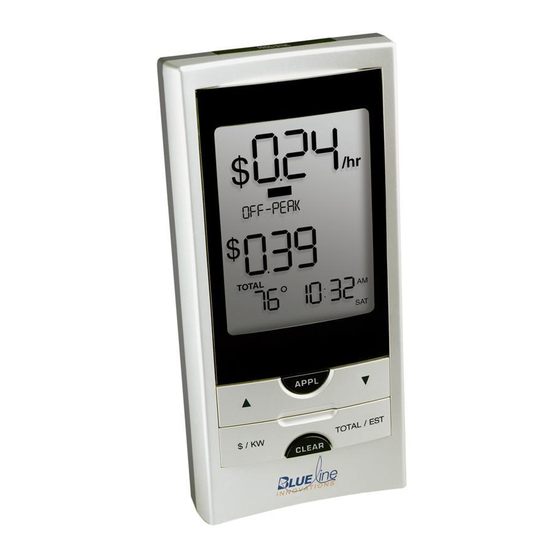
- Page 2 Display Unit - Icons And Buttons Now that you have installed your PowerCost Monitor™ Sensor Unit successfully, you must program your Display Unit. The pictures below illustrate all the various icons and values that can be displayed at any given time on your Display Unit, as well as the locations of all the available buttons.
- Page 3 Icon/Button Purpose Signal Quality Provides an indication of the quality of the signal from the Sensor Unit. The more bars the better the signal. Dollar Mode: Current Values are shown in dollars-per-hour ($/hr) and consumption totals are shown in dollars ($). Kilowatt Mode: Current Values are shown in kilowatts (kW) and consumption totals are shown in kilowatt-hours (kWh).
-
Page 4: Before Starting
Before Starting If you need any clarification of the procedures detailed below, please refer to the appropriate section of your User Manual. Before you start setting up your Display Unit, you must determine the type of billing your electricity provider is applying to your account. Retrieve a recent electricity bill and find out which of the following three billing modes applies in your case. - Page 5 SETUP SEQUENCE - Common Steps IMPORTANT: The instructions that follow assume that your Sensor Unit is transmitting signals normally to your Display Unit. Your Display Unit should show: The Disk Emulator spinning. The Signal Quality indicator showing a good quality signal. 1: Press-and-Hold SET After 3 seconds, the Display Unit beeps and enters Configuration Mode.
- Page 6 8: Press SET Your Day-of-Week segment is stored and the currently stored Kh value flashes. 9: Press OR Press-and-Hold Set your meter’s Kh Factor. Each button press increases or decreases the Kh value by 0.1. Press-and-hold to change the value by increments of 1.0. If you have an electromechanical meter, enter 7.2.
- Page 7 SETUP SEQUENCE - Tiered Rate Mode 10: Press SET Your Kh value is stored. “1” is displayed under Rate, and the currently stored value for Rate 1 flashes next to the ¢/kWh segments. 11: Press Set your first electricity rate This is generally the lowest rate on your bill.
-
Page 8: Display Functions
Display Functions This is a short description of the Display Unit functions. For a full description of each function, please read Section 7 in the User Guide. CHANGING THE TEMPERATURE DISPLAY FORMAT Press ˚C/˚F This button changes the temperature display from degrees Celsius (˚C) to degrees Fahrenheit (˚F) and vice-versa. - Page 9 Toll Free: (877) 766-5412 P/N: BLI-00195 Rev2 © BlueLine Innovations Inc. PowerCost Monitor™ is a trademark of BlueLine Innovations Inc.
Need help?
Do you have a question about the PowerCost Monitor and is the answer not in the manual?
Questions and answers