Table of Contents
Advertisement
Advertisement
Table of Contents

Related Manuals for AgLand Macerator 6620

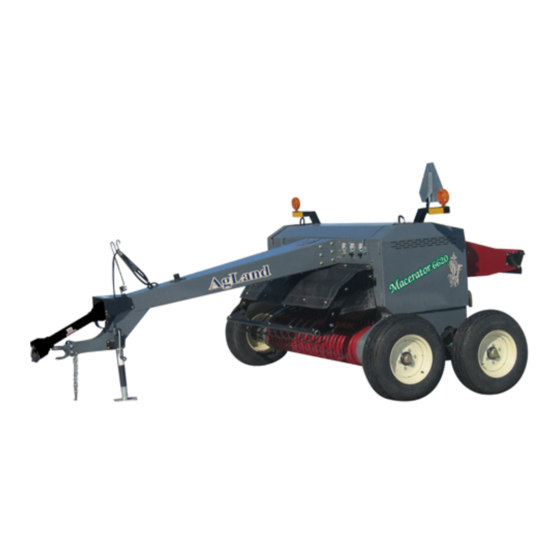
Summary of Contents for AgLand Macerator 6620
- Page 1 2009 Macerator Macerator 6620 6620 Operator’s Manual June 2009...
- Page 2 B o x 4 7 9 A r b o r g M B , R 0 C 0 A 0 Serial number of the machine. The serial number is important in identifying your machine. It Macerator 6620 Model #: contains information for ordering replacement parts and op-...
-
Page 3: Table Of Contents
Contents Warranty Registration Form ............................3 Introduction ..................................5 Safety .................................... 6–7 Transport Safety ....................................6 Operating Safety ....................................Operating Safety ....................................Operating Safety Hydraulic Safety ..................................... 7 Air Safety ........................................ Air Safety ........................................ Air Safety Safety Decals ..................................8 Specifi... -
Page 5: Warranty Registration Form
Schedule in Operator’s Manual). AgLand will not be liable for the cost of shipping or any other cost incurred for replacement or repair of any parts. AgLand is not liable for any accidents which may occur from or during the operation of the Macerator 6620, or damage incurred due to Mac- erator failure. -
Page 7: Introduction
Introduction Congratulations, you have just purchased the new and improved AgLand Macerator 6620. To get the maximum benefi t from your Macerator we suggest that you read this manual carefully. The Macerator is designed to condition hay for a super... -
Page 8: Safety
Safety Signal Words Read this manual completely and understand all oper- ating instructions and precautions BEFORE attempting DANGER to operate or service your machine. The safety information given in this manual does not re- place safety codes, insurance needs, or state/province DANGER: Indicates an imminently hazardous situation and local laws. -
Page 9: Operating Safety
Safety Hydraulic Safety ▪ Ensure that all components in the hydraulic system are kept in good condition. ▪ Replace any worn, cut, abraded, fl attened, or crimped hoses and/or metal lines. ▪ Do not attempt any poorly executed repairs to hy- draulic lines, fi... -
Page 10: Safety Decals
Safety Decals Moving Parts Hazard High Pressure Fluid Hazard Keep Shields and Guards in Place... -
Page 11: Specifi Cations
Specifi cations AgLand Macerator Model 6620 Dimensions Air System Overall Width 10’6” (3.20 m) Size of air pressure tank 12 US Gallon (45 L) Length 11’4” (3.45 m) Maximum air pressure in tank 120 PSI (827.4 kPa) Height operation 3’6” (1.07 m) Hydraulic outlets required transport 5’6”... -
Page 12: Assembly
Assembly Attaching Hitch A. Override Clutch Sometimes the hitch will be shipped detached from the B. Drive Shaft unit to allow for a more compact shipping package. C. Front Hitch Bearing D. A Frame Cover (Back) Bolt hitch to main frame, Figure 1, using fourteen E. -
Page 13: Assembly (Attachments)
Assembly (Attachments) Moldboard Merger Attach left hand (L/H) moldboard attachment brack- Moldboard Sheet Installation et (A) to the moldboard main frame (B) and attach Install short moldboard (L) to outside portion of small main frame to quick attach bracket (C - already in- frame (G) using 5/16”... -
Page 14: Spreader
Assembly (Attachments) Spreader Attachment The spreader attachment allows the Macerator to spread Mount defl ector fi ns (F) to top plate (B) using 3/8” a wider swath and leave a thinner layer on the fi eld for x 3/4” bolts (G) and washers, lock washers, and greater sun and wind exposure. -
Page 15: Windrower
Assembly (Attachments) Windrower Attachment Mount the other side bracket (F) to side panel (K) The windrower attachment allows you to direct the cut hay with 3/8” x 3/4” bolts. down to keep a tighter narrow windrow, or up for a wider swath width. - Page 16 Assembly (Attachments) Tedder Attachment Item No. Stock No. Description Qty. 800165 Bolt, Standard, NC, 1/2” x 1-1/2” 800166 Bolt, Standard, NC, 1/2” x 1-1/4” 800167 Bolt, Standard, NC, 1/2” x 1-3/4” 800190 Bolt, Standard, NC, 3/4” x 2” 800191 Bolt, Standard, NC, 3/4” x 2-1/2” 800233 Nut, Standard, NC, 1/4”...
-
Page 17: Tedder
Assembly (Attachments) Tedder Attachment Item No. Stock No. Description Qty. 800321 Coupler, 1-3/8” 801682 Tedder, Daros (Rossi) 801818 Pin, Lynch, 7/16” 801820 Pin, Hitch, R, 1/8” x 2-5/8” 804196 Nut, Standard, NC, 1/2” 804199 Nut, Standard, NC, 3/4” 804367 Washer, Lock, Spring, 1/2” Gr. 8 804369 Washer, Lock, 3/4”... -
Page 18: Tedder Hydraulics
Assembly (Attachments) Tedder Attachment Hydraulics... - Page 19 Assembly (Attachments) Tedder Attachment Hydraulics Item No. Stock No. Description Qty. 802478 Hydraulic Hose, 24" 801820 Pin, R, 1/8" 802474 Valve, Check 802482 Elbow, Hydraulic 802484 Tee, Hydraulic 802485 Tee, Hydraulic 802486 Adapter, Hydraulic 802836 Valve Body 804099 Quick Coupler 807055 Pin, Clevis 808785...
-
Page 20: Field Set Up
Reinsert pin and lock in place. Steel Roll Adjustment For best results adjust the Macerator 6620 for your specif- ic fi eld conditions. The smaller the gap between the steel serrated rolls, the more aggressive the maceration of the hay will be. -
Page 21: Preparation (Air System)
Field Set Up Preparation (Air System) If there is too much leaf loss or the plants are crushed too intensely, lower the air pressure. The purpose of the air system on the Mac- If there is not enough maceration, increase pressure erator 6620 is to keep continuous pres- to the rolls by increasing the air pressure. -
Page 22: Maintenance
Maintenance Checklist First Time Use □ Tighten hub bolts A–E* after the fi rst one (1) hour of CAUTION operation and repeat procedure after ten (10) hours and fi fty (50) hours. *Important Use Good Safety Practices When Hubs A - tighten to 60 ft-lbs Working On This Machine Hubs B - tighten to 30 ft-lbs Before doing any maintenance or service on the ma-... -
Page 23: Roll Drive Belt Replacement
Maintenance Roll Drive Belt Replacement Replace worn or damaged belts as follows: Raise Macerator and secure travel safety pin, see page 6. To remove belts (A) loosen and turn fl attened bolt (B) counter-clockwise. To remove belts (C) loosen 4 bolts (D), then loosen bolt (E) and slide roll forward.* To remove belt (F) loosen bolt (G) behind tightener, then loosen bolt (H) and slide tightener forward. -
Page 24: Bearing Replacement
Maintenance Bearing Replacement Wheel Bolt Sealed ball bearings are held in position on the shaft by Spindle Spindle a locking collar, Figure 1, which is rotated to lock the as- Washer Washer sembly on the shaft and secured by a set screw. To re- Hub Cap move bearing: Loosen set screw. -
Page 25: Inch Torque Chart For Bolts And Nuts
Maintenance Inch Torque Chart for Bolts and Nuts Metric Torque Chart for Bolts and Nuts Standard Torque Requirements Foot-Pounds Standard Torque Requirements Foot-Pounds Use this chart as a guide when tightening bolts/nuts Use this chart as a guide when tightening bolts/nuts which do not have special torque requirements. -
Page 26: Lubrication
Lubrication General Information A NLGI No. 2 multi-purpose high temperature lithium base grease is recommended. Use a manual grease gun for all greasing. Air powered grease guns may damage the seal on the bearings. Wipe all grease fi ttings with a clean cloth before greasing to avoid injecting dirt or grit in the bearings. -
Page 27: Belts
Belts Reference Part Number Description Drive Qty. 806943 5-5VX800 Bottom Steel Roll 802922 BX-54 Pickup 806942 3-5VX630 Top Rubber Roll 802911 5VX450 Top Steel Roll 802917 BX-36 Bottom Rubber Roll Left Side Left Side Right Side... -
Page 28: Optional Kits
Optional Kits The following is a list of the Optional Kits for the Macerator, please contact your Dealer for availability and pricing. Kit Number Description K107 Gathering Wheels Kit K6005 Tooth Clamp Kit K6008 Alfalfa Roll Speed Kit K6009 Air Regulator Kit K6010 Hitch Clevis Kit K6012... -
Page 29: Troubleshooting
Troubleshooting Problem Possible Cause Solution Pickup is skipping swath or not ▪ Missing or broken pickup teeth. ▪ Replace missing teeth. picking cleanly. ▪ Pickup too high. ▪ Adjust pickup height. ▪ Driving too fast for pickup speed. ▪ Use lower tractor gear with higher RPM. -
Page 30: Warranty
All warranties are subject to legislation of the state or province in which the Macerator is sold. AgLand will not be responsible or liable for any of the following: damage or loss due to the improper, or lack of, use of the a) The return of any part or parts, or the Macerator as a whole, safety tow chain or transport lock pin during transport;...
Need help?
Do you have a question about the Macerator 6620 and is the answer not in the manual?
Questions and answers