Table of Contents
Advertisement
Quick Links
Advertisement
Table of Contents

Related Manuals for Vex Robotics VEX IQ

Summary of Contents for Vex Robotics VEX IQ
- Page 1 Control System User Guide Bedienungsanleitung für die Steuerung...
-
Page 2: Table Of Contents
Table of contents Inhaltsverzeichnis Charge & Install Batteries Batterien laden und einsetzen..............4 Robot Battery Charging & Usage Laden und Verwenden der Robot Brain Batterie..................4 Controller Battery Charging & Usage Laden und Verwenden der Fernsteuerungsbatterie................7 Install Radios & Pair Controller Funkverbindung herstellen..............9 Radio Installation &... - Page 3 Dich auf allen Lernschritten mit dem way as you learn how use VEX IQ! VEX IQ begleiten. Du findest mich an den Rändern - Watch for me on the sidelines - I’ll try to ich stehe dort mit Tipps und Tricks bereit, die Dir offer some tips and tricks that should helfen, wenn es mal kompliziert wird.
-
Page 4: Charge & Install Batteries Batterien Laden Und Einsetzen
Charge & Install Batteries Batterien laden und einsetzen 1.1 Robot Battery Charging & Usage 1.1 Laden und Verwenden der Robot Brain Batterie There are two options for powering the Robot Brain – the Robot Es gibt zwei Möglichkeiten, das Robot Brain mit Strom zu versor- Battery (228-2604) and the Robot AA Battery Holder (228-3493). - Page 5 Robot AA Battery Holder Usage Verwendung des AA-Batteriehalters The Robot AA Battery Holder uses six (6x) 1.5v AA battery cells In den AA-Batteriehalter des Robot Brain müssen sechs (6x) (not included) to power the Robot Brain (228-2540). You can use AA-Batteriezellen mit je 1,5 V (nicht enthalten) eingelegt werden, either rechargeable or non-rechargeable AA batteries but do not um das Robot Brain (228-2540) zu versorgen.
- Page 6 Installing Robot Battery Einlegen der Batterie Orient the Robot Battery or Robot AA Battery Holder to match Richte die Robot Brain Batterie oder den AA-Batteriehalter so aus, the illustration image below and slide the Robot Battery into the wie in der Abbildung unten gezeigt und schiebe die Batterie dann Robot Brain - listen for a click to ensure the Robot Battery is fully in das Robot Brain - wenn sie richtig eingelegt wird, rastet sie mit inserted.
-
Page 7: Controller Battery Charging & Usage
1.2 Controller Battery Charging & Usage 1.2 Laden und Verwenden der Fernsteue- rungsbatterie The Controller (228-2530) is powered by the Controller Battery (228-2779). The Controller Battery is a rechargeable 3.7v 800 mAh Die Fernsteuerung (228-2530) wird durch eine eigene Batterie Li-Ion battery cell, and is charged inside the Controller. - Page 8 Charging Controller Battery Optional Charging Method Plug the Controller into a USB port on your computer using the The Controller Battery will also charge when it is connected to the USB Cable. The Controller will immediately begin charging. Robot Brain using the Tether Cable and the Robot Brain is powered The recommended method for fully charging the Controller Optionale Methode zum Laden Battery is to use the USB Cable.
-
Page 9: Install Radios & Pair Controller Funkverbindung Herstellen
Install Radios & Pair Controller Funkverbindung herstellen 2.1 Radio Installation and Removal 2.1 Einsetzen und Entfernen des Funkmoduls The Controller and Robot Brain wirelessly communicate with each Fernsteuerung und Robot Brain kommunizieren drahtlos über eine other using a pair of either 900 MHz Radio or 2.4 GHz Radio. The Funkverbindung mit entweder 900 MHz oder 2,4 GHz. -
Page 10: Pairing Robot Brain & Controller
2.2 Pairing Robot Brain and Controller 2.2 Verbinden von Robot Brain und Fern- steuerung Before first use, the Robot Brain and Controller must be paired to each other to enable wireless communication. Vor der ersten Benutzung müssen Robot Brain und Fernsteuerung Ensure both the Robot Brain and Controller are powered off with verbunden werden, damit die drahtlose Kommunikation aufgebaut the same type of Radio (either 900 MHz or 2.4 GHz) in each one. -
Page 11: Connecting Smart Devices Sensoren Und Aktoren Anschließen
Connecting Smart Devices Sensoren und Aktoren anschließen 3.1 Smart Device Ports 3.1 Smart Ports - Anschlüsse für Sensoren und Aktoren Any Smart Motor or Sensor can be plugged into any port. For more information on which Smart Device should be plugged into which port for the Built In Programs please see section 6 Jeder Smart Motor und jeder Sensor kann mit jedem Anschluss verbunden werden. -
Page 12: Smart Device Overview
3.2 Smart Device Overview Bumper Switch 3.2 Übersicht der Sensoren und Aktoren Druckschalter Not every sensor is in every kit. Nicht jeder Sensor ist in jedem Kit enthalten. Press to Activate Smart Motor Drücken zum Aktivieren Smart Motor Motor Output Wellenaufnahme 228-2677 Bumper Switches give the Robot Brain a signal when they are pres-... -
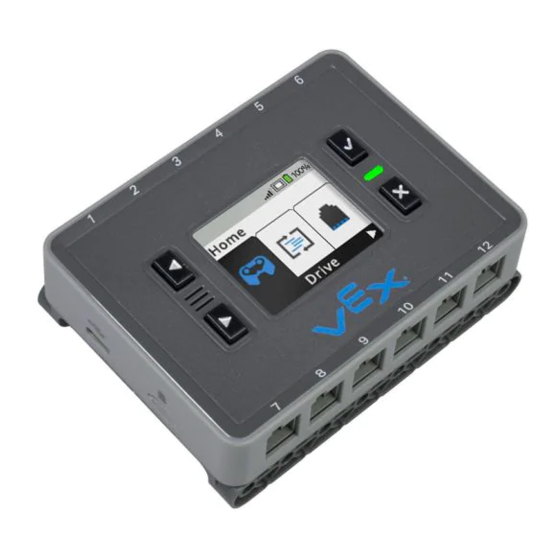
Page 13: Using The Robot Brain
Using the Robot Brain Verwendung des Robot Brain 4.1 Robot Brain and LED Lights Overview 4.1 Übersicht Robot Brain und LEDs Battery low with BLINKING Radio Slot radio link Check Button Funk-Slot BLINKT Batterie schwach Check-Knopf mit Funkverbindung LCD Screen LED Status LCD-Display Battery low with... -
Page 14: Using The Controller Verwendung Der Fernsteuerung
Using the Controller Verwendung der Fernsteuerung 5.1 Controller and LED Lights Overview The farther the joysticks are moved in one direction, the faster the motor will spin. 5.1 Übersicht Fernsteuerung und LEDs Je weiter die Joysticks in eine Richtung bewegt werden, desto schneller dreht der Motor. -
Page 15: Using Built In Programs
Using Built in Programs Verwendung der integrierten Programme 6.1 Driver Control Program 6.1 Fernsteuerungsprogramm The Driver Control program allows you to drive the Clawbot IQ and Das Fernsteuerungsprogramm ("Driver Control") ermöglicht Dir, den Standard Drive Base, as well as robots and mechanisms of your own Clawbot IQ und das Standard-Fahrwerk, sowie selbst aufgebaute creation, using the Controller. - Page 16 In Right Stick mode, the Drive 2 Joystick Mode Left Stick Drive and Turn controls are switched 2-Joystick-Modus Steuern mit linkem to the right joystick. Joystick Im Modus mit dem rechten Joy- stick werden die Steuerungen für Antrieb und Drehung auf den rechten Joystick gelegt.
-
Page 17: Autopilot Program Autopilot-Programm
6.2 Autopilot Program Gyro Sensor Color Sensor Gyro-Sensor Farbsensor 6.2 Autopilot Programm Touch LED Distance Sensor Touch LED Abstandssensor Right Drive Motor Left Drive Motor Rechter Antriebsmotor Linker Antriebsmotor The Autopilot program works only with the Autopilot robot. For building instructions see: Das Autopilot-Programm arbeitet nur mit dem Autopilot-Roboter. -
Page 18: Robot Brain Screen Menus
6.3 Robot Brain Screen Menus 6.3 Bildschirm-Menüs des Robot Brain “Driver “Run” Control” „Starten“ „Fahrer- Steue- rung“ Status Up/Down “Settings” Screen 1 Button “Configure” Status-Me- Aufwärts/Abwärts („Konfigurieren“) Knopf nü 1 Status Up/Down Screen 2 Button “System Info” This screen allows you to reverse motors in the Aufwärts/ Status-Menü... -
Page 19: Firmware Update & Programming Firmware-Aktualisierung Und Programmierung
Systemleistung verbessern. Das korrekte Funktionieren des VEX-IQ-Systems sicherst Du am The best way to ensure your VEX IQ system is functioning properly is to keep your firmware up to date. You can update the firmware besten, wenn Du die Firmware auf dem neuesten Stand hältst. Du on all of these devices by downloading the free VEX IQ Firmware kannst die Firmware auf allen diesen Geräten aktualisieren, indem... -
Page 20: Appendix A: Battery Safety Information
Mal darauf hinweisen, wie die Batterie korrekt gehandhabt wird. children how to use the battery correctly during all usages. - Die Batterie sollte nur von Erwachsenen aus dem VEX IQ Robot Brain (228- - Avoid letting children take the battery out of the VEX IQ Robot 2540) oder dem Ladegerät (228-2743) entnommen werden. - Page 21 Mal darauf hinweisen, wie die Batterie korrekt gehandhabt wird. Die Bat- children how to use the battery correctly during all usages. terie sollte nur von Erwachsenen aus dem VEX IQ Robot Brain (228-2540) Avoid letting children take battery out of VEX IQ Robot Brain entnommen werden.
-
Page 22: Appendix B Compliance Statements Anhang B: Konformitätserklärungen
Greenville, Texas 75402, U.S.A. ©2014 VEX Robotics, Inc. All rights reserved. Patent(s) Pending. All other product names referenced herein are trademarks of their respective companies. ©2014 VEX Robotics, Inc. Tous droits réservés. En attente de brevet. Tout les autres noms de produit référencés ici sont les marques déposées des sociétés respectives. - Page 23 Sensor Calibration Sensorkalibrierung 0° 180° 100%...
- Page 24 Control System User Guide Bedienungsanleitung für die Steuerung Ages 8+ Alter: ab 8 228-3427-750 Rev15 www.vexiq.com...
Need help?
Do you have a question about the VEX IQ and is the answer not in the manual?
Questions and answers