Table of Contents
Advertisement
Advertisement
Table of Contents

Related Manuals for Reka DB-1005


Summary of Contents for Reka DB-1005
- Page 2 Table Of Contents Table Of Contents Overview Scope Of Delivery Components General Information Reading And Storing The User Guide Intended Use Explanation Of Symbols Safety Explanation Of Instructions General Safety Instructions Product Description Description Setup Connecting The Power Adaptor Installing Batteries Turning On For The First Time Power States Power On...
-
Page 3: Table Of Contents
Table Of Contents Table Of Contents DAB Menu - Preset DAB Menu System Settings Changing The FM Channel FM Information FM Menu FM Menu - Scan Setting FM Menu - Audio Setting FM Menu - Preset FM Menu - System Settings Bluetooth Bluetooth Controls Bluetooth Menu... - Page 4 Table Of Contents Table Of Contents Language Factory Reset Software Version Charging A Device Inserting A Mobile Phone Product Care Storing Cleaning Trouble Shooting Technical Data Declaration Of Conformity Disposal Disposing Of The Packaging Disposing Of The Device Copyright © 2020 Thunderbolt Photography, Richard Ross. All rights reserved. All Photos and Illustrations may not be reproduced or used in any manner whatsoever without the express written permission of the copyright holder.
- Page 5 Overview Overview Congratulations! You have made an excellent choice with the purchase of this quality REKA product. ® By doing so you now have the assurance and peace of mind which comes from purchasing a product that has been manufactured to the highest standards of performance and safety, supported by the high quality standards of Quesh Ltd.
- Page 7 General Information General Information This user guide is based on the standards and regulations that are valid within the European Union. Also the country specific directives and laws outside of the EU. Reading and storing the user guide This user guide belongs to this Rugged DAB Radio (referred to as the “product”...
- Page 8 General Information Explanation of symbols The following symbols are used on the product and packaging: This symbol indicates additional information on the assembly or operation of the product. This symbol refers to the declaration of conformity. Products marked with this symbol meet all the applicable community regulations of European economic area.
- Page 9 Safety Safety Explanations of instructions The following symbols and signal words are used in this user guide. This symbol denotes situations that could cause WARNING! injury to yourself or others. This symbol denotes situations that could cause CAUTION! damage to the product or equipment as well as possible injury to yourself.
- Page 10 Safety General Safety Instructions Please read this important safety information before you use this product. The following warning and caution information is to prevent injury to yourself or others and to prevent damage to your product or equipment. WARNING! Risk of electric shock! Failure to comply with safety warnings and regulations can cause serious injury or death.
- Page 11 Safety WARNING! Risk of electric shock! Failure to comply with safety warnings and regulations can cause serious injury or death. • Avoid exposing your product to very cold or very hot temperatures. Extreme temperatures can damage the product and reduce the charge capacity of any installed battery. • DO NOT directly connect the positive and negative terminals. Doing so will cause the product to malfunction. ...
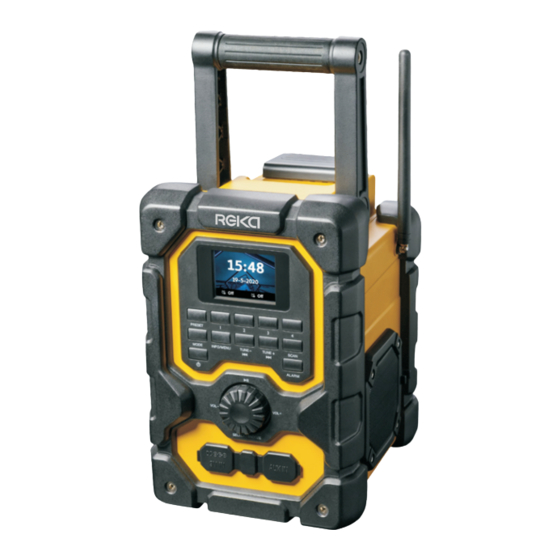
- Page 13 Product Description Description Storage Bay Cover Battery Bay Clasp Mobile Device Holder 5V/1A USB Charge Port...
- Page 14 Setup Setup Check contents before first use to ensure you get the best experience of the product out of the box. Connecting The Power Adaptor To power the radio correctly, you will need to use the supplied 9V/2A mains adaptor. Connect the main adaptor to a suitable mains power outlet making sure the main outlet is switched off.
- Page 15 Setup Installing Batteries This radio can also be powered by 6 x ‘C’ size batteries (not included) for limited portable use. Lift the clasp and unhook it from the main body of the radio. Lower the storage bay cover to access the battery bay cover .
- Page 16 Setup ‘C’ Type Insert 6 x ‘C’ type batteries in the correct orientation matching the terminals indicated on the battery bay moulding. Line up the tabs of the battery bay cover to the tab hole below the battery bay. Raise the battery cover until both tabs click into place and lock battery bay cover into place securely.
- Page 17 Setup Raise the storage bay cover into the upright position. Lift the clasp over the main body of the radio and hook it in place before pushing the clasp down to lock and secure the storage bay cover DO NOT leave batteries in the radio for long term storage. Battery life can last up to 8 hours depending on volume output.
- Page 18 Setup Turning On For The First Time When the radio has been supplied with power and the aerial is in the upright A 13 position, give the button a quick press to turn it on. The radio will show a system splash screen and automatically begin scanning for the available DAB channels.
- Page 19 Power States This radio has a standby mode feature in addition to the power on and off states. Power On To turn the radio on, give the A 13 button a quick press. You will see the system splash screen as the radio boots up followed by the last station played or the first alphabetically listed DAB station if the radio has been left without power for a long period.
- Page 20 Standby When the radio is on and playing, give the A 13 button a quick press to enter standby mode. A state change splash screen will appear to indicate the radio has changed power state to standby before displaying the standby clock screen. A 13 To bring the radio out of standby mode, give the button a quick press.
- Page 21 Changing Mode This radio features 4 different modes: DAB, FM, Bluetooth and AUX. To change between the modes give the ‘MODE’ button a quick press. The white square and text at the bottom of the screen will indicate which mode you have currently selected.
- Page 22 Changing The DAB Channel When the radio is on and playing in DAB mode, you can change the channel by A 10 A 11 giving the ‘TUNE +’ or ‘TUNE -’ a quick press to enter the station list. Press the ‘TUNE +’ A 10 to move up the station list and press ‘TUNE -’...
- Page 23 Preset There are 10 banks to save and recall presets for both DAB and FM stations. The first method uses the ‘PRESET’ button and the second method uses the quick preset buttons ‘1’ , ‘2’ , ‘3’ and ‘4’ Preset - Method 1 To SAVE a station to a preset slot, first tune the radio into a station you want to save.
- Page 24 Preset - Method 2 For convenience, this radio features 4 quick preset buttons. Each button corresponds to a number matching preset slot. To SAVE a station to 1 of the 4 numbered preset slots, first tune the radio into a station you want to save.
- Page 25 DAB Information You can cycle through the various information options by giving the ‘INFO/MENU’ a quick press. The screen will cycle through: Now Playing, Genre, Region, Frequency, Signal Strength, Data Rate, Power Type and Date. Now Playing Genre Region Frequency Signal Strength Data Rate Power Type...
- Page 26 DAB Scan A 12 The ‘SCAN’ button will automatically perform a full scan and refresh the DAB station list. To perform a full scan give the ‘SCAN’ A 12 button a quick press. When the scan is complete, the radio will start to play the first available channel listed alphabetically in DAB mode.
- Page 27 DAB Menu - Station List This option will display the station list on the screen. Press the ‘TUNE +’ A 10 to move up the station list and press ‘TUNE -’ A 11 move down the station list or rotate the ‘MFD’ A 15 .
- Page 28 DAB Menu - Manual Tune This option will allow you to retune to an individual local frequency without performing a full scan. Using this feature can help clear up a poor signal or interference without affecting the rest of the station list. To do this you will need to tune to the radio station you want to retune so it is playing.
- Page 29 DAB Menu - Prune Invalid This option will remove stations from the station list that may not be broadcasting anymore or the radio is unable to receive a signal from a local station because the radio has been moved out the stations broadcasting range. These stations will show up in the station list with a ’?’...
- Page 30 DAB Menu - DRC Dynamic Range Control (DRC) reduces the difference between quiet and loud audio producing a near constant volume level. On the ‘Digital Radio’ menu the current DRC mode in use will be displayed next to ‘DRC’ option in orange. To change the mode select ‘DRC’...
-
Page 31: Dab Menu - Preset
DAB Menu - Preset Selecting this option with show a further 2 choices. To RECALL a saved preset, rotate the ‘MFD’ A 15 so that ‘Preset Recall’ is highlighted in white then give the ‘MFD’ A 15 a quick press. A 15 Rotate the ‘MFD’... -
Page 32: Dab Menu System Settings
DAB Menu - System Settings Select this option to change various system settings. See page 42, System Settings. Changing The FM Channel When the radio is in FM mode (see page 17, Changing Mode), to change the station in A 10 A 11 FM mode, press and hold either ‘TUNE +’... -
Page 33: Fm Information
FM Information You can cycle through the various information options by giving the ‘INFO/MENU’ a quick press. The screen will cycle through: Radio Text, PTY, Name, Stereo/Mono, Power Type and Date. Radio Text Name Stereo/Mono Power Type Date PTY: Programme Type. -
Page 34: Fm Menu
FM Menu The radio has several features to assist and manage the FM function. To access the FM menu option, press and hold the ‘INFO/MENU’ button until the screen displays the FM menu list. Current selected option states are highlighted in orange. Rotate the ‘MFD’... -
Page 35: Fm Menu - Scan Setting
FM Menu - Scan Setting This setting will control the how the radio interacts with the available radio signals. Select ‘Scan Setting’ to change between ‘Strong Stations Only’ and ‘ A ll Stations’. A 15 Rotate the ‘MFD’ to cycle through the available menu options. To select an A 15 option, make sure the option is highlighted in white then give the ‘MFD’... -
Page 36: Fm Menu - Audio Setting
FM Menu - Audio Setting This setting will control the how the radio process the audio output from the radio signals. Select ‘Scan Setting’ to change between ‘Stereo Allowed’ and ‘Forced Mono’. A 15 Rotate the ‘MFD’ to cycle through the available menu options. To select an option, make sure the option is highlighted in white then give the ‘MFD’... -
Page 37: Fm Menu - Preset
FM Menu - Preset Selecting this option with show a further 2 choices. To RECALL a saved preset, rotate the ‘MFD’ A 15 so that ‘Preset Recall’ is highlighted in A 15 white then give the ‘MFD’ a quick press. A 15 Rotate the ‘MFD’... -
Page 38: Fm Menu - System Settings
‘Paired Device’ list. To pair a new device, make sure your device’s bluetooth function is turned on. Check the ‘ A vailable Devices’ list for ‘REKA AUDIO’ and select it. The pairing will automatically begin. Once successful the screen will show ‘Connected’. -
Page 39: Bluetooth Menu
Bluetooth Menu To access the Bluetooth menu option, press and hold the ‘INFO/MENU’ button until the screen displays the FM menu list. This is only one option available. Give the A 15 ‘MFD’ a quick press to access the System Settings. See page 42, System Settings. This radio features a 3.5mm stereo auxiliary port for wired convenience. -
Page 40: Aux Menu
AUX Menu To access the AUX menu option, press and hold the ‘INFO/MENU’ button until the screen displays the AUX menu list. This is only one option available. Give the ‘MFD’ A 15 a quick press to access the System Settings. See page 42, System Settings. Alarm A 14 This radio features 2 alarms that can be set. - Page 41 A circled tick will indicate the option in use for the alarm. A 15 Next, to set is the wake up time. Rotate the ‘MFD’ so that the ‘Wake Up time’ A 15 option is highlighted in white then give the ‘MFD’ a quick press.
- Page 42 Next, set the source used for the alarm sound. Rotate the ‘MFD’ A 15 so that ‘Source’ A 15 is highlighted in white an give the ‘MFD’ a quick press. The option currently select is indicated in orange. A 15 Rotate the ‘MFD’...
- Page 43 The preset list for either DAB or FM will be displayed under ‘Last Listened’ depend- A 15 ing on the previously selected source. Rotate the ‘MFD’ to cycle through the A 15 options. When your preferred choice is highlighted in white an give the ‘MFD’ quick press.
- Page 44 A circled tick will indicate the option in use for the alarm. The Final step is to set the volume for the alarm. Rotate the ‘MFD’ A 15 so that ‘Volume’ is highlighted in white and give the ‘MFD’ A 15 a quick press.
-
Page 45: Turning Off The Alarm
Turning Off The Sounding Alarm A 13 To turn off the alarm give the button a quick press. This will turn the radio back on to standby mode and stop the sounding alarm. Snoozing The Alarm This feature allows you to delay the alarm for a short amount of time, A 15 When the alarm is sounding, give the MFD’... -
Page 46: Settings
Settings Settings The ‘System Settings’ menu is access in all modes under by accessing menu via pressing and holding the ‘INFO/MENU’ button and selecting ‘System Settings’. Sleep This function will turn the radio off after a selected amount of time. Give the ‘MFD’... - Page 47 Settings Once the sleep function is active a purple clock icon and a moon icon will appear on the main screen. The number next to moon icon will show the countdown in minutes. The Sleep splash screen will briefly appear before the radio changes state to standby after the count down reached 0.
-
Page 48: Equaliser
Equaliser This feature controls the way the audio is modified by the radio for a preferred tone. Rotate the ‘MFD’ A 15 to cycle through the options until ‘Equaliser’ is highlighted in white and give ‘MFD’ A 15 a quick press. The current EQ in use is indicated in orange. The radio features one customisable setting in addition to the EQ presets. -
Page 49: Equaliser - My Eq Setup
Settings A 15 Rotating the ‘MFD’ so your preferred option is highlighted in white then give A 15 the ‘MFD’ a quick press. The circled tick will indicate which option is currently in use. Equaliser - My EQ Setup This feature will allow you to programme a custom EQ profile for your radio. A 15 Rotate the ‘MFD’... -
Page 50: My Eq Setup - Treble And Base
Settings My EQ Setup - Treble And Base A 15 Both the ‘Treble’ and ‘Bass’ use a scale of -7 to +7. Rotate the ‘MFD’ to cycle through the options. Once your selection is highlighted in white and give ‘MFD’ A 15 a quick press. -
Page 51: Time/Date
Settings Time/Date This option will allow how the radio’s date and time to be set and presented. Rotate the ‘MFD’ A 15 so that ‘Time/Date’ is highlighted in white and give ‘MFD’ A 15 a quick press. Time/Date - Set Date/Time This option will allow how the radio’s date and time to be set and presented. -
Page 52: Time/Date - Auto Update
Settings Time/Date - Auto Update This option will allow the radio to use a specific source to automatically set the date and time. A 15 Rotate the ‘MFD’ so that ‘ A uto Update’ is highlighted in white and give ‘MFD’ A 15 a quick press. -
Page 53: Time/Date - Set 12/24 Hour
Settings Time/Date - Set 12/24 Hour This option will show the time in either 12 or 24 hour format. Rotate the ‘MFD’ A 15 so that ‘Set 12/24 Hour’ is highlighted in white and give ‘MFD’ A 15 a quick press. The current option in use is shown in orange. A 15 Rotate the ‘MFD’... -
Page 54: Time/Date - Date Format
Settings Time/Date - Date Format This option will show the time in either 12 or 24 hour format. A 15 Rotate the ‘MFD’ so that ‘Set Date Format’ is highlighted in white and give ‘MFD’ A 15 a quick press. The current option in use is shown in orange. A 15 Rotate the ‘MFD’... -
Page 55: Time/Date - Clock Style
Settings Time/Date - Clock Style This option will change the type of clock and screen used on the standby screen. Rotate the ‘MFD’ A 15 so that ‘ A uto Update’ is highlighted in white and give ‘MFD’ A 15 a quick press. -
Page 56: Backlight
Settings Normal Digital Big Digital Classic Analogue Modern Analogue Backlight This option will change how bright the active and inactive main and standby screen are as well as the time timeout period to change between them. A 15 Rotate the ‘MFD’ so that ‘Backlight’... -
Page 57: Backlight - Timeout
Settings Backlight - Timeout This option will change the time period on which the screen brightness level will change between the active and inactive screen. Rotate the ‘MFD’ A 15 so that ‘Timeout’ is highlighted in white and give ‘MFD’ A 15 a quick press. -
Page 58: Backlight - On Level
Settings Backlight - On Level This option will change the screen brightness of the active screen. Rotate the ‘MFD’ A 15 so that ‘On Level’ is highlighted in white and give ‘MFD’ A 15 a quick press. The current option in use is shown in orange. A 15 Rotate the ‘MFD’... -
Page 59: Backlight -Dim Level
Settings Backlight -Dim Level This option will change the screen brightness of the inactive screen. Rotate the ‘MFD’ A 15 so that ‘On Level’ is highlighted in white and give ‘MFD’ A 15 a quick press. The current option in use is shown in orange. A 15 Rotate the ‘MFD’... -
Page 60: Inactive Standby
Settings Inactive Standby This feature controls when radio changes mode to standby if it is left inactive. Rotate the ‘MFD’ A 15 to cycle through the options until ‘Inactive Standby’ is A 15 highlighted in white and give ‘MFD’ a quick press. The current option in use is indicated in orange. -
Page 61: Language
Settings Language This feature controls what language the radio presents the functions and menu A 15 options are in. Rotate the ‘MFD’ to cycle through the options until ‘Language’ is A 15 highlighted in white and give ‘MFD’ a quick press. The current option in use is indicated in orange. -
Page 62: Factory Reset
Settings Factory Reset A 15 This feature will reset the radio to factory defaults. Rotate the ‘MFD’ to cycle A 15 through the options until ‘Factory Reset’ is highlighted in white and give ‘MFD’ quick press. A 15 Rotate the ‘MFD’ to cycle through the ‘yes’... -
Page 63: Charging A Device
Charging A Device Charging A Device This radio features a USB 5V/1A out port and mobile phone holder in the rear compartment. Please check your devices charge requirements before using to avoid possible damage to your device or this product. Inserting A Mobile Phone Lift the clasp and unhook it from the main body of the radio. - Page 64 Insert the mobile device into the holder making sure the charge port is facing up. Using the USB charge cable provided by the device’s manufacturer, insert the USB cable to the USB 5V/1A out port . Insert the other end of the cable to the charge port of your device.
- Page 65 INTENTIONALLY LEFT BLANK...
-
Page 66: Product Care
Product Care Product Care Please read this important product care information before you store or clean this product. The following information is to prevent damage to your product and to keep it in good working condition. Storing It is recommended for long term storage that you do the following: ... -
Page 67: Trouble Shooting
Trouble Shooting Trouble Shooting Problem Cause Solution Bluetooth dropping out after a • Full device cashe. Manually clear the device’s few minutes. cache & restart the device. • Low power. Replace batteries Stuttering/delay music. • Too many processes Close unused apps. running on device. • Corrupt bluetooth profile. Unpair & delete bluetooth profile, then re-pair device. -
Page 68: Technical Data
Bluetooth Protocol: A2DP, AVRCP, HFP, HID, HSP Bluetooth Range: Bluetooth Name: Reka Audio Declaration Of Conformity Hereby, Quesh Ltd declares that this product is in compliance with: Directive 2014/53/EU. The full text of the EU declaration of conformity is available at the following internet... - Page 69 Disposal Information Disposal Information Packaging recyclenow.com The card used in the packaging is made from widely recycled material. Dispose of the box in the council approved recycle bin. Check with your local authority or at www.recyclenow.com to see which items are collected in your area. Product This product uses 6 x ‘C’...
- Page 70 Warranty Conditions Dear Customer, This warranty offers you extensive benefits: Warranty period: 3 years from the date of purchase. 6 months for wear of parts and consumables under normal and proper conditions of use (e.g. Rechargeable batteries). Costs: Free repair/exchange. Refundable postage cost.
- Page 72 Great care has gone into the manufacturing of this product and it should therefore provide you with years of good service when used properly. In the event of product failure within its intended use of the course of the first 3 years after the date of purchase, we will remedy the problem as quickly as possible once it has been brought to our attention.
Need help?
Do you have a question about the DB-1005 and is the answer not in the manual?
Questions and answers