
Related Manuals for Reka 82981


Summary of Contents for Reka 82981
- Page 1 Portable DAB & FM Sports Radio MODEL NUMBER: 82981 USER GUIDE After Sales Support UK/N.IRELAND HELPLINE N 01270 508538 REP.IRELAND HELPLINE N 1800 995 036 WEBSITE: www.quesh.co.uk EMAIL: enquiries@quesh.co.uk...
-
Page 2: Table Of Contents
Contents Welcome Section 13-16. • FM Mode General Information & Safety • Tune In A Station Instructions • Storing A Preset • Recall A Preset Contents & Features • FM Menu • Scan Setting General Layout • System (See Page 16.) •... -
Page 3: Welcome Section
Welcome Section Congratulations! You have made an excellent choice with the purchase of this quality REKA product. ® By doing so you now have the assurance and peace of mind which comes from purchasing a product that has been manufactured to the highest standards of performance and safety, supported by the high quality standards of Quesh Ltd. -
Page 4: General Information & Safety Instructions
General Information & Safety Instructions Battery Care To get the best out of the battery, fully charge and use until flat for the first 5-6 times. Then use until flat and fully charge at least once a month. Prolonged storage without charge may cause damage to the battery and result in poor to no charge. -
Page 5: Contents & Features
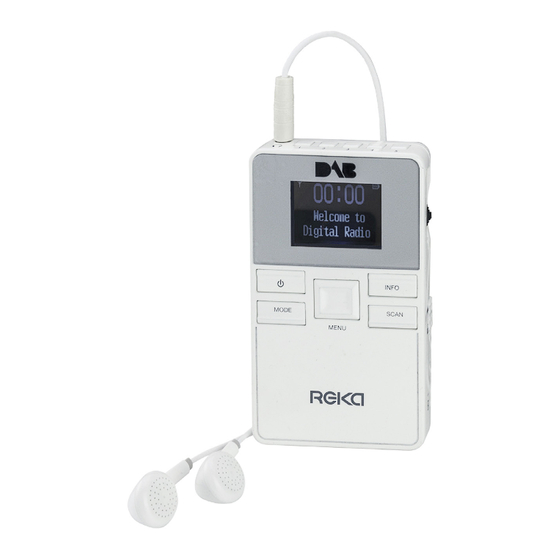
Contents & Features Contents 1 x Pocket DAB & FM Radio 1 x Charge Cable 1 x Headphones 1 x Lanyard Features • Up to 6 hours play time • DAB receiver (174MHz - 240MHz) • FM receiver (87.5MHz - 108.00MHz) •... - Page 6 Layout LCD Screen On/Off/Standby Mode Menu Up/Down/Select Toggle Switch Info Scan Key Lock Micro USB Charge Port Volume - Presets Volume + Headphone Port After Sales Support UK/N.IRELAND HELPLINE N 01270 508538 REP.IRELAND HELPLINE N 1800 995 036 WEBSITE: www.quesh.co.uk EMAIL: enquiries@quesh.co.uk...
-
Page 7: Control Method
Control Method Buttons All the buttons are just a quick press to use unless stated in a process described in this guide. Toggle Switch The general navigation and selection is done with the toggle switch. Push up or down to cycle through options and press the toggle to select a displayed option. -
Page 8: Checking The Adaptor
Checking The Adaptor READ BEFORE USE Adaptor Information Before using a USB mains adaptor please check the “Output” information on the plug face label. For this device 5V/1A or 5V/1000mAh is the maximum output required to charge the battery. Using a stronger output can damage the battery and/or product and void the warranty. -
Page 9: Charging
Charging Charging The Radio Using a 5V/1A USB mains adaptor or a PC or Laptop USB port, connect the charge cable to the USB power output and the micro USB end to the charge port on the radio. It can take approximately 2 hours to fully charge the battery. -
Page 10: Dab
DAB Mode Once the radio is turned on it is usually in DAB mode. If it is not, press the ‘MODE’ button to change the radio to DAB. Tune In A Station All the available stations are displayed in alphabetical order in the station list. -
Page 11: Preset Store
Preset Store You can store up to five DAB stations on this radio. To do this first tune the radio into a station you want to store so it is playing. Next press and hold one of the numbered preset buttons until the screen shows preset stored. -
Page 12: Dab Menu
DAB Menu There are a few options and features available under the DAB menu. To access these press ‘MENU’ once. Using the toggle switch you can cycle through the available options then press down on the toggle to select it. Options: Full Scan >... -
Page 13: Prune
Prune If the radio is only receiving a partial signal but it is strong enough to register in the station list, it will be displayed with a ’?’ at the front of the station name. You can remove these stations from the list with the prune option. -
Page 14: Manual Tune
Manual Tune It is possible to manually tune the DAB function of the radio. To do this you will need to press the ‘MENU’ button and use the toggle switch to navigate and select ‘Manual Tune’. The first screen on this option is the current frequency of the station being played. -
Page 15: Fm Mode
FM Mode Once the radio is turned on it is usually in DAB mode. Press the ‘MODE’ button to change the radio to FM. Tune In A Station Use the toggle switch to cycle through the FM band. The band will adjust in increments of 0.05KHz. -
Page 16: Storing A Preset
Storing A Preset You can store five FM stations on this radio. To do this you need to select or tune in a station so it is playing. Press and hold one of the numbered preset buttons until you see the message ‘Preset Stored’. -
Page 17: Fm Menu
FM Menu There are a few options and features available under the FM menu. To access these press ‘MENU’ once. Using the toggle switch you can cycle through the available options then press down on the toggle to select it. Options: Scan Setting >... -
Page 18: System
Audio Setting The audio settings will allow a stereo radio signal to be used where available or convert that signal to a mono audio output. To change the settings press ‘MENU’ and use the toggle switch to navigate and select ‘Audio Settings’. Use the toggle switch to change between the two options and press the toggle switch to select one. -
Page 19: Time
System Time From here you can set the date and time manually, update it from different sources, change the time format and the date format. Use the toggle switch to navigate and select ‘Time’ from the system menu. In this sub menu you can choose from the following: •... -
Page 20: Time - Set Date Format
System Time - Set Date Format Change the presented format of the date with this option. Once in the Time sub menu list, use the toggle switch to navigate and select this feature. Select the update source by using the toggle switch and pressing it to select the chosen format. -
Page 21: Time - Auto Update
System Select the update source by using the toggle switch and pressing it to select the chosen format. Options: Set 24 hour > Set 12 hour An asterisk will show in the right corner on the currently selected option. Press ‘MENU’ a few times to exit this menu option to the radio. -
Page 22: Sw Version
System SW Version This option will display the current version of firmware in use. Use the toggle switch to navigate and select ‘SW Version’ to view the firmware details. Press ‘MENU’ a couple of times to return to the radio. Factory Reset This option will reset the radio and erase all presets stored. -
Page 23: Language
System Language This option will change the language the menus are displayed in. Use the toggle switch to navigate and select ‘Language’ to access the available languages. Use the toggle switch to cycle through and press it to select your chosen language. -
Page 24: Backlight
System Backlight This option will change the light intensity of the display in use and dimmed as well as the time it takes to dim. Use the toggle switch to navigate and select ‘Backlight’ from the ‘System’ menu. There are three options that can be changed once backlight has been selected. -
Page 25: Backlight - Dim Level
System Backlight - Dim Level This option will change the dimness level of the screen. Use the toggle switch to navigate and select ‘Dim Level’ from the ‘Backlight’ menu. Use the toggle switch again to cycle and select one of the following options available. -
Page 26: Info
Info Information Details When listening in DAB or FM mode you can cycle through the available information from the broadcasting service and the radio by pressing the ‘Info’ button repeatedly. The information cycle: • Now Playing • Now Playing • Signal Strength •... -
Page 27: Faq's
FAQ’s No Sound, Just The Date And Time • The radio is in standby. Give the dial a quick press to bring it out of standby. Buttons Are Not Working, But The Screen Is Active • The ‘Key Lock’ is engaged. Slide the switch to enable the keys. •... - Page 28 After Sales Support UK/N.IRELAND HELPLINE N 01270 508538 REP.IRELAND HELPLINE N 1800 995 036 WEBSITE: www.quesh.co.uk EMAIL: enquiries@quesh.co.uk...
-
Page 29: Specifications
Specification Portable DAB & FM Sports Radio General Size: 58mm x 100mm x 16mm (approx) Approx Weight: Ports: Micro USB port 3.5mm Headphone Port Radio Solution: Frontier DAB Frequency Range: 174MHz - 240MHz FM Frequency Range: Infinity Aerial Type: Headphone Cable Preset Storage: 5 DAB / 5 FM Battery... - Page 30 Warranty Certificate Warranty This product is warranted to be free from defects in workmanship and parts for a period of 36 months from the date of purchase. Defects that occur within this warranty period, under normal use and care, will be repaired, replaced or refunded at our discretion, solely at our option with no charge for parts and labour.
- Page 31 Warranty Card Portable DAB & FM Sports Radio Model Number: 82981 Please keep your purchase receipt together with your warranty card Name: Address: Date of purchase: Location of purchase: Fault Description: Office Use: Repaired Replaced Other We recommend that you attach a photocopy of your receipt, showing the date of purchase, to this warranty card and keep it for your reference.
Need help?
Do you have a question about the 82981 and is the answer not in the manual?
Questions and answers