Table of Contents
Advertisement
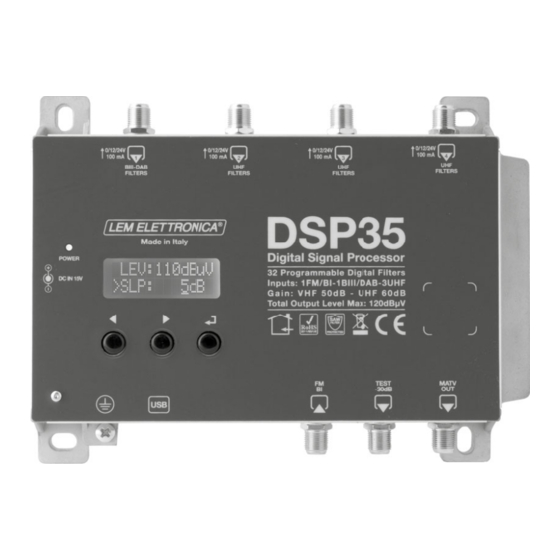
DSP35-
DIGITAL SIGNAL PROCESSOR
24 Digits LCD display
5 Inputs
Auto-Tuning function
SAW filters against Lte 4G interferences
A.C.G. in each filter
32 high selectivity digital filters
DC powering from plug or coaxial output
Zamak chassis for high screening protection
Programmable compact multi-input multiband head-
end to digitally filter, convert and equalize DVB-T / T2
channels. The built-in amplifier with adjustable output
allows the use in small or medium multi dwelling units.
LEM
GUI
WARRANTY
YEARS
MODEL
NUMBER OF INPUTS
INPUTS FREQUENCY RANGE
LTE PROTECTION
SINGLE CHANNEL FILTERS
NUMBER OF CHANNEL PER FILTERS
INPUT LEVEL RANGE
BI/FM INPUT ATTENUATOR
BIII/DAB INPUT AMPLIFIER
UHF INPUT AMPLIFIER
BIII/DAB - UHF INPUTS A.C.G. RANGE
DIGITAL FILTERS SELECTIVITY
VHF GAIN
UHF GAIN
OUTPUT LEVEL RANGE
BIII/DAB ADJUSTABLE SLOPE
UHF ADJUSTABLE SLOPE
MAX VHF-UHF OUTPUT LEVEL
MAX OUTPUT LEVEL WITH 6 MUX
RETURN LOSS IN/OUT
TEST OUTPUT
USB CONNECTOR
REMOTE POWER SUPPLY VHF-UHF
MAXIMUM CONSUMPTION
OPERATING TEMPERATURE
DIMENSIONS
4G
AUTO
TUNING
5
MHz
dBμV
dB
dB
dB
dB
dB
dB
dBμV
dB
dB
dBμV
dBμV
dB
°C
mm
DSP35-4G
1 FM; 1 BIII/DAB; 3 UHF
FM (40... 108)
BIII (170... 230) / DAB (170... 240)
UHF (470... 790)
LTE790
32
1... 2
FM 35... 90 - BIII/DAB 40... 110 - UHF... 45... 100
0/-12/-24
0/+20 (OFF/ON)
0/+10 (OFF/ON)
40 dB
35 @1MHz
50
60
93... 113
0... -10
0... -5
120 (IM3 DIN 45004B - 60 dBc)
113
>12
1 (-30 dB)
USB 1.0 / 2.0 Type B
12V / 24V 100 mA
15Vcc 0,53A - 8W
-5... 50
193 x 148 x 36
Firmware rel. 1.5
Hardware rel. 5.0
Advertisement
Table of Contents

Related Manuals for Lem Elettronica DSP35-4G


Summary of Contents for Lem Elettronica DSP35-4G
- Page 1 Firmware rel. 1.5 AUTO TUNING Hardware rel. 5.0 WARRANTY YEARS MODEL DSP35-4G NUMBER OF INPUTS 1 FM; 1 BIII/DAB; 3 UHF INPUTS FREQUENCY RANGE FM (40... 108) BIII (170... 230) / DAB (170... 240) UHF (470... 790) LTE PROTECTION...
-
Page 2: Icons Description
ICONS DESCRIPTION High rejection SAW fi lters for optimal protection against Lte 4G interferences In addition to the easy to use built-in LCD display, programming applications are available for PC Windows and Android devices Self programming Auto-tuning function to scan and detect DVB-T/T2 AUTO signals from the VHF/UHF inputs and allocate a single digital fi... -
Page 3: Safety Instructions
Safety instructions 1. Do not expose the amplifier to extreme temperatures. 2. Place the amplifier in a dry and well-aired location. 3. Install the unit on a vertical wall, or in a waterproof cabinet with a minimum IP55 rating, and fix it safely using the provided fixing plugs. 4. -
Page 4: Installation And Start-Up
2 Connect the TV aerial(s) to the amplifier’s inputs 3 Connect the MATV output and terminate the unused inputs with 75Ω loads 4 Connect the power supplier unit to the DSP35-4G and then connect the power supplier to mains plug... - Page 5 Connections Schematic with Remote PSU Lte790/4G SAW Filters BIII USB Port FM Input Test - 30dB Switching Power Supplier Coaxial DC YS25-1501250 Injector INS02 MATV Installation and start-up 1 Connect an earth wire to grounding clamp 2 Connect the TV aerial(s) to the amplifier’s inputs 3 Connect the MATV output and terminate the unused inputs with 75Ω...
- Page 6 Programming via display 1. Press ⏎ to activate the display Firmware rel. 1.5 2. Press ⏎ for three seconds to enter the Hardware rel. 5.0 programming menu Note: the display will go out after 3 minutes if inactive, but the menu will remain open on the last selected function.
- Page 7 Automatic channel scan and memorization To begin the AUTO-TUNING procedure connect the antenna(s) to the DSP35-4G inputs, then follow the operations described below. To begin the automatic programming, AUTO- T U N I N G TUNING, place the pointer --- below AUTO. Press...
-
Page 8: Manual Programming
Manual programming Position the pointer --- on MAN to start the manual T U N I N G programming though the key and press ⏎ to A U TO M A N continue. Press the keys at the same time to go back to the main menu from anywhere in the INPUT menu. - Page 9 SINGLE MUX FILTERING Press to position the function selector > on P R E A M P : ADD 1 CH and press ⏎. > A D D 1 C H To activate the fi ltering function on a single MUX P R E A M P : set the desired channel through the keys, then...
- Page 10 INPUT [2] UHF To set the INPUT 2 UHF parameters, press ⏎ to enter I N P U T U H F 2 the menu. The same procedures described for input 1 apply for all settings. INPUT 2 UHF Processable channels Input: 21...
-
Page 11: Advanced Settings
ADVANCED SETTINGS Press the keys at the same time to go A D VA N C E D back to the main menu from anywhere in the ADVANCED menu. REMOTE POWER SUPPLY Select the DC voltage setting function and press ⏎, A D VA N C E D press the keys to select the voltage 12V or 24V... - Page 12 RESET DSP35-4G To restore the default settings select RESET and T H R : 5 5 d B u V confi rm YES pressing ⏎. The display will show > R E S E T RESET OK for a few second to confi rm the operation.
-
Page 13: Display Error Messages
Display Error Messages Wrong power input voltage. Please check the power D C N O T VA L I D supplier. Power Led red Input short circuit or over current. Please check the O V E R C U R R E N T ! input(s) with the remote power supply activated and remove the issue. - Page 14 2. To connect the Android Smartphone/Tablet you need a USB OTG cable or adapter. 3. Download the application LEMGUI from Google play and install. 4. Switch on the DSP35-4G and wait until the BOOTING procedure is completed. 5. Connect the DSP35-4G to your Android device with the USB-OTG cable 6.
- Page 15 LEM ELETTRONICA srl • Via Grezze, 38 • 25015 Desenzano d/G • Italy Tel. +39 0309120006 • Fax. +39 0309123035 • info@lemelettronica.it www.lemelettronica.it...
-
Page 16: Digital Signal Processor
DSP35- DIGITAL SIGNAL PROCESSOR 24 Digits LCD display 5 Inputs Auto-Tuning function SAW filters against Lte 4G and 5G interferences A.C.G. in each filter 32 high selectivity digital filters DC powering from plug or coaxial output Zamak chassis for high screening protection Programmable compact multi-input multiband head- end to digitally filter, convert and equalize DVB-T / T2 channels. - Page 17 ICONS DESCRIPTION High rejection SAW fi lters for optimal protection against Lte 4G and 5G interferences In addition to the easy to use built-in LCD display, programming applications are available for PC Windows and Android devices Self programming Auto-tuning function to scan and detect DVB-T/T2 AUTO signals from the VHF/UHF inputs and allocate a single digital fi...
- Page 18 Safety instructions 1. Do not expose the amplifier to extreme temperatures. 2. Place the amplifier in a dry and well-aired location. 3. Install the unit on a vertical wall, or in a waterproof cabinet with a minimum IP55 rating, and fix it safely using the provided fixing plugs. 4.
-
Page 19: Installation And Start-Up
Standard Connections Schematic Lte 4G-5G SAW Filters BIII Switching Power Supplier YS25-1501250 MATV Output USB Port Test - 30dB FM Input Installation and start-up 1 Connect an earth wire to grounding clamp 2 Connect the TV aerial(s) to the amplifier’s inputs 3 Connect the MATV output and terminate the unused inputs with 75Ω... - Page 20 Connections Schematic with Remote PSU Lte4G-5G SAW Filters BIII USB Port FM Input Test - 30dB Switching Power Supplier Coaxial DC YS25-1501250 Injector INS02 MATV Installation and start-up 1 Connect an earth wire to grounding clamp 2 Connect the TV aerial(s) to the amplifier’s inputs 3 Connect the MATV output and terminate the unused inputs with 75Ω...
- Page 21 Programming via display 1. Press ⏎ to activate the display Firmware rel. 1.5 2. Press ⏎ for three seconds to enter the Hardware rel. 5.4 programming menu Note: the display will go out after 3 minutes if inactive, but the menu will remain open on the last selected function.
- Page 22 Automatic channel scan and memorization To begin the AUTO-TUNING procedure connect the antenna(s) to the DSP35-5G inputs, then follow the operations described below. To begin the automatic programming, AUTO- T U N I N G TUNING, place the pointer --- below AUTO. Press A U TO M A N ⏎...
- Page 23 Manual programming Position the pointer --- on MAN to start the manual T U N I N G programming though the key and press ⏎ to A U TO M A N continue. Press the keys at the same time to go back to the main menu from anywhere in the INPUT menu.
- Page 24 SINGLE MUX FILTERING Press to position the function selector > on P R E A M P : ADD 1 CH and press ⏎. > A D D 1 C H To activate the fi ltering function on a single MUX P R E A M P : set the desired channel through the keys, then...
- Page 25 INPUT [2] UHF To set the INPUT 2 UHF parameters, press ⏎ to enter I N P U T U H F 2 the menu. The same procedures described for input 1 apply for all settings. INPUT 2 UHF Processable channels Input: 21...
- Page 26 ADVANCED SETTINGS Press the keys at the same time to go A D VA N C E D back to the main menu from anywhere in the ADVANCED menu. REMOTE POWER SUPPLY Select the DC voltage setting function and press ⏎, A D VA N C E D press the keys to select the voltage 12V or 24V...
- Page 27 RESET DSP35-5G To restore the default settings select RESET and T H R : 5 5 d B u V confi rm YES pressing ⏎. The display will show > R E S E T RESET OK for a few second to confi rm the operation. If you wish to skip the RESET select NO and press R E S E T ? ⏎...
- Page 28 Display Error Messages Wrong power input voltage. Please check the power D C N O T VA L I D supplier. Power Led red Input short circuit or over current. Please check the O V E R C U R R E N T ! input(s) with the remote power supply activated and remove the issue.
- Page 29 PC Windows Programming GUI 1. Download the latest GUI release from our website http://www.lemelettronica. 2. Install the GUI selecting the file Setup.exe and follow the guided procedure step by step until the installation is completed. Software minimum requirements Windows 7 or more recent operating system, Microsoft Framework.NET 3.5* or higher and langpack (free download from the Microsoft website).
- Page 30 LEM ELETTRONICA srl • Via Grezze, 38 • 25015 Desenzano d/G • Italy Tel. +39 0309120006 • Fax. +39 0309123035 • info@lemelettronica.it www.lemelettronica.it...
Need help?
Do you have a question about the DSP35-4G and is the answer not in the manual?
Questions and answers