Table of Contents

Subscribe to Our Youtube Channel
Related Manuals for Bestron EASY HOME AST9000


Summary of Contents for Bestron EASY HOME AST9000
- Page 1 EASY HOME AST9000 2600 INSTRUCTION MANUAL Watts Volts Bedienungsanleitung Instruction manual Mode d’emploi Istruzioni per l’uso Handleiding Manual del usuario...
-
Page 3: Herzlichen Glückwunsch
HERZLICHEN GLÜCKWUNSCH! Herzlichen Glückwunsch zum Erwerb dieses Bestron-Produktes. In dieser Gebrauchsanweisung erläutern wir die Funktion und die Benutzung. Lesen Sie somit diese Gebrauchsanweisung aufmerksam durch, bevor Sie das Gerät benutzen. Verwenden Sie das Gerät nur so, wie es in der Gebrauchsanweisung beschrieben ist. Bewahren Sie die Gebrauchsanweisung danach sorgfältig auf. - Page 4 • Tauchen Sie Elektrogeräte, Kabel oder Stecker nie in Wasser oder eine andere Flüssigkeit. • Fassen Sie Elektrogeräte nie an, wenn sie ins Wasser gefallen sind. Ziehen Sie direkt den Stecker aus der Steckdose. Benutzen Sie das Gerät nicht mehr. •...
-
Page 5: Ce-Konformitätserklärung
UMWELT • Werfen Sie Verpackungsmaterial, wie zum Beispiel Plastik und Karton, in die dazu bestimmten Container. • Dieses Produkt am Ende der Nutzungsdauer nicht als normalen Haushaltabfall entsorgen, sondern bei einer Sammelstelle zur Wiederverwendung von elektrischem und elektronischem Gerät. Achten Sie auf das Symbol auf dem Produkt, der Gebrauchsanweisung oder Verpackung. -
Page 6: Vor Der Ersten Verwendung
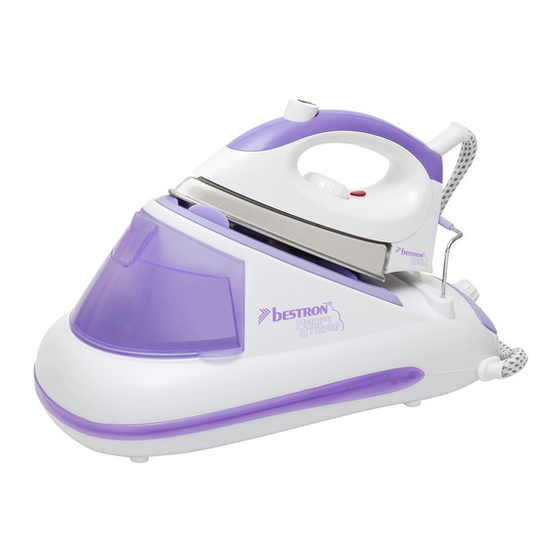
FUNKTION - Allgemein Das Gerät ist nur für den Hausgebrauch vorgesehen und nicht für die professionelle Verwendung. 1. Zuführungsleitung 8. Deckel des Wassertanks 2. Temperatureinstellknopf 9. Kontrollleuchte 3. Drucktaste für Dampfabgabe 10. Kontrollleuchte fùr Dampf 4. Bügeleisen 11. Ein-/Ausschalter für Boiler mit Kontrollleuchte 5. - Page 7 • Fügen Sie dem Wasser keinesfalls Fleckenentferner oder anderen Mitteln hinzu. • Vor jedem Gebrauch die Drucktaste fùr Dampfabgabe (3) ca. 20 Sekunden betätigen, um eventuelle Kalkablagerungen aus dem Gerät zu entfermen BENUTZUNG - Einsetzen des Wassertanks Achten Sie darauf, dass der Wassertank korrekt eingesetzt wurde. Drücken Sie ihn an den seitlich ange- brachten ‘Flügeln’...
- Page 8 7. Stellen Sie nach der Benutzung den Temperatureinstellknopf auf 0, schalten Sie den Ein-/Ausschalter auf 0 und ziehen Sie den Stecker aus der Steckdose. Stellen Sie das Bügeleisen vertikal hin und lassen Sie es abkühlen. ACHTUNG: • Bei niedriger Temperatur können Wassertropfen mit dem Dampf aus der Bügelsohle laufen. Dies kann Flecken verursachen.
-
Page 9: Reinigung Und Wartung
••• Baumwolle Dampfbügeln Verwenden Sie je nach Dicke des Gewebes und leichtes mehr Dampf. Drehen Sie dunkle und Kleidungsstücke mit Leinen und Stickereien auf links. verstärktes Gewebe Leinen Dampfbügeln Verwenden Sie viel Dampf und drehen Sie dunkle Kleidungsstücke auf links, um ein glänzendes Aussehen zu vermeiden. -
Page 10: Störungssuche
STÖRUNGSSUCHE PROBLEM MÖGLICHE URSACHE MÖGLICHE LÖSUNG Das Gerät gibt keinen oder Der Wassertank ist leer. Füllen Sie den Wassertank. wenig Dampf ab. __________________________ __________________________ Das Wasser erreicht nicht Warten Sie, bis die Kontrolllampe die korrekte Temperatur. ausgeht. Das bedeutet, dass die korrekte Temperatur erreicht wurde. - Page 11 PROBLEM MÖGLICHE URSACHE MÖGLICHE LÖSUNG Das Bügeln hinterlässt Flecken Die eingestellte Temperatur ist Stellen Sie sicher, dass am Gerät auf der Kleidung. zu hoch für die Stoffqualität, die die Temperatur eingestellt wurde, Sie bügeln. die in den Pflegehinweisen auf dem Etikett im Kleidungsstück angegeben ist.
- Page 12 GARANTIEBESTIMMUNGEN Bestron handhabt unter den folgenden Bedingungen eine Garantie von 60 Monaten ab Kaufdatum gegen Defekte, die durch Herstellungs- und/oder Materialfehler entstanden sind. 1. Im genannten Garantiezeitraum werden keine Kosten für Arbeitslohn und Material berechnet. 2. Die unter der Garantie ausgeführte Reparatur verlängert nicht die Garantiefrist.
- Page 13 FÉLICITATIONS ! Nous vous félicitons pour l’achat de votre produit Bestron. Dans le présent manuel d’utilisation, nous vous expliquons comment celui fonctionne et comment vous devez l’utiliser. Nous vous invitons par conséquent à lire attentivement les instructions d’utilisation avant d’utiliser l’appareil. Lorsque vous l’utilisez, prenez soin de suivre parfaitement les instructions d’utilisation.
- Page 14 CE QUE VOUS DEVEZ SAVOIR AU SUJET DES APPAREILS ÉLECTRIQUES • Avant toute utilisation, vérifiez que la tension électrique du réseau correspond à la tension électrique indiquée sur la plaque signalétique de l’appareil concerné. • Contrôlez que la prise à laquelle vous raccordez l’appareil électrique est reliée à...
-
Page 15: Déclaration De Conformité Ce
CE QUE VOUS DEVEZ SAVOIR AU SUJET DE CET APPAREIL • Soyez prudent lorsque vous utilisez l’appareil à l’extérieur. • N’utilisez jamais l’appareil dans des pièces humides. • Après utilisation, nettoyez soigneusement l’appareil (voir Nettoyage et entretien). • Never hold the iron upside down during use. Hot water could drip from the iron and cause burns. - Page 16 FONCTIONNEMENT - Généralités Cet appareil est destiné uniquement à l’utilisation domestique, et non à l’usage professionnel. 1. Câble pour l’alimentation en électricité et en 9. Lampe témoin allumé quand le fer à repasser vapeur chauffe 2. Bouton de réglage de la température 10.
- Page 17 UTILISATION - Positionnement du réservoir d’eau Assurez-vous que le réservoir d’eau est correctement positionné. Appuyer dessus à l’aide des «ailettes» sur le côté, pour que le réservoir se loge dans son emplacement. UTILISATION - Repassage à sec 1. Branchez la fiche (13). 2.
- Page 18 ATTENTION: • Si la température est trop basse, de l’eau peut s’écouler de la semelle avec la vapeur. Elle peut laisser des taches. Si ceci vous arrive, mettez le bouton de réglage de la température sur la position recommandée. Ne repassez jamais avec des gouttes d’eau sur la semelle. UTILISATION - Instruction de repassage •...
-
Page 19: Nettoyage Et Entretien
NETTOYAGE ET ENTRETIEN - Rinçage du réservoir Le rinçage du réservoir tous les mois réduit les dépôts calcaires et prolonge la durée de vie de votre appareil. 1. Assurez-vous que le réservoir est vide et complètement refroidi. 2. Remplissez le réservoir jusqu’au trois quarts avec de l’eau froide. 3. - Page 20 PROBLEME CAUSE POSSIBLE SOLUTION POSSIBLE Du liquide brun fuit du fer. L’eau contient des additifs Ne pas ajouter d’additifs à (comme des agents détartrants, l’eau. Si vous l’avez fait, prenez de l’eau parfumée ou de contact avec notre service à la l’amidon).
- Page 21 DISPOSITIONS CONCERNANT LA GARANTIE Le présent produit Bestron bénéficie – aux conditions ci-après – d’une garantie de 60 mois suivant la date d’achat et couvrant toute panne résultant d’un défaut/vice de fabrication et/ou de fonctionnement. 1. Pendant la période de garantie précitée, aucun frais ne sera facturé au titre des coûts de main- d’œuvre et de matériel.
- Page 22 PROFICIAT! Proficiat met de aankoop van dit Bestron-product. In deze gebruiksaanwijzing leggen we de werking en het gebruik uit. Lees de gebruiksaanwijzing dus aandachtig door vóór u het apparaat gaat gebruiken. Gebruik het apparaat alleen zoals beschreven in de gebruiksaanwijzing. Bewaar de gebruiksaanwijzing daarna zorgvuldig.
- Page 23 WAT U MOET WETEN OVER ELEKTRISCHE APPARATEN • Controleer of de netspanning overeenkomt met de aangegeven netspanning op het typeplaatje van een elektrisch apparaat, voordat u het gebruikt. • Controleer of het stopcontact waarop u een elektrisch apparaat aansluit, geaard is. •...
-
Page 24: Ce-Conformiteitsverklaring
WAT U MOET WETEN OVER DIT APPARAAT • Wees voorzichtig wanneer u het apparaat buitenshuis gebruikt. • Gebruik het apparaat nooit in vochtige ruimten. • Maak het apparaat na gebruik grondig schoon (zie Reiniging en onderhoud). • Houd het strijkijzer nooit ondersteboven tijdens het gebruik. Heet water kan uit het strijkijzer druppelen en brandwonden veroorzaken. -
Page 25: Voor Het Eerste Gebruik
WERKING - Algemeen Het apparaat is alleen bedoeld voor huishoudelijke doeleinden, niet voor professioneel gebruik. 1. Toevoerslang 9. Indicatielampje dat brandt als het 2. Temperatuurinstelknop strijkijzer verwarmd wordt 3. Stoomafgifteknop 10. Indicatielampje dat brandt als stoom 4. Strijkijzer opgebouwd wordt 5. - Page 26 GEBRUIK - Waterreservoir plaatsen Zorg dat het waterreservoir correct geplaatst wordt, anders zal het apparaat geen stoom kunnen produceren. Druk het naar beneden met behulp van de ‘vleugels’ aan de zijkant zodat het waterreservoir vast in de uitsparing komt te zitten. GEBRUIK - Droogstrijken 1.
- Page 27 GEBRUIK - Verticaal stoomstrijken U kunt ook stoom in verticale positie afgeven, bijvoorbeeld voor het reinigen van textiel. Het beste resultaat krijgt u door in twee fasen te strijken: bevochtig het kledingstuk eerst met stoom door de strijkzool er ca. 20 cm boven te bewegen. Gebruik meer stoom naarmate het kledingstuk meer kreukels bevat. Strijk het kledingstuk vervolgens droog.
-
Page 28: Reiniging En Onderhoud
REINIGING EN ONDERHOUD - Omspoelen Maandelijks omspoelen van het waterreservoir voorkomt kalkaanslag en verlengt de levensduur van uw strijksysteem. 1. Zorg dat het waterreservoir leeg en volledig afgekoeld is. 2. Vul het waterreservoir voor ongeveer driekwart met koud kraanwater. 3. Schud het waterreservoir stevig heen en weer zodat de binnenkant volledig gespoeld wordt. 4. - Page 29 PROBLEEM MOGELIJKE OORZAAK MOGELIJKE OPLOSSING De strijkzool lekt bruine vloeistof. Het water bevat aanvullende Voeg géén aanvullende middelen (zoals ontkalkings- middelen aan het water toe. Hebt middelen, geurwater of stijfsel). u dit toch gedaan, reinig het waterreservoir zoals beschreven onder ‘Reiniging en onderhoud - Omspoelen’.
- Page 30 9. Aanspraak op garantie kan alleen bij uw (web-)winkelier of rechtstreeks bij de Bestron Service Dienst. Stuur echter nooit zomaar iets op. Het pakket kan dan namelijk geweigerd worden en eventuele kosten zijn voor uw rekening.
- Page 31 CONGRATULATIONS! Congratulations with the purchase of this Bestron product. These instructions tell you how the product works and how to use it. Read the instructions carefully before you start using the appliance. Only use the appliance in the manner described in the instructions. Keep these instructions in a safe place for future reference.
- Page 32 WHAT YOU SHOULD KNOW ABOUT ELECTRICAL APPLIANCES • Check that the mains voltage corresponds with that shown on the rating plate of an electrical appliance before you use it. • Check that the socket to which you connect the electrical appliance is earthed.
-
Page 33: Ce Declaration Of Conformity
WHAT YOU SHOULD KNOW ABOUT THIS APPLIANCE • Be careful when using the appliance outdoors. • Never use the appliance in damp or wet locations. • Thoroughly clean the appliance after use (see Cleaning and Maintenance). • Never hold the iron upside down during use. Hot water could drip from the iron and cause burns. -
Page 34: Before First Use
OPERATION - General The appliance is intended only for domestic use, not for professional use. 1. Electricity and steam cable 9. Pilot light (iron warming up) 2. Iron temperature control 10. Pilot light (building up pressure) 3. Steam release button 11. - Page 35 USE - Placing the water tank Make sure the water tank is placed correctly. Press it downwards with the help of the ‘wings’ on the side, so the tank becomes lodged in its notch USE - Dry ironing 1. Insert the plug (13) into the wall socket. 2.
- Page 36 WARNING: • If the temperature is too low, drops of water can escape with the steam. This can cause stains. If this does happen, you should turn the temperaturecontrol dial to the recommended position. Never iron whilst there are drops of water on the soleplate. USE - Vertical steam ironing You can also release steam when the iron is held vertically, for example, to clean fabric.
-
Page 37: Cleaning And Maintenance
cloth between the iron and the wool. It is best to press wool on the inner surface of the fabric. • Always iron velvety fabrics and other fabrics that readily become shiny in one direction; apply gentle pressure to the iron. •... - Page 38 PROBLEM POSSIBLE CAUSE POSSIBLE SOLUTION The iron is leaking brown fluids. The water contains additives Do not add any additives (like descaling agents, perfumed whatsoever to the water. If you water or starch). did do this, then please contact our service department, the address can be found in the back of the manual.
-
Page 39: Warranty Conditions
8. The warranty does not entitle the purchaser to compensation for any damage other than replacement or repair of the faulty parts. Bestron cannot in any event be held liable for any indirect or consequential losses caused by or in relation to the equipment it has provided. - Page 40 COMPLIMENTI! Congratulazioni per l’acquisto di questo prodotto Bestron. Nelle presenti istruzioni per l’uso viene spiegato il funzionamento e l’impiego dell’apparecchio. Pertanto, prima di utilizzarlo, leggerle attentamente. Utilizzare l’apparecchio esclusivamente come di seguito descritto. Conservare queste istruzioni in luogo sicuro. In caso di guasto: Nel caso indesiderato in cui l’unità...
- Page 41 COSA È NECESSARIO SAPERE SUI DISPOSITIVI ELETTRICI • Prima di utilizzare un dispositivo elettrico, assicurarsi che la tensione di rete corrisponda alla tensione di rete indicata sulla sua targhetta d’identificazione. • Assicurarsi che la presa elettrica a cui si intende collegare un dispositivo elettrico sia collegata a terra.
-
Page 42: Dichiarazione Di Conformità Ce
COSA È NECESSARIO SAPERE SU QUESTO DISPOSITIVO • Fare attenzione quando si utilizza il dispositivo all’aperto. • Non utilizzare mai l’apparecchio in ambienti umidi. • Pulire accuratamente l’unità dopo l’uso (vedere la sezione Pulizia e manutenzione). • Non tenere mai il ferro capovolto durante l’uso. L’acqua calda potrebbe gocciolare dal ferro e causare ustioni. - Page 43 FUNZIONAMENTO - Avvertenze generali Questo apparecchio è concepito esclusivamente per l’impiego domestico, e non per l’uso professionale. 1. Monotubo per ferro da stiro (alimentazione e 8. Coperchio della caldaia vapore) 9. Spia luminosa di riscaldamento del ferro da 2. Termostato regolabile stiro 3.
- Page 44 USO - Posizionare il serbatoio dell’acqua Assicurarsi che il serbatoio dell’acqua è posizionato correttamente. Premere verso il basso con l’aiuto delle “ali” sui lati in modo che il serbatoio si incastri nell’incavo. USO - Stiratura a secco 1. Inserire la spina nella presa di corrente. 2.
- Page 45 6. Stirare il tessuto passandovi sopra il ferro da stiro. Durante la stiratura, la resistenza verrà attivata e disattivata continuamente per mantenere costante la temperatura della piastra. Anche la spia luminosa di riscaldamento del ferro si accenderà e spegnerà di conseguenza. 7.
- Page 46 ••• Cotone Stiratura a vapore. Utilizzare una maggiore quantità e tessuti in lino di vapore ove il tessuto risulti più spesso. Stirare sul leggero rovescio i capi di colore scuro e ricamati. inamidati Lino Stiratura a vapore. Utilizzare una elevata quantità di vapore e stirare sul rovescio i capi di colore scuro per evitare l’effetto lucido.
-
Page 47: Risoluzione Dei Problemi
RISOLUZIONE DEI PROBLEMI PROBLEMA POSSIBILE CAUSA POSSIBILE SOLUZIONE Il dispositivo perde liquido L’acqua contiene additivi (agenti Non aggiungere additivi nell’ marrone. per la disincrostazione, acqua l’acqua. Se è già stato fatto aromatizzata o amido). contattare il servizio clienti, l’indirizzo si può trovare in fondo al manuale d’istruzioni. - Page 48 PROBLEMA POSSIBILE CAUSA POSSIBILE SOLUZIONE Il ferro da stiro lascia macchie La temperatura di stiratura è Assicurarsi che il sistema sui vestiti. troppo alta per il tipo di vestiti stirante è impostato per la che ferro. temperatura di nome sull’asse da istruzioni in vostri vestiti.
-
Page 49: Servizio Assistenza
DISPOSIZIONI DI GARANZIA In base alle seguenti condizioni, Bestron garantisce questo apparecchio per la durata di 60 mesi dalla data di acquisto contro i guasti causati da difetti di fabbricazione e/o del materiale. 1. Durante il periodo di garanzia non verranno addebitati costi di manodopera e per i materiali necessari. - Page 50 ¡FELICIDADES! Felicidades por la compra de este producto Bestron. En estas instrucciones le explicamos su funcionamiento y cómo usarlo. Antes de usar el aparato, lea bien el manual de instrucciones. Utilice el aparato únicamente tal y como se describe en el manual de instrucciones.
- Page 51 QUÉ DEBE SABER SOBRE LOS APARATOS ELÉCTRICOS • Antes de usar un aparato eléctrico, compruebe que la tensión coincida con la tensión indicada en su placa descriptiva. • Compruebe que el enchufe que vaya a utilizar para un aparato eléctrico tenga contacto a tierra. •...
-
Page 52: Medio Ambiente
QUÉ NECESITA SABER SOBRE ESTE APARATO • Tenga cuidado al usar el dispositivo en el exterior. • No use nunca el aparato en espacios húmedos. • Limpie bien el aparato después de su uso, véase «Limpieza y mantenimiento». • Nunca sostenga la plancha boca abajo durante el uso. El agua caliente podría gotear de la plancha y causar quemaduras. -
Page 53: Antes Del Primer Uso
FUNCIONAMIENTO - General Este aparato está concebido únicamente para uso doméstico, no para uso profesional. 1. Cable para electricidad y vapor 9. Piloto indicador que se enciende cuando está 2. Selector de temperatura calentando la plancha 3. Botón para emisión de vapor 10. - Page 54 • Deje el dispositivo de vapor (de aprox. 20 segundos) antes de cada uso pulsando el botón de liberación de vapor de agua (3) para eliminar los depósitos de calcio Deje el dispositivo de vapor (de aprox. 20 segundos) antes de cada uso pulsando el botón de liberación de vapor de agua (3) para eliminar los depósitos de calcio USO - Colocando el tanque del agua Verifique que el tanque del agua haya sido colocado correctamente.
- Page 55 ATENCIÓN: • Deje el dispositivo de vapor (de aprox. 20 segundos) antes de cada uso pulsando el botón de liberación de vapor de agua (3) para eliminar los depósitos de calcio Deje el dispositivo de vapor (de aprox. 20 segundos) antes de cada uso pulsando el botón de liberación de vapor de agua (3) para eliminar los depósitos de calcio 6.
-
Page 56: Limpieza Y Mantenimiento
••• Algodón Planchar a vapor. Mientras más gruesa sea la tela, y lino liviano y mayor cantidad de vapor. Planche por el revés las tejidos prendas de color oscuro y las prendas bordadas. almidonados Lino Planchar a vapor. Use bastante vapor y planche las prendas oscuras por el revés para evitar el brillo. -
Page 57: Solución De Problemas
SOLUCIÓN DE PROBLEMAS PROBLEMA POSIBLE CAUSA POSIBLE SOLUCIÓN El dispositivo no hace nada. El dispositivo no está recibiendo Verifique que el enchufe esté energía eléctrica. conectado al tomacorriente y que el dispositivo haya sido encendido. Hay líquidos cafés goteando El agua contiene aditivos (como No agregue ningún tipo de fuera de la plancha. - Page 58 PROBLEMA POSIBLE CAUSA POSIBLE SOLUCIÓN El planchado mancha la ropa. La temperatura de planchado es Verifique que el dispositivo muy alta para el tipo de material se ajuste a la temperatura que está planchando. descrita en las instrucciones de planchado de su prenda.
-
Page 59: Condiciones De Garantía
CONDICIONES DE GARANTÍA Bestron ofrece 60 meses de garantía después de la fecha de compra de este equipo. La garantía cubre las averías por errores de fabricación y/o material y se atiene a las siguientes condiciones. 1. La garantía no cubre ningún gasto por mano de obra ni material. - Page 60 v190123-03 NEED HELP? CHAT WITH US! WHATSAPP CUSTOMER SERVICE B E S T R O N . C O M / W H A T S A P P...
Need help?
Do you have a question about the EASY HOME AST9000 and is the answer not in the manual?
Questions and answers