
Related Manuals for AquaScape 83013


Summary of Contents for AquaScape 83013
- Page 1 I N S T R U C T I O N S & M A I N T E N A N C E BACKYARD WATERFALL LANDSCAPE FOUNTAIN KIT Backyard Waterfall Landscape Fountain Kit Item #83013 aquascapeinc.com...
-
Page 2: Table Of Contents
Backyard Waterfall Landscape Fountain the sights and sounds of cascading water into your yard or Kit. Our goal at Aquascape is to provide our landscape, providing up to a 3-foot waterfall. All necessary components are provided in a convenient, all-in-one kit... -
Page 3: Contents
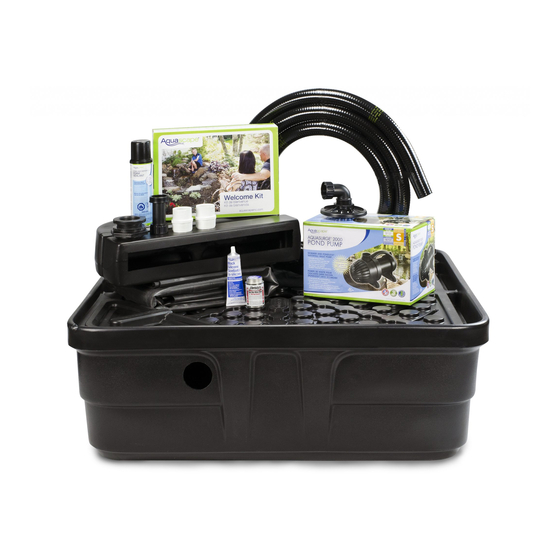
Contents Description AquaBasin 45 Pump Access Panel ® AquaBasin ® Waterfall Spillway Pre-Cut EPDM Liner 7.5' x 7.5' (2) Geotextile Underlayment Flexible PVC Pipe 1.5" x 15' AquaSurge 2000 Pond Pump ® AquaSurge Low Suction Intake ® Attachment Installation Kit Bulkhead Fitting 2"... -
Page 4: Helpful Symbols
Helpful Symbols WARNING Symbol - Will alert you to the TIP Symbol - Helpful information provided by a possibility of damage, injury or death if you do professional water feature installer. not comply with the warnings that accompany them. The hazard may come from something mechanical or from electrical shock. -
Page 5: Installation
Installation SUPPORT VIDEO LINK: aquascapeinc.com/backyard-waterfall-landscape-fountain-kit STEP 1 CAREFULLY REMOVE CONTENTS FROM THE BOX STEP 2 Ex. 3 SELECT YOUR LOCATION • Next, mark out the channel for the flex PVC pipe, leading • Set the AquaBasin 45 in from the pre-drilled bulkhead port to the opposite corner of the desired location. - Page 6 This prevents any • The AquaBasin 45 provides the option of installing the unnecessary settling during Aquascape Compact Fill Valve (not included, #88006) to or after installation (Ex. 9). automatically add water to the feature when needed. This reduces the time spent manually filling the basin.
- Page 7 STEP 9 screen is designed to pop off when it is pulled from either side. BACKFILLING • Next, remove the inner filter screen by twisting it in a • Once the pump and plumbing installation is complete, counterclockwise motion, unscrewing it from the intake check again to make sure the AquaBasin is level.
- Page 8 (Ex. 27). This ADD OPTIONAL LED LIGHTING will protect the liner from • Aquascape LED Garden and Pond Lighting (not included) damage when setting rocks can be added to bring the water feature to life at night. Ex. 27 along the plastic edge of the •...
- Page 9 • Level the Waterfall Spillway • Replace the removed rubber gasket back onto the fitting. (Ex. 35). The spillway should The liner should now be positioned between the two be level from side-to-side rubber gaskets (Ex. 41). and tilted forward a 1/4 bubble to ensure proper Liner Inner Rubber Gasket...
- Page 10 • Once plumbing connections are complete, bury the pipe WARNING: Any electrical should be plugged by filling in the trench around it. into a GFCI rated receptacle. STEP 14 • You can tweak the waterfall by placing smaller stones DISGUISE THE WATERFALL SPILLWAY and gravel on the waterfall cascades.
-
Page 11: Winter Application
• Add Water Treatments – To keep your waterfall clean and healthy we recommend adding Aquascape Fountain Maintenance (included) on a regular basis. For information on other water treatment products designed to maintain your water feature, visit aquascapeinc.com. -
Page 12: Warranty Information
Units should be checked for proper operation prior to returning as defective. Aquascape Inc. or its affiliates are not liable for loss or damage of any nature or kind, whether arising out of or from the use of the product, defective or not defective. - Page 13 I N S T R U C T I O N S E N T R E T I E N BACKYARD WATERFALL LANDSCAPE FOUNTAIN KIT Backyard Waterfall Landscape Fountain Kit Référence #83013 aquascapeinc.com...
-
Page 14: Introduction
Backyard Waterfall Landscape Fountain Kit Merci d’avoir choisi l’écumoire de Aquascape Le kit de fontaine paysagère pour cascade Aquascape Backyard est fourni avec tout ce dont vous avez besoin pour Backyard Waterfall Landscape Fountain Kit. intégrer les images et les sons d’une cascade dans votre Chez Aquascape, notre objectif est de fournir jardin ou votre paysage, en fournissant une chute d’eau... -
Page 15: Pond And Waterfall Foam Sealant
Contenu N° Description Panneau d’accès à la pompe AquaBasin AquaBasin Waterfall Spillway Doublure en EPDM prédécoupée 7,5 pi. x 7,5 pi. (2) Sous-couche géotextile Tuyau exible en PVC 1,5 po. x 15 pi. Pompe de bassin AquaSurge 2000 AquaSurge Fixation d’admission à faible aspiration Kit d’installation Raccord de cloison 2 po. -
Page 16: Symboles Utiles
Symboles utiles Symbole MISE EN GARDE - Vous alertera sur la Symbole CONSEIL - Informations utiles fournies possibilité de dommages corporels ou matériels si par un installateur professionnel de bassins. vous ne vous conformez pas aux avertissements qui les accompagnent. Le danger peut avoir une origine mécanique ou être dû... -
Page 17: Installation
Installation ÉTAPE 3 LIEN VERS LA VIDÉO D’ASSISTANCE : DÉLIMITER L’EMPLACEMENT DE LA VASQUE aquascapeinc.com/backyard-waterfall-landscape-fountain-kit • À l’aide d’une peinture au pistolet de couleur vive, délimitez la zone qui doit être creusée autour de la vasque ÉTAPE 1 (Ex. 3). RETIRER SOIGNEUSEMENT LE CONTENU DE LA CAISSE ÉTAPE 2... - Page 18 ne permet pas de répondre à ces exigences, ajoutez un ÉTAPE 5 matériau qui se tasse facilement, par exemple du sable, afin que le bassin repose sur un support approprié. POSE DU RACCORD DE TRAVERSÉE DE CLOISON • Une fois que le fond du •...
- Page 19 Aquascape (non fourni, n° 88006) • Attachez la rotule à la sortie de la pompe à l’aide de la permettant d’ajouter automatiquement de l’eau à rondelle plate en caoutchouc qui est fournie (Ex. 20). l’accessoire quand il le faut. Cette option réduit le temps passé...
- Page 20 ÉTAPE 11 CONSTRUCTION DE LA CHUTE D’EAU ET AJOUT DE Sous-couche géotextile GRAVIER Doublure • Une fois que la pose de la poche est achevée, il est temps de passer à la construction de la chute d’eau. • Vous pouvez prévoir d’utiliser environ 1 000 livres (1/2 tonne) de pierres et Ex.
- Page 21 • Un éclairage à DEL Aquascape pour jardins et pièces d’eau (non fourni) peut être ajouté pour égayer l’accessoire • Mettez de niveau le aquatique la nuit.
- Page 22 • Le raccord du déversoir de chute d’eau comprend deux joints statiques en caoutchouc déjà montés. Retirez le joint statique extérieur en caoutchouc du raccord. Guidez ensuite le trou dans la poche sur le Ex. 40 Ex. 44 Ex. 45 raccord de manière à...
-
Page 23: Utilisation L'hiver
ÉTAPE 18 TAILLEZ LA POCHE • Une fois que la chute d’eau est en activité, faites-en le tour et taillez la partie de la poche qui est en trop en ayant toujours soin de laisser une bande de Ex. 48 plusieurs centimètres au- dessus du niveau d’eau/ ÉTAPE 16... -
Page 24: Entretien Général
Les unités doivent être vérifiés pour le bon fonctionnement avant de retourner comme défectueux. Aquascape Inc. ou leurs sociétés affiliées ne sont pas responsables des dommages de toute nature, que ce soit découlant de l’utilisation du produit, défectueux ou non défectueux.
Need help?
Do you have a question about the 83013 and is the answer not in the manual?
Questions and answers