Table of Contents
Advertisement
Available languages
Available languages
Quick Links
Advertisement
Chapters
Table of Contents

Related Manuals for AquaScape 83013


Summary of Contents for AquaScape 83013
- Page 1 Backyard Waterfall Landscape Fountain Kit INSTRUCTION MANUAL...
-
Page 2: Introduction
LANDSCAPE FOUNTAIN KIT Introduction Thank you for your purchase of the Aquascape Backyard Waterfall Landscape Fountain Kit. At Aquascape, our goal is to supply our customers with the best valued products in water gardening. We hope you enjoy your purchase. -
Page 3: Table Of Contents
Table of Contents Instructional Video Follow this link to access our helpful support video. Use the video in conjunction with this manual for a hassle-free Introduction …………………………………………… 2 installation. Components …………………………………………… 4 http://www.aquascapeinc.com/backyard-waterfall-land- Recommended Tools ………………………………… 5 scape-fountain-kit Safety Information ……………………………………… 6 Contact Us Helpful Symbols ………………………………………... -
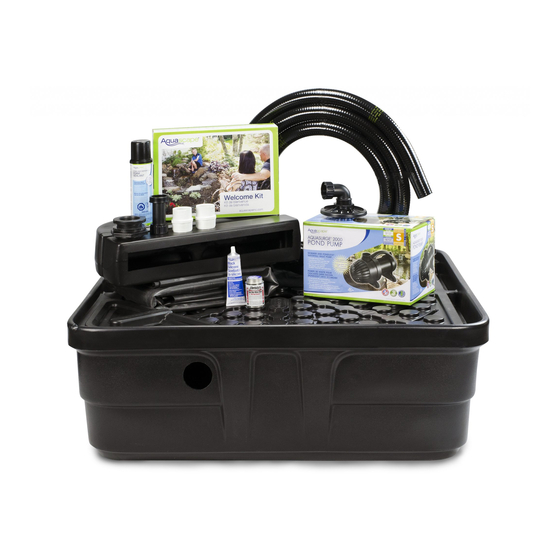
Page 4: Components
Components Contents Description Waterfall Spillway AquaBasin ® AquaBasin ® Pump Access Panel Pre-Cut EPDM Liner 7.5' x 7.5' (2) Geotextile Underlayment Flexible PVC Pipe 1.5" x 15' AquaSurge 2000 Pond Pump ® AquaSurge Low Suction ® Intake Attachment Installation Kit Bulkhead Fitting 2"... -
Page 5: Recommended Tools
Recommended Tools Screwdriver or Soil Tamper Brightly Colored Spray Paint Carpenter's Scissors or Level Utility Knife Shovels Channel Tape Locks Measure Also need: Roughly 1,000 pounds (1/2 ton) of stone and approximately 300 pounds of 1" to 1.5" diameter gravel. US (866) 877-6637 | CAN (866) 766-3426... -
Page 6: Safety Information
Helpful Symbols WARNING Symbol - Will alert you to the TIP Symbol - Helpful information provided by a possibility of damage, injury, or death if you do professional water feature installer. not comply with the warnings that accompany them. The hazard may come from something mechanical or from electrical shock. -
Page 7: Electrical Specifi Cations
Electrical Specifi cations - AquaSurge 2000 Pond Pump ® • Input voltage: 120V AC • Input frequency: 60 Hz • Input watts: 160 Watts Quick Step Guide Position basin and Select location Excavate area Install and level basin Install plumbing outline area ! ! ! ! ! ! ! ! ! Install underlayment... -
Page 8: Installation Instructions
Installation Instructions Support Video Link: • Position the basin with the pump access panel opposite of the location where the waterfall will enter the basin http://www.aquascapeinc.com/backyard-waterfall-landscape-fountain-kit (Figure 2). Setting the AquaBasin in a diagonal ® STEP 1 orientation will maximize the usable space. Be sure to provide enough space to build the waterfall behind the CAREFULLY REMOVE CONTENTS FROM THE BOX location of the AquaBasin... - Page 9 STEP 4 STEP 3 EXCAVATE THE BASIN AND PLUMBING LINE MARK OUT THE AREA • Using the traced area as a • Using a can of brightly colored spray paint, trace around guide, dig the hole for the the basin to outline the area that is to be excavated AquaBasin roughly to 17"...
- Page 10 STEP 5 STEP 6 BULKHEAD INSTALLATION INSTALL AND LEVEL THE BASIN • The included 2" bulkhead contains a rubber gasket and a • Use a soil tamper to plastic washer. When installing the bulkhead, make sure properly compact the the rubber gasket is installed on the inside of the basin and soil.
- Page 11 45 provides the option of installing the ® coat the threads of one of the PVC Aquascape Compact Fill Valve (not included, #88006) to male adapter fittings. Then, thread automatically add water to the feature when needed. This the fitting into the outside of the reduces the time spent manually filling the basin.
- Page 12 STEP 8 • Loosen the collar in the PUMP PREPARATION AND INSTALLATION center of the rotational ball and rotate until the inlet and • Remove the included AquaSurge ® outlet form a 90º angle 2000 Pond Pump from its (Figure 18). packaging.
- Page 13 STEP 9 • Remove any sharp objects from the location where the BACKFILLING liner will be placed to prevent damage during installation. • Once the pump and plumbing installation is complete, • Clear an approximately 3" (8 cm) deep gap between check again to make sure the AquaBasin is level.
- Page 14 STEP 10 CONT... Note: The waterfall should be built no more than 2' or 3' (61-91 cm) back from the corner of the basin, • Lay the second strip of geotextile ensuring there will be enough liner and pipe to underlayment over the liner and properly connect the Waterfall Spillway.
- Page 15 Note: It is recommended to install lights (not included) at this time. Refer to Step 12 to complete • Aquascape LED Garden and Pond Lighting (not included) all lighting installation prior to covering the remainder can be added to bring the water feature to life at night.
- Page 16 STEP 13 • Fold the liner over the top of the CONNECT THE WATERFALL SPILLWAY Waterfall Spillway (Figure 33). It is recommended to provide some • Using a soil tamper, thoroughly slack in case the position of the compact the soil in the future spillway needs minor adjustment location of the Waterfall Spillway later in the installation.
- Page 17 • Place the retaining nut on the spillway fitting and hand- • Use a knife or pair of scissors to tighten. The Waterfall Spillway fitting is reverse threaded; trim the traced hole in the liner please refer to the arrow located on the retaining nut for approximately a 1/8"...
- Page 18 STEP 15 • Insert the pipe into the fitting, firmly APPLY POND AND WATERFALL FOAM SEALANT holding in place for approximately 30 seconds (Figure 42). • The included Pond and Waterfall Foam Sealant is used to fill in gaps between the waterfall rocks, forcing the water to •...
- Page 19 STEP 16 STEP 18 ADD WATER TRIM THE LINER • Fill the basin by adding water to the pump access or by • With the waterfall running, go placing a running garden hose on top of the basin. around and trim off any excess liner, leaving several inches above the water level (Figure STEP 17...
-
Page 20: Maintenance
STEP 20 healthy we recommend adding Aquascape Fountain ENJOY! Maintenance (included) on a regular basis. For information on other water treatment products designed to maintain your water feature, visit aquascapeinc.com. • Remove Debris – Throughout the year, leaves and other debris may end up in your waterfall. -
Page 21: Replacement Parts
Replacement Parts AquaSurge 2000 Pond Pump Replacement Parts ® Item number/description 91063 - Intake Screen Kit 91065 - Discharge Fitting Kit 91066 - Water Chamber Cover and O-Ring Kit 91068 - Pump Handle and Feet Kit 91070 - Replacement Impeller Kit US (866) 877-6637 | CAN (866) 766-3426... -
Page 22: Warranty Information
Units should be checked for proper operation prior to returning as defective. Aquascape Inc. or its affiliates are not liable for loss or damage of any nature or kind, whether arising out of or from the use of the product, defective or not defective. - Page 23 US (866) 877-6637 | CAN (866) 766-3426...
- Page 24 ©2017 Aquascape, Inc. • All Worldwide Rights Reserved 86319 • 01/17...
- Page 25 Ensemble fontaine naturelle pour chute d’eau d’arrière-cour MANUEL D'INSTRUCTIONS...
-
Page 26: Introduction
Introducción Nous vous remercions d'avoir acheté l'ensemble fontaine naturelle pour chute d'eau d'arrière-cour Aquascape. Chez Aquascape, notre objectif est de fournir à nos clients les meilleurs produits de jardinage aquatique. Nous espérons que vous profiterez bien de votre achat. Ce livret contient les instructions pour l'ensemble fontaine naturelle pour chute d'eau d'arrière-cour... - Page 27 Table des matières Tutoriels vidéos Suivez ce lien pour accéder à une vidéo d'assistance utile. Pour une pose sans souci, utilisez la vidéo ensemble avec ce Introduction ………………………………………… 26 manuel. Composants ………………………………………… 28 http://www.aquascapeinc.com/backyard-waterfall-land- Outils recommandés ………………………………… 29 scape-fountain-kit Informations sur la sécurité ………………………… 30 Nous joindre Symboles utiles ……………………………………...
-
Page 28: Composants
Composants Contenu Description Waterfall Spillway AquaBasin ® AquaBasin ® Pump Access Panel Pre-Cut EPDM Liner 7.5' x 7.5' (2) Geotextile Underlayment Flexible PVC Pipe 1.5" x 15' AquaSurge 2000 Pond Pump ® AquaSurge Low Suction ® Intake Attachment Installation Kit Bulkhead Fitting 2"... -
Page 29: Outils Recommandés
Outils recommandés Tournevis Dameuse Peinture au pistolet de couleur vive Niveau à bulle Ciseaux Pelles Pince multiprise Ruban à à crémaillère mesurer Vous aurez également besoin de: environ 1 000 livres (1/2 tonne) de pierres et environ 300 livres de gravier de 1 po à 1,5 po de diamètre. -
Page 30: Informations Sur La Sécurité
Symboles utiles Symbole AVERTISSEMENT - Vous alertera sur Symbole CONSEIL - Informations utiles la possibilité de dommages corporels ou matériels fournies par un installateur professionnel de si vous ne vous conformez pas aux avertissements bassins. qui les accompagnent. Le danger peut avoir une origine mécanique ou être dû... -
Page 31: Spécifi Cations Électriques
Spécifi cations électriques - Pompe AquaSurge 2000 • Tension d’entrée : 120 VCA Fréquence d’entrée : 60 Hz• • Puissance d'entrée : 160 W Guide d’aperçu rapide des étapes Positionnement de la Choix d'un emplacement Pratiquer une excavation Pose et mise de niveau vasque et délimitation de Pose de la plomberie approprié... -
Page 32: Instructions Pour L'installation
Instructions pour l’installation Lien vers la vidéo d’assistance : et qui permette d'en profiter de l'intérieur comme de l'extérieur (Figure 1). http://www.aquascapeinc.com/backyard-waterfall-landscape-fountain-kit • Positionnez la vasque de manière à ce que le panneau ÉTAPE 1 d'accès à la pompe soit du côté opposé à l'endroit où l'eau de la chute d'eau entrera dans la vasque (Figure RETIRER SOIGNEUSEMENT LE CONTENU DE LA CAISSE 2). - Page 33 ÉTAPE 4 ÉTAPE 3 PRATIQUER UNE EXCAVATION POUR LA VASQUE ET DÉLIMITER L'EMPLACEMENT DE LA VASQUE LA CONDUITE • À l'aide d'une peinture au pistolet de couleur vive, • En vous guidant d'après délimitez la zone qui doit être creusée autour de la vasque les limites tracées au (Figure 3).
- Page 34 ÉTAPE 5 ÉTAPE 6 POSE ET MISE DE NIVEAU DE LA VASQUE POSE DU RACCORD DE TRAVERSÉE DE CLOISON • Le raccord de traversée de cloison de 2 po est fourni avec un • Utilisez une dameuse vibrante joint statique en caoutchouc et une rondelle en plastique. Lors pour tasser le sol de façon de la pose du raccord de traversée de cloison, veillez à...
- Page 35 • À l'aide d'un agent d'étanchéité à • L'AquaBasin® 45 offre l'option de poser un robinet base de silicone noir, enduisez les de remplissage compact Aquascape (non fourni, n° filets d'un des raccords adaptateurs 88006) permettant d'ajouter automatiquement de l'eau à...
- Page 36 ÉTAPE 8 • Desserrez le collier au centre PRÉPARATION ET POSE DE LA POMPE de la rotule et tournez-la jusqu'à ce que l'entrée et la • Retirez de son emballage la pompe sortie forment un angle de de bassin AquaSurge® 2000 90°...
- Page 37 ÉTAPE 9 • Retirez tout ce qui est pointu ou tranchant de REMBLAYAGE l'emplacement prévu pour la poche, et ce afin d'empêcher de l'endommager pendant sa pose. • Une fois que la pose de la pompe et la plomberie est achevée, vérifiez à...
- Page 38 ÉTAPE 10 SUITE... Remarque : la chute d'eau ne doit pas être construite à plus de 2 po ou 3 po (61 cm à 91 cm) • Disposez la seconde bande de du coin de la vasque, et ce pour s'assurer qu'il y ait couche de sous-finition géotextile une longueur suffisante de poche et de tuyau pour sur la poche et le long du rebord...
- Page 39 AJOUT D'UN ÉCLAIRAGE À DEL (FACULTATIF) Remarque: nous vous recommandons ensuite d'installer l'éclairage (non fourni). Reportez-vous à • Un éclairage à DEL Aquascape pour jardins et pièces d'eau (non fourni) peut être ajouté pour égayer l'Étape 12 pour installer l'éclairage avant de recouvrir l'accessoire aquatique la nuit.
- Page 40 ÉTAPE 13 • Repliez la poche sur la partie RACCORDEMENT DU DÉVERSOIR DE CHUTE D'EAU supérieure du déversoir de chute d'eau (Figure 33). Il est • À l'aide d'une dameuse vibrante, recommandé de prévoir un peu tassez soigneusement la terre à de jeu au cas où...
- Page 41 • Placez l'écrou de retenue sur le raccord du déversoir et • Utilisez une paire de ciseaux pour serrez à la main. Le filet du raccord du déversoir de chute découper le trou tracé dans la d'eau est à pas inverse : basez-vous sur la flèche située poche à...
- Page 42 ÉTAPE 15 • Insérez le tuyau dans le raccord en APPLICATION D'UN AGENT D'ÉTANCHÉITÉ EN le maintenant fermement en place MOUSSE POUR BASSINS ET CHUTES D'EAU pendant environ 30 secondes (Figure 42). • L'agent d'étanchéité en mousse pour bassins et chutes d'eau qui est fourni est utilisé...
- Page 43 ÉTAPE 16 gravier ou de tout autre AJOUTER DE L'EAU matériau décoratif. • Remplissez la vasque en ajoutant de l'eau au niveau de Remarque: ne taillez pas l'accès à la pompe ou en plaçant un boyau d'arrosage au- la poche tant que l'eau ne dessus de la vasque.
-
Page 44: Entretien
ÉTAPE 20 • Ajoutez des produits de traitement des eaux : pour À VOUS D'EN PROFITER MAINTENANT! maintenir votre chute d'eau propre et. Pour plus de renseignements sur d'autres produits de traitement des eaux conçus pour l'entretien des accessoires aquatiques, veuillez vous rendre sur le site accessoire aquascapeinc.com. -
Page 45: Pièces De Rechange
Pièces de rechange AquaSurge 2000 Pond Pump Replacement Parts ® Item number/description 91063 - Intake Screen Kit 91065 - Discharge Fitting Kit 91066 - Water Chamber Cover and O-Ring Kit 91068 - Pump Handle and Feet Kit 91070 - Replacement Impeller Kit US (866) 877-6637 | CAN (866) 766-3426... -
Page 46: Informations Sur La Garantie
Les unités doivent être vérifiés pour le bon fonctionnement avant de retourner comme défectueux. Aquascape Inc. ou leurs sociétés affiliées ne sont pas responsables des dommages de toute nature, que ce soit découlant de l’utilisation du produit, défectueux ou non défectueux. - Page 47 US (866) 877-6637 | CAN (866) 766-3426...
- Page 48 ©2017 Aquascape, Inc. • All Worldwide Rights Reserved 86319 • 01/17...