Advertisement
Quick Links
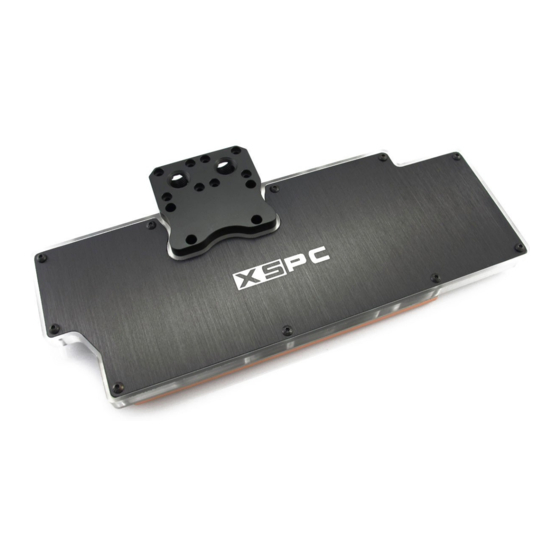
XSpc
Technical Details
- Dimensions: 264 x 125 x 25mm
- Ports: G1/4"
Box Contents
1 x R9 waterblock
5 x G1/4 plugs
8 x 1mm thermal pad
1 x Thermal paste
13 x M3x6mm screw
13 x Red washer
1 x Twin 3mm blue led
G1/4" hose fittings sold separately
Note: This waterblock is only suitable for reference design R9 290X and 290 cards. If you are unsure if your card if a reference design card,
contact us prior to installation to make sure.
1. The waterblock is designed for crossfire setups, so
you can fit the G1/4" fittings to multiple sides of the
block. Decide which configuration is best for your
system.
3. Attach your chosen fittings to the G1/4" ports. Make
sure to attach one of the left and one on the right side.
Flow direction is not important.
Optional
If you are using cards in crossflow you can use the
optional SLI flow connector to bridge the two cards.
This should be done after step 12.
®
RAZOR R9 290X / 290
2. Use the G1/4" blanking plugs to block the unused
ports.
4. The block is now ready to be connected to the other
watercooling components for leak testing.
6.
NEXT PAGE
In the next steps the waterblock is shown without tubing
or other watercooling components connected.
This has been done to make it easier to see the
installation process.
www.xs-pc.com/support
Advertisement

Related Manuals for XSPC RAZOR R9 290X/290


Summary of Contents for XSPC RAZOR R9 290X/290
- Page 1 RAZOR R9 290X / 290 ® XSpc Technical Details - Dimensions: 264 x 125 x 25mm - Ports: G1/4” Box Contents 1 x R9 waterblock 5 x G1/4 plugs 8 x 1mm thermal pad 1 x Thermal paste 13 x M3x6mm screw...
- Page 2 7. Now turn the card on its back and remove the 16 6. Before handing the card you should take screws highlighted above. precautions to avoid static damage. Remove the R9 card from the box ready for installation. 9. Clean the thermal paste from the GPU core and 8.
Need help?
Do you have a question about the RAZOR R9 290X/290 and is the answer not in the manual?
Questions and answers