Table of Contents
Advertisement
Quick Links
230V 1/2"
BENCH
MORTICER
33651
These instructions accompanying the product are the original instructions. This document is part of the product,
keep it for the life of the product passing it on to any subsequent holder of the product. Read all these instructions
before assembling, operating or maintaining this product.
This manual has been compiled by Draper Tools describing the purpose for which the product has been designed,
and contains all the necessary information to ensure its correct and safe use. By following all the general safety
instructions contained in this manual, it will ensure both product and operator safety, together with longer life of the
product itself.
AlI photographs and drawings in this manual are supplied by Draper Tools to help illustrate the operation of the
product.
Whilst every effort has been made to ensure the accuracy of information contained in this manual, the Draper Tools
policy of continuous improvement determines the right to make modifications without prior warning.
Advertisement
Table of Contents

Related Manuals for Draper BENCH MORTICER


Summary of Contents for Draper BENCH MORTICER
- Page 1 AlI photographs and drawings in this manual are supplied by Draper Tools to help illustrate the operation of the product.
-
Page 2: Title Page
TITLE PAGE 1.1 INTRODUCTION: USER MANUAL FOR: 230V 1/2" Bench Morticer Stock No: 33651 Part No: BM13 REVISION HISTORY: Date first published April 2020. As our user manuals are continually updated, users should make sure that they use the very latest version. -
Page 3: Table Of Contents
6.1 IDENTIFICATION ........................ 9 UNPACKING AND CHECKING 7.1 PACKAGING ........................10 7.2 WHAT’S IN THE BOX ......................10 PREPARING THE BENCH MORTICER 8.1 ASSEMBLY .........................11 SETTING THE BENCH MORTICER 9.1 CHISEL AND BIT INSTALLATION ..................13 10. BASIC WOOD TURNING 10.1 OPERATION AND USE .................... -
Page 4: Warranty
This warranty applies in lieu of any other warranty expressed or implied and variations of its terms are not authorised. Your Draper warranty is not effective unless you can produce upon request a dated receipt or invoice to verify your proof of purchase within the warranty period. -
Page 5: Introduction
A morticer is a specialised woodworking machine used to cut square or rectangular holes in a piece of wood. The Bench Morticer (also called a hollow chisel morticer), combines the cutting of a four-sided chisel with the action of a drill bit in the centre. The bit clears out most of the material to be removed and the chisel ensures the edges are straight and clean. -
Page 6: Health And Safety Information
HEALTH AND SAFETY INFORMATION 5.1 GENERAL SAFETY INSTRUCTIONS FOR POWER TOOL USE When using any type of power tool there are steps that should be taken to make sure that you, as the user, remain safe. Common sense and a respect for the tool will help reduce the risk of injury. Read the instruction manual fully. -
Page 7: Specific Safety Instructions For Morticer Use
HEALTH AND SAFETY INFORMATION Wait for the machine to stop. Unless the machine is fitted with a safety brake some parts may continue to move due to momentum. Wait for all parts to stop then disconnect it from the air line before making any adjustments, carrying out maintenance operations or just finishing using the tool. -
Page 8: Connection To The Power Supply
HEALTH AND SAFETY INFORMATION 5.3 CONNECTION TO THE POWER SUPPLY Caution: Risk of electric shock. Do not open. This appliance is supplied with a moulded 3 pin mains plug for your safety. The value of the fuse fitted is marked on the pin face of the plug. Should the fuse need replacing, ensure the substitute is of the correct rating, approved to BS1362 and ASTA or BS Kite marked. -
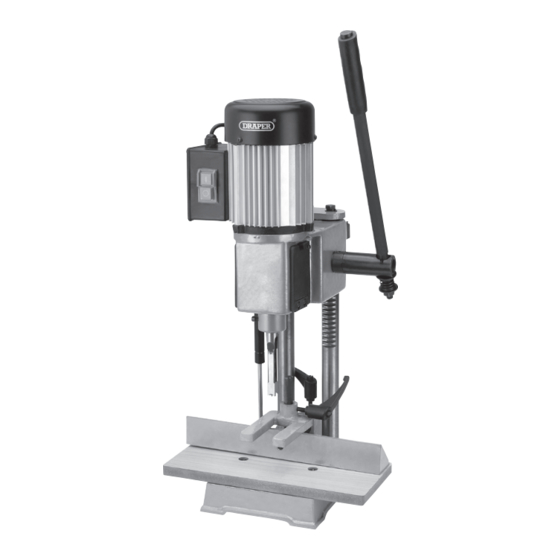
Page 9: Technical Description
TECHNICAL DESCRIPTION 6.1 IDENTIFICATION (1) Table (6) Hold down (2) Fence (7) Chuck access covers (3) Work piece clamp (8) Chuck key (4) ON/OFF switch (9) BS moulded plug & cable (5) Plunge handle – 9 –... -
Page 10: Unpacking And Checking
Lay the contents out and check them against the parts shown below. If any part is damaged or missing please contact the Draper help line (the telephone number appears on the Title page) and do not attempt to use the product. -
Page 11: Preparing The Bench Morticer
PREPARING THE BENCH MORTISER 8.1 ASSEMBLY - FIGS.1 - 6 Clip the gas spring (20) onto side of machine body (20) of connection points. (19) Use cross head screwdriver to secure table with the screws (19) provided. FIG. 1 Fix down hold down post (10) to fence (2) by (10) tightening grub screw with hex. - Page 12 PREPARING THE BENCH MORTISER Remove the nut, 2 x washers and spring from the end of the plunge lever. Fit the lever through the dog clutch and reassemble the washers, spring and nut. FIG. 5 Finally, attach tool rack to the side with hex. key (13) provided.
-
Page 13: Setting The Bench Morticer
SETTING THE BENCH MORTISER Warning! Remove the plug before carrying out any adjustment, servicing or maintenance. 9.1 CHISEL AND BIT INSTALLATION - FIGS. 7 - 12 Undo the screws securing the chuck access covers (7). FIG. 7 Select the correct reducing bush (16) for the diameter chisel you are using. - Page 14 SETTING THE BENCH MORTISER Note: It is important the bottom point of the bit protrudes 2.5mm below the bottom edge of the chisel (Fig.11). 2.5mm FIG. 11 The chisel and drill bit (12) must be fitted so that the open side is to the left or right. The workpiece must travel in the direction away from the open face.
-
Page 15: Basic Wood Turning
10. BASIC WOOD TURNING 10.1 OPERATION AND USE The dog clutch allows the plung lever to be repositioned relative to the user. By pulling the lever to the right it disengages the chuck, the positional adjustment can be made for user comfort. -
Page 16: Optional Accessories
11. OPTIONAL ACCESSORIES 11.1 OPTIONAL ACCESSORIES A full range of accessories are available from Draper Tools. Please visit our website for details: www.drapertools.com – 16 –... -
Page 17: Troubleshooting
Clean chisel and bit or the chisel. replace. Blunt chisel and bit. Sharpen chisel and bit. Feed pressure too light. Apply more pressure. Important: Please note all repairs/adjustments should be carried out by a qualified person Draper helpline (023) 8049 4344. – 17 –... -
Page 18: Maintenance
13. MAINTENANCE 13.1 MAINTENANCE The morticer requires minor maintenance. This includes the light oiling of moving parts. Removing dust from the machine after use. Check fastening are secure before use. Sharpening of bit and chisel when required. – 18 –... -
Page 19: Disposal
14. DISPOSAL 14.1 DISPOSAL – At the end of the machine’s working life, or when it can no longer be repaired, ensure that it is disposed of according to national regulations. – Contact your local authority for details of collection schemes in your area. In all circumstances: •... -
Page 20: Explanation Of Symbols
15. EXPLANATION OF SYMBOLS 15.1 EXPLANATION OF SYMBOLS Read the instruction manual. Wear face mask and safety glasses. Wear ear defenders. Wear protective gloves. Do not abandon into the environment. Keep out of the reach of children. Warning! WEEE – Waste Electrical & Electronic Equipment. - Page 21 NOTES – 21 –...
- Page 22 NOTES – 22 –...
- Page 23 NOTES – 23 –...
- Page 24 ©Published by Draper Tools Limited. No part of this publication may be reproduced, stored in a retrieval system or transmitted in any form or by any means, electronic, mechanical photocopying, recording or otherwise without prior permission in writing from Draper Tools Ltd.
Need help?
Do you have a question about the BENCH MORTICER and is the answer not in the manual?
Questions and answers