
Related Manuals for Kärcher SC EasyFix ATK 2


Summary of Contents for Kärcher SC EasyFix ATK 2
- Page 1 SC EasyFix ATK 2 Operating Instructions Please read the operating instructions carefully before using the unit 59690370 07/19...
-
Page 4: Table Of Contents
Contents Warranty The warranty terms published by the relevant sales Safety Instructions for Steam Cleaners ..company are applicable in each country. We will repair Safety Devices ..... . . potential failures of your appliance within the warranty Description of the Appliance . - Page 5 Repair works may only be Electric components performed by the authorized DANGER customer service. Never use the appliance in The connection between the pools containing water. power cord and extension ca- Do not level the steam jet di- ble must not lie in water.
- Page 6 sons who have not been in- Safe handling structed accordingly. DANGER This appliance is not intended The user must use the appli- for use by persons with limit- ance as intended. The person ed physical, sensory or men- must consider the local condi- tal capacities or lacking expe- tions and must pay attention...
-
Page 7: Safety Devices
CAUTION Safety Devices Create stability for the appli- CAUTION ance prior to any work on or Safety devices protect the with the appliance to prevent user and may not be modified accidents or damage. or bypassed. Never fill solvents, solvent- Symbols on the machine containing liquids or undiluted acids (e.g. -
Page 8: Description Of The Appliance
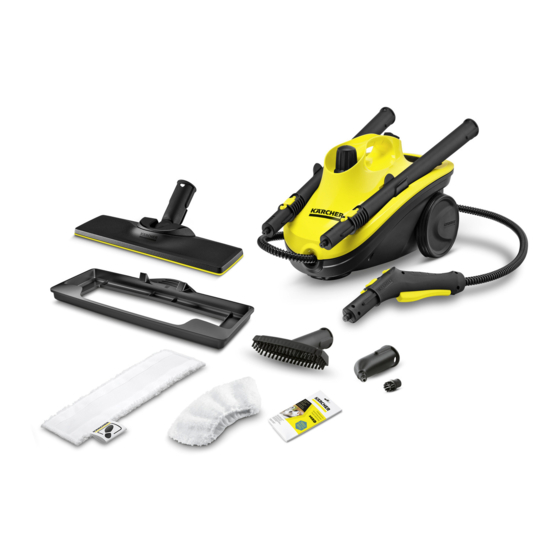
Description of the Appliance Switch - ON A11 Running wheels (2 ea.) Switch - OFF A12 Steering roller Indicator lamp (green) – line voltage is on B1 Steam gun Indicator lamp - heater (ORANGE) B2 Unlocking button Safety cap B3 Selector switch for the steam volume (with child Holder for accessories protection) Storage holder for floor nozzle... -
Page 9: Description Of The Appliance
Description of the Appliance C1 Detail nozzle F1 Floor nozzle C2 Round brush F2 Hook and loop fastener F3 Microfibre floor cloth D1 Hand nozzle F4 Carpet glider D2 Manual nozzle microfibre cover G1 Descaler E1 Extension tubes (two tubes) E2 Unlocking button –... -
Page 10: Quick Reference
Quick Reference Unscrew the safety lock and fill the steam cleaner Plug in the mains plug. with a max. of 1 litre of water. Turn on the machine. Screw in safety cap. The green and orange indicator lamps light up. Wait until the orange indicator lamp goes out. -
Page 11: Operation
Operation Adjusting the Steam Quantity Use the selector switch for the steam volume to regulate Attaching the Accessories the discharged steam. The selector switch has three po- Illustration sitions: Insert steering roller and running wheels and lock Maximum steam volume them. -
Page 12: How To Use The Accessories
Storing the Appliance Detail nozzle Illustration The closer this nozzle is to the contaminated area, the – Put the extension pipes into the large accessory higher the cleaning effect, as the temperature and the holders. steam are highest at the nozzle output. Especially suit- –... -
Page 13: Care And Maintenance
Removing the floor cleaning cloth Removing the carpet glider from the floor nozzle CAUTION Illustration Beware of burns to your feet Place one foot on the bottom corner of the floor The carpet glider can heat up during the steaming pro- cleaning cloth and lift the floor nozzle up. -
Page 14: Troubleshooting
Technical specifications Care of the Accessories (Accessories - depending on scope of delivery) Power connection NOTICE Voltage 220-240 The micro fibre cloths are not suitable for dryer. 1~50-60 NOTICE When washing the cloths, observe the instructions on Protective class the washing tag. Do not use any liquid softeners as this Protection class IPX4 will affect the ability of the cloths to pick up dirt. - Page 16 www.kaercher.com/dealersearch Alfred Kärcher & Co. KG Alfred-Kärcher-Str. 28-40 71364 Winnenden (Germany) Tel.: +49 7195 14-0 Fax: +49 7195 14-2212...
Need help?
Do you have a question about the SC EasyFix ATK 2 and is the answer not in the manual?
Questions and answers