Advertisement
Quick Links
Advertisement

Subscribe to Our Youtube Channel
Related Manuals for Dive Gear Express DGX Xtra First Stage


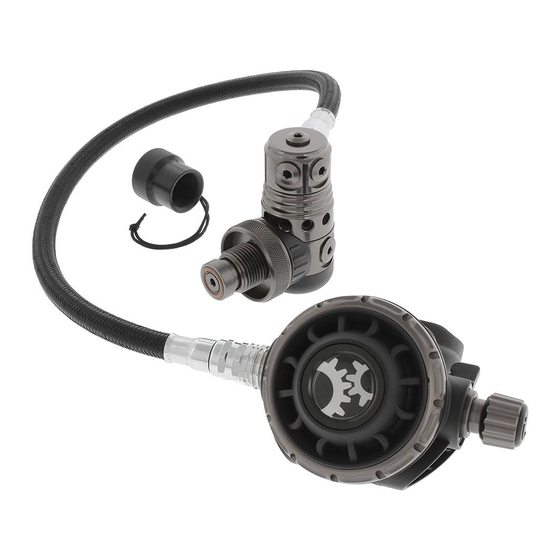
Summary of Contents for Dive Gear Express DGX Xtra First Stage
- Page 1 DGX Gears XTRA Regulator Service Manual DGX Xtra First Stage...
- Page 2 Copyright © 2020 Dive Gear Express Author/Photographer – UDM Consulting All rights reserved. Revision 5d Published 8/17/2020...
- Page 3 1. Overview (1) The availability of subassemblies and components, repair parts, specialized tools, and maintenance manuals does not imply qualification to assemble and/or service scuba equipment. Improper service of dive equipment can lead to severe injury or death. Dive Gear Express recommends that nonqualified individuals seek professional training/mentoring before attempting repairs or servicing on any diving equipment Failure to follow the procedures outlined herein may result in injury or death! (2) In the following pages will be found, the disassembly, assembly, tuning, and troubleshooting steps for these components. Photos are used throughout to illustrate the procedures. Please pay special attention to all caution notes! (3) Whenever an item of extra importance needs to be observed, a “Caution Note:” will appear, followed by the required information. See below. Caution Note: This must be read and followed! (4) Included in this manual is a list of recommended/required tools for each disassembly, assembly, and testing section. They are identified in each section where they are used. ...
- Page 4 Cleaning and Rinsing General Considerations (11) Cleaning and rinsing of the components should be done using clean, fresh water. If available, distilled water is recommended to maintain oxygen cleanliness. (12) Only use degreasers that leave no organic residue (clear Simple Green, dyefree Dawn dishwashing liquid, or Blue Gold Cleaner as examples). (13) To deal with corrosion, use a 50/50 vinegarwater solution and nylon brushes. (14) Allow parts to air dry without the use of cloths that may leave fibers. For regulators that are going to be used with Oxygen percentages above 40%, a UV light is strongly recommended to check for organic contamination. (15) Once all service procedures have been completed and bench testing done, in water testing in a confined ...
- Page 5 Inspection After Cleaning (21) Before assembling the regulator, it is necessary to inspect all of the cleaned components. Using the magnifying glass, check the components for damage that may have been hidden by corrosion or lubricant. Look for scratches that may affect the sealing of the regulator. In a darkened room, use the UV light to look for organic material. If any are present, reclean the part! This is critical for use with oxygen percentages above 50%! (22) Another way to check for residual lubricants is to fill a tray with clean, fresh, water deep enough to cover the parts by an inch or so. Lay the components in and circulate the water. Allow the pieces to soak for several minutes. Once it has settled, look for a rainbow sheen on the surface of the water. Any residual lubricants will float and form a “slick” on the surface. If one is present, the parts must be cleaned again. (23) Now that all parts have been cleaned and checked, the assembly can begin. Make sure all old parts that are to be replaced have been discarded or segregated. Remove the new parts from the service kit bag and lay them out in the order they will be used. Do not take the new parts out of the bags yet! Caution Note: Removing parts from their individual bags, before they are to be used, runs the risk of mixing them up. Some orings are very close in size but are not interchangeable! Keep the parts in the bags until you actually need them. (24) As with the parts that have been cleaned, it is a good idea to inspect the new parts as well. Especially the HP seat. Make sure it is free of any defects. Check all of the orings and inspect them as you use them for nicks or other concerns. Inspect the washers to ensure they are free of excess burrs or other concerns that could affect their function. It is also a good idea to use the parts list on the schematic to ensure that all of the new parts that are needed are present and accounted for in their required quantities. (25) Lubrication of Orings; Lubrication can be overdone. Doing so runs the risk of trapping excess dirt or debris on the parts. One way of reducing the risk of overdoing it is to use the lubeinabag method. This involves using a small clean plastic bag and putting a small amount of lube in it. Then the oring is inserted into the bag, worked around, excess squeezed off, and taken out of the bag, and used in its location. Fig. 1 Fig. 2. (26) Another way is to apply a small amount of Tribolube to the gloved index finger and massage the oring between the thumb and index finger. Either way works, but the bag method tends to give better distribution results and uses less lubricant. ...
- Page 6 (27) Under most circumstances, a lubricant is used correctly very sparingly or not at all. In nearly all scuba applications, if you can see the lubricant, you’ve used too much. Before using any lubricant, any existing lubrication should be removed before new is applied. In dynamic applications, it is used to reduce excessive wear. Static orings do not generally require the use of lubricant. (28) Where parts are not necessary to be lubricated, it is good practice to avoid getting any lubricant on them. Primarily when the regulator is used with high O2 content mixes. It also helps to keep those parts clean and free of debris that will cling to the lubricant. The next section lists the tools you will need to service the regulator. ...
-
Page 7: Tool List
2. TOOL LIST (1) The tool list has been divided into two sections. Required and Recommended. Required tools are necessary for servicing the regulator. Recommended are those items that make servicing easier or more efficient as well as lessening the chance of damage. Required tools Adjustable Torque Wrench 3/8 drive 0300 inchpounds range Piston Stem Bushing Assembly Tool – Scuba Tools part number 20150200 Scuba MultiTool – Scuba Tools part number 20100200 Stage Handle for HP and LP ports 3/4 inch 3/8 drive socket 6mm 3/8inch drive Hex Head male socket 5mm 3/8 drive hex socket 4mm 3/8 drive hex socket 2 Adjustable Wrenches Brass Picks for removing orings Intermediate Pressure Gauge Tribolube 71 Soft Bristle Cleaning Brushes (Nylon) Recommended tools 1. Inline second stage adjustment tool with slotted orifice selected ... - Page 8 Fig. 3 Fig. 4 Required Tools Recommended Tools Fig. 5 Fig. 6 Colander Strainers ...
- Page 9 3. Preliminary Testing (1) Preliminary testing of the regulator is necessary to identify any issues with the first and second stages and verify the overall regulator function. This testing will include: 1. Visual inspection of the first and second stages 2. Inspection of the hoses 3. Intermediate Pressure check 4. Cracking Pressure and Second Stage Negative Pressure Test Visual inspection is done to identify issues that could affect servicing and to ensure that pressurizing the system will not compromise the safety of the service technician. The technician will check all connections to make sure they are secure. The technician will check that on the first stage, there are no extruded orings, and hoses are tight. The technician will check there are no defects to the SPG. The technician will ensure that the DIN assembly is secure, and the O ring is intact and able to form a seal. The technician will inspect the filter for signs of discoloration. Detailed Inspection of Hoses is done to ensure it is safe to pressurize the regulator set. The technician will check all hoses, looking for evidence of possible failure. The technician will check all hose connection crimps. Defects must be taken care of before pressurizing the system! Replacement of any suspect hoses is recommended. Caution Note: Defects in hoses require replacement before pressurizing the regulator! Failure to do so may result in serious injury or death! (2) Detailed Visual Inspection of the SPG and connection – The technician will check the SPG for any signs of cracking of the face, water intrusion, and corrosion around the SPG to the hose connection. If using a console or boot, it is necessary to remove the SPG from the rubber boot. Once this is done, the HP spool should be inspected and, if necessary, replaced. (3) Checking of Intermediate Pressure (IP) – The Intermediate Pressure (IP) of the system should be tested only after the preceding checks have been done to ensure technician safety. Checking of intermediate pressure is done by attaching an intermediate pressure gauge to the LP pressure inflator hose. The system is ...
- Page 10 Caution Note: If the second stage is leaking even slightly, IP will be affected. If the second stage is leaking, turn the adjustment knob to stop it or use a second stage that is not leaking through when paired with the first stage. (4) The standard operating range for the system is with an IP of 135 PSI. Ideally, the system is operating at 135 PSI +/ 5 PSI and show no signs of “creep” or instability at 3000 PSI. Caution Note: “Creep” will show as the IP steadily increasing while the regulator is not in use. Normally the IP will drop 510 PSI during a breath or purge and then return to its setting. It should not return to the setting and keep increasing. This would indicate a problem with the highpressure seat, Piston, or sealing orings. (5) If the system shows no sign of creep or IP instability, it is generally not necessary to rebuild the 1 stage with some exceptions. Caution Note: If the unit shows signs of internal corrosion or the filter shows evidence of contamination, the unit must be rebuilt! Regardless of the Intermediate Pressure. (6) The regulator will require rebuilding if small bubbles are leaking from between the turret retainer and main body, from under the rubber cap, or out of the highpressure seat retainer. Knowledge of flooding of the first stage will also require the unit to be rebuilt. Freshwater contains dissolved minerals and other materials that, due to internal corrosion over time, may cause the regulator to malfunction. (7) After the IP has been checked, hoses and regulator body inspected, and SPG evaluated, the service of the stage can take place if it is determined that service is necessary. ...
- Page 11 4. First Stage Disassembly (1) 1 stage disassembly – Ensure the system is depressurized. Document the position of all hoses and port plugs. The use of small, clean containers to hold parts is recommended. (2) In the following steps, the part numbers from the schematic will be used with their description. Have the schematic in front of you while following the instructions! Be sure to keep all old parts organized and separate from new ones in the service kit! 1. Remove all hoses and port plugs – Fig. 7. Fig. 7 2. Remove the DIN Shutter valve (D2) using a 4mm hex and DIN shutter crown (D4), which contains the Spring (D6) and two small nylon washers (D5) – Fig. 8. Washers are replaced as indicated by the * symbol. Fig. 8 The numbers on the photo correspond with the parts list on the schematic. This is done to aid in the identification of individual items. Items in the service kits are identified in the same way. ...
- Page 12 3. Remove the Retainer Housing (D8) with the 4mm hex and lift the DIN Handwheel off of the body – Fig. 9. Fig. 9 4. Insert the 1 stage handle into one of the highpressure ports and clamp the handle into a vise – Fig. 10. NEVER CLAMP THE 1 STAGE BODY INTO THE JAWS OF A VISE! Fig.10 Caution Note: Clamping the body of the regulator into the jaws of a vise may result in damage to the body that will require replacement of the regulator. Always use a 1 stage handle to secure the regulator. ...
-
Page 13: Caution Note
5. Using a ¾ inch socket and ratchet loosen the Filter Retainer DIN (D10) – Fig. 11. Be sure to hold the socket firmly so that it doesn’t slip. Use steady, even pressure. Remove the Retainer and Saddle (08). Fig. 11 6. - Page 14 7. Using the Multitool or Pin Spanner, carefully remove the rubber End Cap (34) – Fig. 13. This exposes the HP Seat Retainer (33) – Fig. 14. Fig. 13 Fig. 14 8. Loosen the HP Seat Retainer with a 5mm hex wrench and remove it from the body, exposing the HP Seat (31) –...
- Page 15 10. Using the universal wrench or a pin spanner with an appropriate pin, and the 1 stage handle secure – Fig. 17, loosen the End Cap (19) so that a gap is visible – Fig. 18. Fig. 17 Fig. 18 11.
- Page 16 13. Carefully remove the following components from the HP side of the regulator body. Washer (28), Oring (27), and Teflon Washer (26) using the Piston Stem Bushing Assembly Tool – Fig.22. Turn the body over and remove the other Oring (27) with a brass or nylon pick – Fig. 23. Fig.
- Page 17 (3) The photographs below show the disassembled first stage – Fig. 26 and 1 stage service kit – Fig. 27. All of the parts not in the service kit need to be washed, rinsed, and dried, as discussed previously. Fig. 26 Disassembled 1 Stage Fig.
- Page 18 5. First Stage Assembly (1) Before starting the assembly of the second stage, complete a thorough inspection of all parts to be re used. Refer to the Overview Inspection section for details. At this time, open the service kit and lay out the parts.
- Page 19 3. Set this assembly aside and install one of the Orings (27) into the groove on the regulator body that the End Cap/Port Swivel assembly screws onto – Fig.32. Use the Piston Stem Bushing Assembly Tool and on the narrower end place in the following order Washer (28), lubricated Oring (27), and Teflon Washer (26) – Fig. Fig.
- Page 20 6. Reverse the tool to hold the stack and protect the Piston end Fig. 39. Insert the Piston/End Cap/Port Swivel assembly into the regulator and screw it on hand tight Fig. 40. Fig. 39 Fig. 40 7. Install the 1 stage handle into a highpressure port ...
- Page 21 9. Install the HP Seat Retainer into the body and torque this to 130 inlbs/ 150 kgf cm/ 15 Nm Fig. 45. Fig. 45 10. Once the HP Seat Retainer is torqued to its proper specification, install the rubber End Cap (34) onto the regulator body.
- Page 22 12. Torque the Filter Retainer (D10) to 260 inlbs/ 300 kgf cm/ 30 Nm. Set the Handwheel (D9) on the Filter Retainer. Lubricate the three remaining Orings (D7) and install them on the Retainer Housing (D8) Fig. 48. Fig. 48 13.
- Page 23 15. Lubricate the Oring (D1) and install it on the DIN Shutter Valve (D2) Fig.51. Slide the Shutter Valve into the Crown Fig.52 and using a 4mm hex, torque the Valve to 27 inlbs / 31 kgf cm/ 3 Nm. Fig.53 Fig.
- Page 24 A transfill whip like the one from Dive Gear Express will make setting up the cylinders easier. https://www.divegearexpress.com/dgxtransfillhosewithanaloggauge (2) Attach a second stage with a hose with an inline tool/IP gauge combination, or a second stage with a...
- Page 25 Caution Note: Do not submerge the second stage with the inline tool attached or with the plugin IP gauge on the low pressure inflator. They are made for surface use only, and submerging them may result in damage to the tool or gauge! (7)General Trouble Shooting – Not all possibilities may be noted. No airflow Check supply pressure Free Flowing Excessive IP. Highpressure seat bad, piston edge damaged, Excessive IP Bad HP seat, HP Seat or Piston Oring (s) bad Leaks between seams on body Bad orings, excessive IP, body/end caps damaged, dirt introduced during a rebuild...
Need help?
Do you have a question about the DGX Xtra First Stage and is the answer not in the manual?
Questions and answers