
Subscribe to Our Youtube Channel
Related Manuals for Holman Solid Metal Travelling Sprinkler


Summary of Contents for Holman Solid Metal Travelling Sprinkler
- Page 1 FOLLOWS PATH SET BY HOSE IDEAL FOR LARGE LAWNS 7700H PRODUC T CODE 1 of 8 User Guide...
-
Page 2: Table Of Contents
Contents Introduction The Solid Metal Travelling Sprinkler is ideal Introduction Overview for extra large lawns. It is built extra durable with Connecting the Spray Arms a heavy duty cast iron body. Self propelled by a Spray Arm Direction 2-speed gearbox, the front wheel travels the path... -
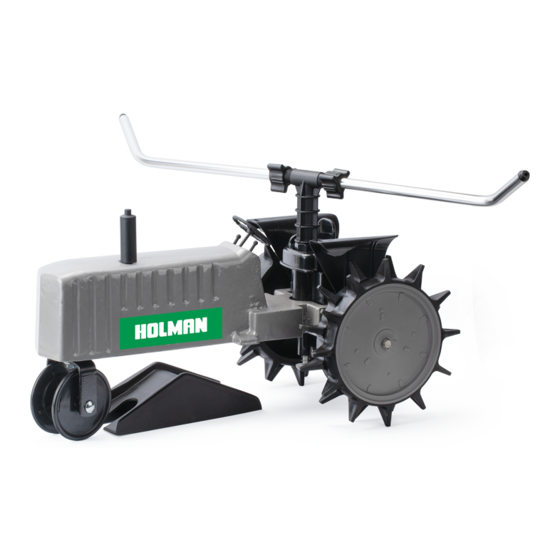
Page 3: Overview
Overview Travelling Sprinkler 1. Arm Centre Assembly Post 5. Back Wheels Assembly 9. Sprinkler Accessory Pack 2. Spray Arms 6. Front Wheel Assembly 10. 12mm Snap-on Hose Connector 3. Connector Nuts 7. Stop Pin 11. 18mm Snap-on 4. Travelling Sprinkler Body 8. -
Page 4: Connecting The Spray Arms
Installation and Setup Spray Arms Connecting the Spray Arms: Spray Arm Direction: 1. Using the wrench provided, securely It is important that the Spray Arms are positioned hold the Connector Nut located in the correctly, otherwise the Travelling Sprinkler will seat of the Travelling Sprinkler not move properly, or it many not move at all 2. -
Page 5: Spray Arm Adjustments
Installation and Setup (continued) Spray Arms Adjusting the Angle of the Spray Arms: Adjusting the angle of the Spray Arms allow you to control the spray distance For maximum coverage, turn the tips upwards and out to approximately a 30º angle For minimum coverage, turn the tips slightly downward and clear of the Travelling Sprinkler body Setting up the Hose Track... -
Page 6: Sprinkler Operation
Sprinkler Operation Sprinkler Operation Sprinkler Gears The small Front Wheel should straddle the hose Protect the water motor gears from damage track. The Stop Pin (on the underside of the by never operating the Travelling Sprinkler Travelling Sprinkler near the Back Wheels) on driveways or footpaths should be pulled out for watering Œ... -
Page 7: Sprinkler Flow Rate
Sprinkler Flow Rate Sprinkler flow rate for 12mm and 18mm Hoses Chart calculated using 12mm hose of up to 30m length, with an average pressure of 275kPa. Dependent on sprinkler set up, flow rate ranges from 14Lpm to 20Lpm (average is 17Lpm). 12mm Diameter Hose Spray Coverage 4.5 Metres... - Page 8 We recommend registering your new product on our website. This will ensure we have a copy of your purchase and activate an extended warranty. Keep up to date to with relevant product information and special offers available through our newsletter. www.holmanindustries.com.au/product-registration/ Thanks again for choosing Holman...
Need help?
Do you have a question about the Solid Metal Travelling Sprinkler and is the answer not in the manual?
Questions and answers
how do i remove the base to repair the cogs