
Related Manuals for JMQ Fitness RBT3008


Summary of Contents for JMQ Fitness RBT3008
- Page 2 Installation and Operation Manual INSTALL AND OPERATE THE PRODUCT ONLY AFTER CAREFULLY READING ALL CONTENTS OF THE MANUAL, AND PROPERLY KEEP THIS MANUAL...
- Page 3 Important Safety Knowledge Please properly keep this manual for future reference. Precautions Although safety precautions have been taken into account as far as possible in the design and manufacturing of this fitness equipment, there are still some safety precautions to be followed during operation. Before assembling and using this fitness equipment, please carefully read the manual, especially the following safety precautions: Keep children and pets away from the fitness equipment, and never leave...
-
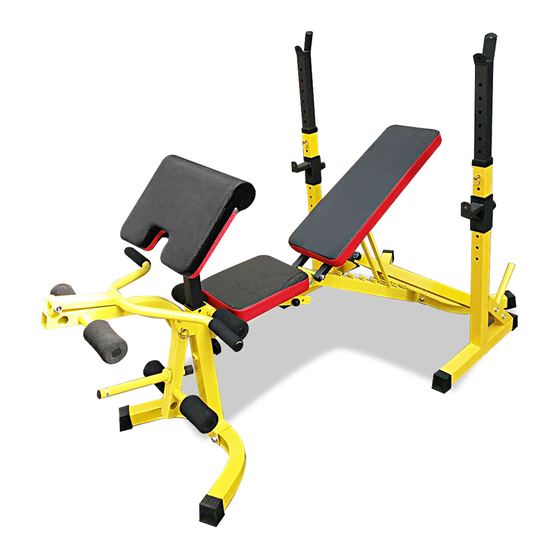
Page 4: Product Detail
Product Detail... -
Page 5: Detail List
Detail List Description Quantity Front bent pipe Rear bent pipe Front bracket Master bracket Seat cushion tube Backrest tube Seat cushion adjusting bracket Backrest tube adjusting bracket Pedal bracket Supporting plate adjusting bracket Foam tube Handle Supporting plate mat Seat cushion plate Backing plate Foam Handle foam... - Page 6 Assembly Instructions Tools required for assembling: Two 13-17 open-end wrenches, one 5# socket head wrench and one 6# socket head wrench. Remarks: to avoid injury, two or more persons are required for assembling the equipment. Step 1 Place Item 1 and Item 3 as shown in the figure, and fix Item 3 on Item 1 with the bolt (Item 25), flat gasket (Item 31) and nylon nut (Item 32);...
- Page 7 Step 2 Match Item 9 and Item 3 as shown in the figure, lead the bolt (Item 25) through Item 3 and Item 9 and fix it on Item 3, and assemble the flat gasket (Item 31), then screw on the nylon nut (Item 32), and insert Item 28 into the corresponding spacing hole;...
- Page 8 Step 2 Match Item 9 and Item 3 as shown in the figure, lead the bolt (Item 25) through Item 3 and Item 9 and fix it on Item 3, and assemble the flat gasket (Item 31), then screw on the nylon nut (Item 32), and insert Item 28 into the corresponding spacing hole;...
- Page 9 Step 3 Match Item 12 and Item 9 as shown in the figure, lead the bolt (Item 28) through Item 9 and Item 12 and fix it on Item 9, and assemble the flat gasket (Item 31), then screw on the nylon nut (Item 32); Insert Item 11 (both) into the corresponding holes in Item 9 and Item 3, and then assemble Item 16 to both ends of Item 11.
- Page 10 Step 4 Connect Item 13 to Item 10 with two bolts (Item 30) as shown in the figure; Connect Item 14 to Item 5 with four bolts (Item 29) as shown in the figure; Connect Item 15 to Item 6 (both) with four bolts (Item 29) as shown in the figure;...
- Page 11 Training Instructions By using this product, you can not only strengthen your body constitution and exercise your muscles, but also lose weight through reasonable diet collocation. Warm-up before training Warm-ups boost your blood circulation and make your muscles reach a better state of training, while reducing the risk of cramp or muscle strain during training.
- Page 12 Training Instructions By using this product, you can not only strengthen your body constitution and exercise your muscles, but also lose weight through reasonable diet collocation. Warm-up before training Warm-ups boost your blood circulation and make your muscles reach a better state of training, while reducing the risk of cramp or muscle strain during training.
- Page 13 Installation and Operation Manual INSTALL AND OPERATE THE PRODUCT ONLY AFTER CAREFULLY READING ALL CONTENTS OF THE MANUAL, AND PROPERLY KEEP THIS MANUAL...
- Page 14 Important Safety Knowledge Please properly keep this manual for future reference. Precautions Although safety precautions have been taken into account as far as possible in the design and manufacturing of this fitness equipment, there are still some safety precautions to be followed during operation.
- Page 15 Product Detail...
- Page 16 Detail List Description Quantity Main supporting bracket Main adjusting bracket Upper and lower adjusting bracket Adjusting bracket 50 threaded tube end for square tube 50-turn 45 bushing 60-turn 50 bushing Elastic pull pin Pull-ring bolt Adjusting bracket 25 flat pipe plug Hex head cap screw (M10*65) Flat gasket (∮10) Nylon nut (M10)
- Page 17 Assembly Instructions Tools required for assembling: Two 13-17 open-end wrenches Remarks: to avoid injury, two or more persons are required for assembling the equipment. Step 1 A) Connect Item 2 and Item 1 as shown in the figure, and fix them with the bolt (Item 12), flat gasket (Item 13) and nut (Item 14);...
Need help?
Do you have a question about the RBT3008 and is the answer not in the manual?
Questions and answers