Table of Contents
Advertisement
Quick Links
Advertisement
Table of Contents

Related Manuals for JMQ Fitness PBED-LEEKON-T59-WBLK


Summary of Contents for JMQ Fitness PBED-LEEKON-T59-WBLK
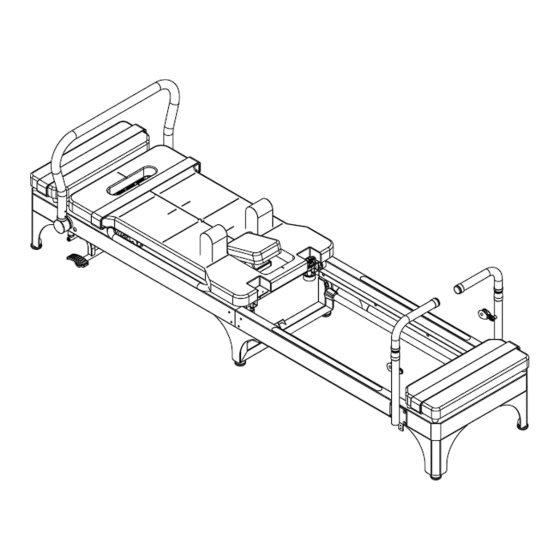
- Page 1 Pilates reformer Please read the manual carefully before using this...
-
Page 2: Ⅰ.safety Precautions
equipment Ⅰ.Safety Precautions Before using this product, please read the following safety precautions in detail. - Page 3 Be sure to store this user manual in an easily accessible place for future reference. *Before starting any sports course, consult your doctor for best training advice *The maximum user weight of this machine is 130Kg. *Warning: improper / overtraining can cause health damage. If you feel unwell while training at home, please stop immediately *Please follow the correct training details in the training guide *...
- Page 4 Step 1: remove the bubble pad wrapped on the mechanical parts, and then find out the following parts and install them according to the figure below; Step2 Install the main frame . Find the following accessories as shown in : ②...
- Page 5 Step3 The dumbbell rack is installed, and the following accessories are : ③ found as shown in the figure below. All screws are installed in a fixed position and can be removed after removal.
- Page 6 Step 4 The front pad is installed. Find the following accessories as shown : ⑦ in the figure below. All screws are installed in a fixed position and can be removed by removing.
- Page 7 Step 5 The movable frame ⑨ is installed. Find the following accessories as : shown in the figure below. All screws and screws are installed in a fixed position and can be installed after removing.
- Page 8 Step 6 Before and after the installation of the front and rear frames, first install : the movable frame on the rear main frame . Take care to remove the ⑨ ② screws in the enlarged view, and then install the front frame as shown ①...
- Page 9 Step 7:The rear cushion is installed, and the movable frame is first ⑥ ⑨ installed on the rear main frame . Note that in the enlarged view, the screws ② are first removed and then installed as shown in the following figure. When the jump board needs to be replaced, the same action is taken.
- Page 10 Step 8:To install the footbar ⑩, find the following accessories as shown in the figure below. All screws and screws are installed in a fixed position and can be removed after removal.
- Page 11 Step 9: Install the rope ⑬, find the following accessories as shown in the figure below, pay attention to the enlarged picture, the rope passes through the rope clamp...
- Page 12 Step 10: To place and install the accessories, find the following accessories as shown below, and place them as shown below...
-
Page 13: Parts List
Parts List... - Page 14 Serial No. Name Serial No. Name Body bar front frame ① ⑯ hook Bottle rear main holder ② ⑰ frame fixing plate Dumbbell Bottle ③ ⑱ rack holder springs ④ ⑲ Jump board ⑤ rear cushion ⑥ Front pad ⑦ Handle bar ⑧...
-
Page 15: Daily Cleaning
》Daily cleaning: The surface of the equipment shall be wiped after being dried with cotton cloth soaked with diluted neutral detergent; Wipe the sliding part with cotton cloth and Degreaser 》Daily inspection: Is the pulling rope twisted, worn or loose? Is the connection part of the frame tight and reliable? Is the rotation or part smooth and noisy? Is there any defect in motion diagram and warning sign?
Need help?
Do you have a question about the PBED-LEEKON-T59-WBLK and is the answer not in the manual?
Questions and answers