Advertisement
Available languages
Available languages
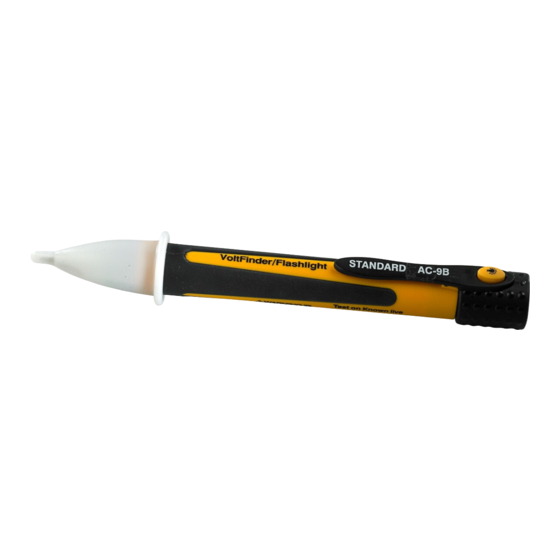
Voltage Detector
Art.no 36-2285
Please read the entire instruction manual before use and
save it for future reference. We reserve the right for any
errors in text or images and for making any necessary
technical changes to this document. If you should have
any questions concerning technical problems please
contact our Customer Services.
Warning!
•
Contact with live components can lead to electric
shock with serious consequences.
•
Never use the product if your hands are wet.
•
Never measure voltages of greater than 600 V.
•
Do not use the voltage detector if it is damaged or if
any part of it is missing.
•
Do not dismantle the voltage detector, it contains no
parts that can be altered or repaired.
•
Do not expose the voltage detector to extreme
temperatures or humidity.
Warnings found on the product
Always test the voltage detector on a component known
to be carrying voltage before testing unknown components.
Never use it if you get no indication when testing compo-
nents known to be carrying voltage!
Description
The voltage detector is intended to indicate when
the test object is live by means of a red LED and buzzer.
•
Contact-free measurement of AC voltage, from 100 V AC
to 600 V AC, 50/60Hz.
•
Robust casing.
•
Suitable for checking the fuses in your distribution
box, indicating cable breaks, live sockets and
insulated cables, e.g. checking which of the Christmas
tree lights has blown etc.
•
Red LED and buzzer to indicate if there is any voltage
in the test object.
•
Built-in LED with on/off switch.
•
Convenient size, equipped with belt clip.
1 2 3
4
1. LED
2. Battery cover
3. On/off switch for the LED
GREAT BRITAIN • CUSTOMER SERVICE
tel: 0845 3009 799 internet: www.clasohlson.com/uk
e-mail customerservice@clasohlson.co.uk
5
4. Attachment clip
5. Detector casing
6.
Test probes
Battery change
1. Carefully bend the attachment clip back until the lock
releases, pull the battery cover back (with the LED).
2. Remove the old batteries and insert two new
batteries (LR03) with the plus (+) pointing forward
(as marked on the casing).
3.
Push in the attachment clip until it locks in
the normal position.
Use
•
Test the voltage detector on a component that is
known to be carrying voltage.
•
Place the test probes close to the test object
(power point, fuse,etc) draw them along the cable
(if testing the cable).
•
The red LED and weak buzzer tone indicate the
presence of any voltage.
Note!
Draw the test probes along the cable, do not hold
the probes in the same spot, the wires in the cable might
be crossed and the detector measures alternating voltage.
The detector cannot be used on shielded cable, cable in
cable tracks, behind panels or metal surfaces.
Do not rub the test probes on anything before you start
testing, the detector might indicate any static electricity
produced by the rubbing.
Disposal
Follow local ordinances when disposing of this product.
If you are unsure about how to dispose of this product
contact your municipality.
Specifications
Standard
Measurement Range
Operating temperature
Humidity
Size
Weight
Batteries
6
CAT III 1000 V
100–600 V AC, 50/60 Hz
-10 to 50 ºC
0–30 ºC; 95% RH
30–40 ºC; 75% RH
40–50 ºC; 45% RH
176 mm × Ø 26 mm
48 g (including batteries)
LR03 (×2) (not included)
Advertisement
Table of Contents

Related Manuals for Clas Ohlson 36-2285


Summary of Contents for Clas Ohlson 36-2285
- Page 1 Voltage Detector Battery change 1. Carefully bend the attachment clip back until the lock releases, pull the battery cover back (with the LED). Art.no 36-2285 2. Remove the old batteries and insert two new batteries (LR03) with the plus (+) pointing forward Please read the entire instruction manual before use and (as marked on the casing). save it for future reference. We reserve the right for any Push in the attachment clip until it locks in errors in text or images and for making any necessary the normal position.
- Page 2 Spänningsdetektor Batteribyte 1. Vik försiktigt fästclipset utåt tills låsningen släpper, dra batterilocket (med lampan) rakt bakåt. Art.nr 36-2285 2. Ta ur de gamla batterierna, sätt i 2 nya batterier (LR03) med plus (+) framåt (enligt märkning på höljet). Läs igenom hela bruksanvisningen före användning och Tryck in bältesclipset tills det låser i sin normala position. spara den sedan för framtida bruk. Vi reserverar oss för ev. text- och bildfel samt ändringar av tekniska data. Användning Vid tekniska problem eller andra frågor, kontakta vår kundtjänst. • Testa spänningsdetektorn på en känd spännings- förande komponent. Varning • Placera mätproben nära mätobjektet (eluttag, säkring etc.) för den längs efter kabeln (vid mätning av kabel). •...
- Page 3 Spenningsdetektor Batteriskifte 1. Bend festeklipsen forsiktig utover til låsingen slipper og dra batterilokket (med lampen i) rett bakover. Art.nr. 36-2285 2. Ta ut de gamle batteriene, sett i 2 nye (LR03) med plusspolen (+) framover. (Se merking på Les hele bruksanvisningen grundig, og ta vare på den til indikatorens deksel). seinere bruk. Vi reserverer oss fra ev. tekst- og bildefeil, 3. Trykk inn belteklipset til det låses fast igjen. samt forandringer av tekniske data. Ved tekniske problemer eller ev. spørsmål, ta kontakt med vår kundetjeneste. Bruk Varsel • Test spenningsdetektoren på en kjent spennings- førende komponent. • Kontakt med spenningsførende komponenter kan føre • Plasser detektoren nær måleobjektet (eluttaket, til elektrisk støt med dertil store konsekvenser. sikringen etc.) og før den langs kabelen (ved måling • Bruk aldri produktet med våte hender. av kabel). • Mål ikke spenning større enn 600 V.
- Page 4 Jännitteenilmaisin Paristojen vaihto 1. Taita vyökiinnikettä ulospäin, kunnes lukitus avautuu. Vedä paristolokeron kantta (jossa lamppu) suoraan Tuotenro 36-2285 taaksepäin. Poista vanhat paristot ja aseta tilalle kaksi uutta Lue käyttöohjeet ennen tuotteen käyttöönottoa. Säilytä LR03-paristoa kotelon napaisuusmerkintöjen käyttöohjeet tulevaa tarvetta varten. Pidätämme oikeuden mukaisesti. teknisten tietojen muutoksiin. Emme vastaa mahdollisista 3. Napsauta vyökiinnike takaisin omalle paikalleen. teksti- tai kuvavirheistä. Jos laitteeseen tulee teknisiä...
- Page 5 Spannungsdetektor Batteriewechsel 1. Vorsichtig den Gürtelclip nach außen biegen, bis er sich löst. Dann die Batterieabdeckung (mit der Lampe) Art.Nr. 36-2285 gerade nach hinten ziehen. Die alten Batterien entnehmen und zwei neue Batterien Vor Inbetriebnahme die komplette Bedienungsanleitung (LR03) mit dem Pluspol (+) nach vorn einlegen (siehe durchlesen und aufbewahren. Irrtümer, Abweichungen Markierung am Gehäuse). und Änderungen behalten wir uns vor. Bei technischen Den Gürtelclip wieder in seiner normalen Position Problemen oder anderen Fragen freut sich unser Kunden- andrücken. service über eine Kontaktaufnahme. Verwendung Warnung • Den Spannungsdetektor zunächst an einer bekannten, • Ein Kontakt mit spannungsführenden Komponenten spannungsführenden Komponente testen. kann zu elektrischem Schlag mit schwerwiegende • Die Messsonde in die Nähe des Messobjekts (Stroman- Folgen führen. schluss, Sicherung o. Ä.) halten. Beim Messen an Kabeln • Das Produkt nie mit nassen Händen verwenden. die Messsonde am Kabel entlang führen. • Niemals Spannungen über 600 V messen. • Der Spannungsdetektor gibt vorhandene Spannung • Das Gerät nicht verwenden, wenn Teile fehlen oder mit einer roten Leuchtdiode und einem Summerton an.
Need help?
Do you have a question about the 36-2285 and is the answer not in the manual?
Questions and answers