Table of Contents
Advertisement
Quick Links
1
Congratulations on the purchase of your new Fluval C Power Filter. Please allow
approximately 15-20 minutes for the complete installation of filter parts and
inserts. Inspect the filter for any visible signs of shipping damage, and verify
that the motor is securely fastened to the filter case. The following parts should
be included in your package.
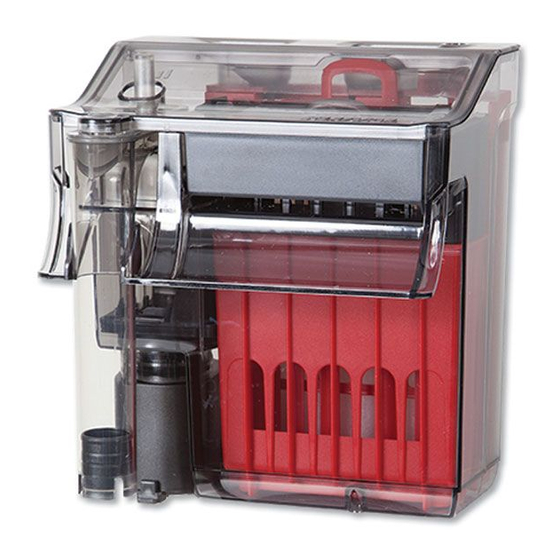
Filter Cover
Leveling
Device
"U" Tube
Telescopic Intake Tube
09601000 11B10
Instruction Manual
Quick Start Guide
PACKING LIST
Filter Case
C-Nodes
C Power Filter
Bio-Screen
Mechanical Frame
Chemical Basket
Impeller Cover Assembly
Biological Trickle chamber
with cover
Poly/Foam Pad
Activated Carbon
Impeller
Motor Unit with Seal Ring
Advertisement
Table of Contents

Related Manuals for Fluval C Power Filter


Summary of Contents for Fluval C Power Filter
- Page 1 Quick Start Guide PACKING LIST Congratulations on the purchase of your new Fluval C Power Filter. Please allow approximately 15-20 minutes for the complete installation of filter parts and inserts. Inspect the filter for any visible signs of shipping damage, and verify that the motor is securely fastened to the filter case.
- Page 2 NOTE: Regular replacement of Fluval filter inserts is essential to ensure optimum filter performance. The Fluval Poly/Foam Pad, Activated Carbon, Bio Screen and C-Nodes should be changed alternately in order to maintain continuous biological activity. To enhance bacterial action, pour a dose...
- Page 3 ATTACHING “U” TUBE 1. Attach the telescopic intake tube to the “U” tube. 2. Slide the “U“ tube down into its place. Note: For deep aquariums, an additional extension tube can be purchased separately.
- Page 4 INSTALLING FILTER INSERTS After preparing filter inserts, first slide the mechanical cartridge frame into the rear of filter case with the cleaning indicator to the right. Then slide the chemical basket and Trickle Chamber into the filter case.
- Page 5 ATTACHING LEVELING DEVICE To ensure optimal operating performance, the Fluval C Power Filter must be level. 1. Insert leveller into bottom of filter case. 2. Mount Power Filter onto rear of aquarium, and adjust leveller by turning it to the...
- Page 6 POWER FILTER START-UP 1. With the cover removed, fill the Power Filter case completely with water and replace cover. 2. For the initial start-up and for a faster priming of the filter, adjust water flow control lever on the intake “U” tube to its minimum position. 3.
-
Page 7: Replacement Parts
REPLACEMENT PARTS To re-order parts for your Fluval C Power Filter, please refer to the parts list below. ITEM Filter Case A20265 A20266 A20267 Biological Trickle Chamber with cover A20268 A20269 A20270 Chemical Basket A20271 A20272 A20273 Filter Cover A20274... - Page 8 — to avoid possible electrical shock, special care should be taken since water is employed in the use of this equipment. For each of the following situations, do not attempt repairs yourself; return the Fluval Power Filter for repair to an authorized service facility for service or discard the appliance.
-
Page 9: Year Warranty
To register your warranty on line or for more information on this and other products go to: www.hagen.com The Fluval C Filters are guaranteed against defects in material or workmanship under normal aquarium usage and service for 2 years. We offer a 2 year guarantee on all non-replaceable parts which means that the filter will be repaired or replaced at the manufacturer’s discretion, free of charge,... - Page 10 HOW IT WORKS The Fluval C Power Filter draws water from the aquarium through the intake tube into the motor which then pumps water out of the impeller assembly. The motor pushes the flow of unfiltered water through filter inserts to trap particles, debris, and purify the water.
- Page 11 Rinse thoroughly afterward to eliminate acid residue. Following a routine maintenance schedule will result in a healthier aquarium, and extend the life of the filter. Fluval C Power Filters have been designed to facilitate these tasks, as they can be done within a matter of minutes.
- Page 12 Poly/Foam Pad Remove mechanical frame from the filter body and place in an empty bucket. Remove Poly/ Foam Pad from frame, and rinse using water taken from the aquarium. Do not use tap water as this will kill the beneficial bacteria in your foam.
- Page 13 filter and motor guide. Pull impeller out of the impeller well, and rinse to remove accumulated slime deposits. If the impeller well needs cleaning, scrub it gently with a Fluval Cleaning Brush (sold separately). A cotton swab or impeller well brush (not supplied) can be used to remove more stubborn deposits. It is recommended to wet motor seal ring to prevent damage before placing into filter case.
- Page 14 AVAILABLE SEPARATELY Alternate Filter Inserts We offer the following alternative chemical stage inserts as superior solutions to your filtration system. Fluval Ammonia Remover Filter Insert Ammonia remover is a natural ion-exchange media designed to remove toxic ammonia as water passes over it.
-
Page 15: Troubleshooting And Faqs
NUTRAFIN WATER CARE PRODUCTS Nutrafin Aqua Plus Tap Water Conditioner makes tap water safe for fish. Nutrafin Cycle Biological aquarium supplement introduces beneficial bacteria to accelerate the maturation of new tanks. TROUBLE-SHOOTING & FAQs Q. What if the power filter motor doesn’t start or makes a mechanical noise? A. -
Page 16: Liste Des Articles
FLUVALC LISTE DES ARTICLES Félicitations pour l’achat de votre nouveau filtre à moteur Fluval C. Il faut allouer environ de 15 à 20 minutes pour l’installation complète des pièces et des masses filtrantes du filtre. Inspecter le filtre pour tout signe visible de dommage au moment de l’expédition et vérifier que le moteur est solidement fixé... - Page 17 Rincer Bio-Screen sous l’eau du robinet et le placer sur le couvercle de la chambre de que le couvercle ferme parfaitement. filtration à ruissellement. Note : ENTRETIEN DES MASSES FILTRANTES NOTE : Le remplacement régulier des masses filtrantes Fluval est essentiel pour assurer le rendement optimal du filtre.
- Page 18 FIXATION DU TUBE EN U 2. Glisser le tube en U en place. Note :...
- Page 19 INSTALLATION DES MASSES FILTRANTES droite. Glisser ensuite le panier de filtration chimique et la chambre de filtration à ruissellement dans la cuve du filtre.
- Page 20 FIXATION DU DISPOSITIF DE NIVELLEMENT Afin d’assurer un rendement optimal, le filtre à moteur Fluval C doit être de niveau.
- Page 21 DÉMARRAGE DU FILTRE À MOTEUR avec de l’eau et replacer le couvercle. 3. Brancher la fiche du cordon d’alimentation dans la prise de courant. Allouer quelques (voir Fonctionnement - Système de refiltration breveté). IMPORTANT : NE PAS FAIRE FONCTIONNER LE FILTRE À SEC NOTE : d’effectuer un nettoyage courant des masses filtrantes toutes les deux semaines, pour un minimum...
-
Page 22: Pièces De Rechange
PIÈCES DE RECHANGE ARTICLE Cuve du filtre A20265 A20266 A20267 Chambre de filtration biologique à A20268 A20269 A20270 ruissellement avec couvercle Panier de filtration chimique A20271 A20272 A20273 Couvercle du filtre A20274 A20275 A20276 A20277 A20278 A20279 A20280 A20280 A20281 Tube en U A20282 A20282... -
Page 23: Mesures De Sécurité Importantes
DANGER — I. Si le moteur du filtre Fluval tombe dans l’eau NE PAS II. Si le moteur du filtre montre un signe quelconque de fuite d’eau anormale ou si le dispositif de l’alimentation principale et sortir le filtre de l’eau. - Page 24 6. Cet appareil est un filtre-pompe pour aquarium. Ne pas se servir de ce filtre pour un autre usage que celui dangereuses et annulera votre garantie. 7. Ce filtre convient pour usage DOMESTIQUE ET À L’INTÉRIEUR seulement. Ne pas installer ni ranger pompe fonctionner à...
- Page 25 RECYCLAGE produits électroniques non compris dans le processus de collecte sélective sont potentiellement dangereux pour l’environnement et la santé humaine en raison de la présence de substances dangereuses. FONCTIONNEMENT dans le moteur qui pompe ensuite l’eau en dehors du bloc de la couronne. NOUVEAU SYSTÈME DE FILTRATION EN 5 ÉTAPES Filtrations mécanique, chimique et biologique inégalées...
- Page 26 Pour un aquarium sain et une eau claire NOTE : Un débit réduit est aussi recommandé durant le nourrissage pour assurer une consommation très efficace de nourriture et moins de déchets. DÉBIT DES FILTRES À MOTEUR FLUVAL C MODÈLE N Débit maximum Débit minimum...
- Page 27 Plaquette de mousse/polyester plaquette de mousse/polyester du cadre et rincer en utilisant de l’eau de l’aquarium. Ne pas utiliser de l’eau du robinet, car celle-ci détruira les bactéries utiles dans la mousse. NE JAMAIS utiliser de savon ni de détergent, car ces produits pourraient être dangereux pour les habitants de l’aquarium.
- Page 28 fixer à la cuve du filtre. Note : Il est conseillé de remplacer le joint d’étanchéité du moteur chaque année pour prévenir les fuites d’eau. La couronne s’usera avec le temps. Une couronne de rechange peut être commandée du détaillant local Fluval. Fixer le moteur à la cuve du filtre. Retirer le moteur Replacer le moteur...
- Page 29 Neutralisant d’ammoniaque Fluval Le neutralisant d’ammoniaque est une masse filtrante l’ammoniaque toxique alors que l’eau le traverse. poissons. L’utiliser pour assurer un milieu sain au Masse filtrante Zeo-Carb Fluval supprimant l’ammoniaque toxique, ce qui produit une et fascinant à la maison.
-
Page 30: Dépannage Et Faq
TRAITEMENTS POUR L’EAU NUTRAFIN Aqua Plus Nutrafin Ce traitement pour l’eau du robinet la rend sûre pour les poissons. Cycle Nutrafin de nouveaux aquariums. DÉPANNAGE ET FAQ Q. Que faire si le moteur du filtre ne démarre pas ou fait un bruit mécanique? Q.