Advertisement
Quick Links
TFA_No. 60.2524_Anleitung_GB
Instruction Manual
RoHS
Fig. 1
B
C
E
F
G
H
Fig. 2
D
L
M
12.08.2013
13:35 Uhr
Seite 1
Kat. Nr. 60.2524
A
I
J
Kat. Nr. 60.2524
K
Kat. Nr. 60.2524
Radio controlled alarm clock
Thank you for choosing this instrument from the firm TFA.
1. Before you start using it
• Please make sure to read the instruction manual carefully.
• Following and respecting the instructions in your manual will prevent
damage to your instrument and loss of your statutory rights arising
from defects due to incorrect use.
• Likewise, we take no responsibility for any incorrect readings and for
any consequences which may result from them.
• We shall not be liable for any damage occurring as a result of not
following these instructions.
• Please take particular note of the safety advice!
• Please keep this instruction manual for future reference.
2. Field of operation and all the benefits of your new instrument at
a glance
• Highest precision radio-controlled clock
• Display of seconds, date, day-of-the-week, temperature
• Alarm with two different alarm times and snooze function
• Backlight
3. For your safety
• The product is exclusively intended for the field of application described
above. It should only be used as described within these instructions.
• Unauthorized repairs, modifications or changes to the product are pro-
hibited.
• The product is not be used for medical purpose or for public informa-
tion, it is only intended only for home use.
Caution!
Risk of injury:
• Keep this instrument and the batteries out of the reach of children.
• Batteries must not be thrown into a fire, short-circuited, taken apart or
recharged. Risk of explosion!
• Never use a combination of old and new batteries together, or batteries
of different types.
• Batteries contain harmful acids. Low batteries should be changed as
soon as possible to prevent damage caused by leaking.
• Wear chemical-resistant protective gloves and safety glasses when
handling leaking batteries.
Important information on product safety!
• Do not place the unit near extreme temperatures, vibrations or shocks.
• Protect it from moisture.
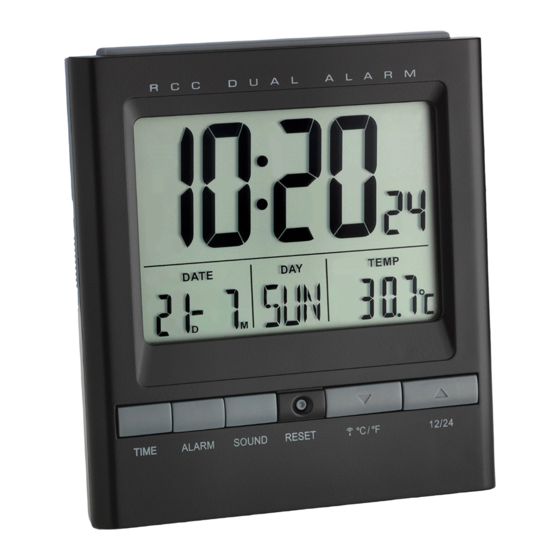
4. Elements
Display
A:
RC reception symbol
B:
Radio controlled time
C:
Date/alarm 1, day-of-the-week, temperature/alarm 2
Buttons
D:
SNOOZE/LIGHT button (on top)
E:
TIME button
F:
ALARM button
G:
SOUND button
H:
RESET button
▼/°C/°F/
I:
button
▲/12/24 button
J:
K:
ALARM 1 switch ON/OFF
L:
ALARM 2 switch ON/OFF
Housing
M:
Battery compartment
5. Getting started
• Open the battery compartment and remove the insulation strip. Close
the battery compartment again. The unit is now ready to use.
• After the initial setup the clock is trying to receive the radio signal for 5
minutes.
• The MSF symbol
will be flashing.
• When the time code is received, the radio-controlled time will be
shown and the MSF symbol
appears permanently. If the first recep-
tion fails, the MSF symbol disappears and the reception will be repeat-
ed the next full hour. The clock will automatically receive the MSF signal
every day at 2.00 am and in case of no reception at 3.00 am and 4.00 am.
• The reception can also be initialized manually. Press and hold the
▼/°C/°F/
button for 3 seconds and the MSF symbol will be flashing.
The clock will scan the MSF frequency signal.
Advertisement

Related Manuals for TFA 60.2524


Summary of Contents for TFA 60.2524
- Page 1 Seite 1 Instruction Manual Radio controlled alarm clock Thank you for choosing this instrument from the firm TFA. 1. Before you start using it • Please make sure to read the instruction manual carefully. • Following and respecting the instructions in your manual will prevent damage to your instrument and loss of your statutory rights arising from defects due to incorrect use.
- Page 2 TFA Dostmann GmbH & Co.KG, Zum Ottersberg 12, D-97877 Wertheim. off after 2 minutes and will be reactivated at the same time. No part of this manual may be reproduced without written consent of TFA Dostmann. • You can activate the snooze function by pressing the SNOOZE/LIGHT The technical data are correct at the time of going to print and may change without button.
Need help?
Do you have a question about the 60.2524 and is the answer not in the manual?
Questions and answers