Advertisement
Quick Links
Advertisement

Related Manuals for Sharper Image SI-380


Summary of Contents for Sharper Image SI-380
- Page 1 CANISTER STEAM CLEANER OWNER’S GUIDE MODEL SI-380...
-
Page 3: Table Of Contents
CONTENTS Important Safety Instructions ................................4 Product Information .....................................6 Assembly ..........................................10 Filling Water Tank ......................................13 How to Use .........................................14 Storage & Care ......................................16 Warranty..........................................17 Product Support......................................18... -
Page 4: Important Safety Instructions
IMPORTANT SAFETY INSTRUCTIONS This owner’s guide and any additional inserts are considered part of the product. They contain important information about safety, use and disposal. Before using the product, please familiarize yourself with all operating and safety instructions. Please keep all documents for future reference and pass these documents on, together with the product, to any future owner. - Page 5 information on rating label agrees with your power supply. - To reduce the likelihood of circuit overload, DO NOT operate another high wattage appliance on the same circuit. - Do not use an extension cord to operate this unit. - To reduce the risk of electrical shock, this appliance uses a grounded (three- pronged) plug.
-
Page 6: Product Information
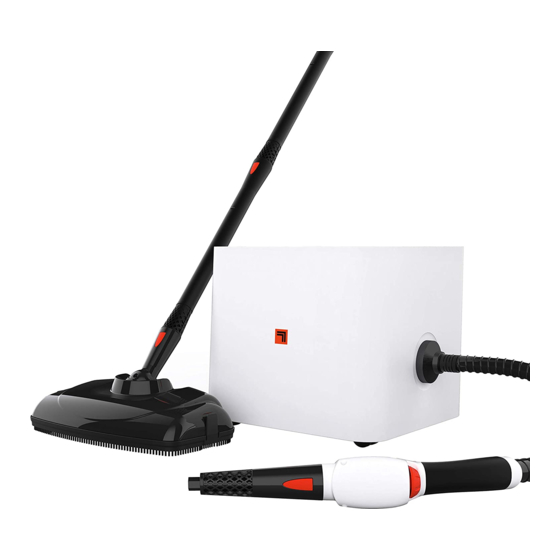
PRODUCT INFORMATION The following features are included with your Canister Steamer. Carefully inspect the packing material for all parts listed below. To obtain possible missing parts, contact (833.800.8669) or (help@sihomecomfort.com). . UNIT FEATURES & ACCESORIES Water Reservoir Cap Scrubbing Mop Pad Carry Handle Microfiber Mop Pad Heating Indicator Light... - Page 7 English...
- Page 8 The Water Reservoir Cap is designed to safely contain steam inside the Reservoir, while providing easy access to the Reservoir’s fill hole. The Carry Handle is designed for convenient carrying up stairs and over obstacles. The Heating Indicator Light turns red when unit is powered ON and unit is heating.
- Page 9 The Microfiber Pad attaches to the Mop Head, and is designed for removing scuffs and stains from hard floors. The Pads are reusable and machine washable. The Jet Nozzle focuses the flow of steam from the Steam Nozzle, and serves as the base to which the brushes and Angled Nozzle connect.
-
Page 10: Assembly
ASSEMBLY STEAM MOPPING ACCESSORIES WARNING: Do not try to connect accessories while unit is emitting steam. EXTENSION WANDS 1. Select one of the Extension Wands. Insert end (A) of Wand onto Steam Nozzle (B) with orange lock/release button slightly off center with hole. Fully insert and rotate wand slightly to allow button to snap into hole. - Page 11 Pad Grips on underside of Mop Head. Pad should now be attached and ready for use (See figure 2-B). CAUTION: Use care when handling a recently used Microfiber Pad, as it may still be hot. NOTE: Microfiber Pads are machine washable. To avoid picking up lint, washing separately from other fabrics is recommended.
- Page 12 STEAM CLEANING ACCESSORIES WARNING: Do not connect accessories while unit is emitting steam. JET NOZZLE / SCRAPER 1. Select Jet Nozzle or Scraper and push onto the Steam Nozzle (A). 2. Rotate accessory until the orange lock/release button snaps into the accessory hole (B). NOTE: The Jet Nozzle and Scraper can be connected to the end of an Extension Wand for reaching high or difficult spots.
-
Page 13: Filling Water Tank
FILLING WATER TANK 1. Place Canister Steam Cleaner on a flat, level surface. 2. Make sure Power Button is OFF (Heating Indicator Light will not be illuminated) and grounded power cord is unplugged from electrical outlet. If unit has been in use, always use the following safety precautions before removing the Reservoir cap to add water: •... -
Page 14: How To Use
HOW TO USE STEAM CLEANING NOTE: Be sure that Reservoir has been filled and that all desired accessories are connected before following these steps. 1. For first time use, remove protective plastic cover from electrical plug. Plug power cord into a convenient electrical outlet. 2. - Page 15 STEAM MOPPING NOTE: Be sure that Reservoir has been filled and that all steam mopping accessories are connected before following these steps. It is recommended to sweep or vacuum hard floors before mopping. 1. Follow STEPS 1-3 of Steam Cleaning section. Refer to Page 11 for a listing of hard floor surfaces that are recommended for cleaning with the Canister Steam Cleaner.
-
Page 16: Storage & Care
STORAGE & CARE PROPER STORAGE Preparing your Canister Steam Cleaner for storage is quick and simple. When you have finished your steaming tasks, follow the steps listed below. 1. Turn unit “Off” and unplug power cord. 2. Allow unit to completely cool (at least 30 minutes). 3. -
Page 17: Warranty
G U A R A N T E E Vornado Air, LLC warrants to the original consumer or purchaser this Sharper Image® Steam Product (“Product”) is free from defects in material or workmanship for a period of one (1) year from the date of purchase. -
Page 18: Product Support
PRODUCT SUPPORT CONSUMER SERVICES For problems with your Canister Steam Cleaner or to order Accessories & Parts, 833.800.8669 or visit our website contact our Consumer Service Department at sihomecomfort.com ACCESSORIES & PARTS Refer to the part numbers below when ordering parts and accessories for your Canister Steam Cleaner. - Page 19 T380-001 R-, V00...
Need help?
Do you have a question about the SI-380 and is the answer not in the manual?
Questions and answers