Advertisement
Quick Links
Advertisement

Subscribe to Our Youtube Channel
Related Manuals for IVY DESIGN STANDARD


Summary of Contents for IVY DESIGN STANDARD
- Page 1 MODEL STANDARD...
-
Page 2: Maintenance
Warning Before you start unpacking and mounting your table make sure that no children are around. Small parts as screws can be swallowed. The table has to be fi xed properly to the wall by an expert. Children are not allowed to fold up or down the table themselves! When you fold up or down your table babies/children must be out of reach! NEVER stand on the table! Bevor Sie Ihr Paket öffnen und Ihren Tisch montieren, stellen Sie sicher, dass sich... - Page 3 Look for the right spot to mount your table: It is crucial to choose the right spot for mounting your table. The wall where you would like to fi x your table must be in a good condition and strong enough to hold your tables weight.
-
Page 4: Montage
Mounting Montage... - Page 5 2 x Upper Wall Mount 1 x Lower Wall Mount Drill holes at the green marked spots: 4 holes for the Lower Wall Mount, 2 holes for each Upper Wall Mount. Use your wall mounts to mark the drill holes. Length and type of screws respectively anchor bolts depend on the quality of your wall! Bohren Sie Löcher an den grün markierten Stellen: 4 Löcher für die Untere und...
- Page 6 Fix the table legs, lift the table up and slide the grooves on the table surface into the Lower Wall Mount on the wall. Screw in the bolts with an Allen key on both sides of the table. Schieben Sie die Schlitze an der Tischoberfl äche in die Untere Wandbefesti- gung.
- Page 7 Push the Upper Wall Mount Lock Bars totally into the side of the table top before you fold the table up. Schieben Sie den Oberen Riegel der Wandbefestigung ganz in die Tischsei- te bevor Sie den Tisch nach oben klappen.
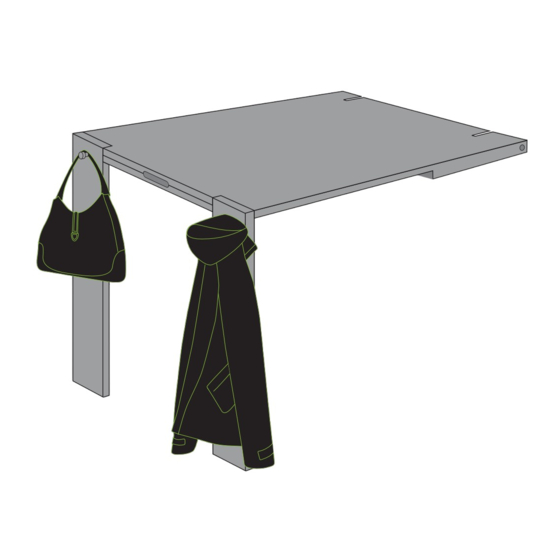
- Page 8 To lock the table legs insert the Bolts on either side of the table. The bolts can serve you as clothes hooks. Um die Tischbeine zu arretieren, müssen die beiden Stahlstifte, die auch als Kleiderhaken verwendet werden können, positioniert werden.
- Page 9 Now your IvyDesign Model Standard is locked and ready to use. IvyDesign Modell Standard ist gesichert und kann jetzt benützt werden.
- Page 10 Manual Anleitung...
- Page 11 Before folding up the table remove the bolts. Bevor der Tisch nach oben geklappt wird, müssen die Stahlstifte entfernt werden.
- Page 12 Lift up the table. Heben Sie den Tisch an.
- Page 13 Lift the table until it‘s parallel to the wall. Heben Sie den Tisch bis die Tischfl äche parallel zur Wand positioniert ist.
- Page 14 Push the Upper Wall Mount Lock Bars outwards into the Upper Metal Lock. Schieben Sie den Oberen Riegel der Wandbefestigung nach außen in die Metallschließe.
- Page 15 Insert the bolts into the picture frame. Stecken Sie die Stahlstilfte in den Bilderrahmen.
- Page 16 The Bolts can be used to hang up your cloths. Stahlstifte können als Garderobenhaken verwendet werden.
- Page 17 For Model Standard with plexiglass: For Model Standard with plexiglass: Exchange the Poster Exchange the Poster Für Modell Standard mit Plexiglas: Für Modell Standard mit Plexiglas: Austausch des Posters Austausch des Posters...
- Page 18 Knock softly on the right lower piece of the frame with your hand in order to release this part. Klopfen Sie vorsichtig auf die innere Seite des unteren Teil des Rahmens, sodass er sich lösen lässt.
- Page 19 When the lower piece of the frame is released you are able to slide off the perspex protection sheet and insert/exchange your poster/photo. Wenn der untere Rahmenteil gelöst ist, können Sie das Plexiglas nach rechts herausziehen um Ihr Poster/Foto auszutauschen.
- Page 20 Drag the perspex protection sheet out and insert your own individual poster. Ziehen Sie die Plexiglasplatte heraus und fügen Sie ihr individuelles Poster ein.
- Page 21 Put the short wooden bar back again into the original position. Bringen Sie den Balken wieder in die ursprüngliche Position zurück.
- Page 22 60,6 cm = 23,86 inch 48 cm = 18,9 inch Your poster will look even more impressive if you additionally insert a white mat of this size. Ihr Bild sieht noch eindrucksvoller aus, wenn Sie es mit einem Passepartout präsentieren.
- Page 23 Enjoy your Enjoy your IvyDesign folding tab- IvyDesign folding tab- le Model Standard le Model Standard Viel Freude mit Viel Freude mit deinem IvyDesign deinem IvyDesign Klapptisch Model Klapptisch Model Standard Standard...
Need help?
Do you have a question about the STANDARD and is the answer not in the manual?
Questions and answers