Table of Contents
Advertisement
Advertisement
Table of Contents

Related Manuals for Innova CarScan


Summary of Contents for Innova CarScan
-
Page 2: Table Of Contents
Table of Contents SAFETY PRECAUTIONS SAFETY FIRST! ................... SCAN TOOL CONTROLS CONTROLS AND INDICATORS ............DISPLAY FUNCTIONS ................ BATTERY REPLACEMENT ..............USING THE SCAN TOOL CODE RETRIEVAL PROCEDURE ............THE SYSTEM MENU ................VIEWING OEM ENHANCED DTCs (except Ford/Mazda) ....VIEWING OEM ENHANCED DTCs (Ford/Mazda only) ...... -
Page 3: Safety Precautions
Safety Precautions SAFETY FIRST! SAFETY FIRST! This manual describes common test procedures used by experienced service technicians. Many test procedures require precautions to avoid accidents that can result in personal injury, and/or damage to your vehicle or test equipment. Always read your vehicle's service manual and follow its safety precautions before and during any test or service procedure. -
Page 4: Scan Tool Controls
Scan Tool Controls CONTROLS AND INDICATORS CONTROLS AND INDICATORS Figure 1. Controls and Indicators See Figure 1 for the locations of items 1 through 20, below. ERASE button - Erases Diagnostic Trouble Codes (DTCs), and “Freeze Frame” data from your vehicle’s computer, and resets Monitor status. - Page 5 Scan Tool Controls CONTROLS AND INDICATORS UP button – When in MENU mode, scrolls UP through the menu options. When LINKED to a vehicle, scrolls UP through the current display screen to display any additional data. ENTER button – When in MENU mode, confirms the selected option or value.
-
Page 6: Display Functions
Scan Tool Controls DISPLAY FUNCTIONS DISPLAY FUNCTIONS Figure 2. Display Functions See Figure 2 for the locations of items 1 through 15, below. 1. I/M MONITOR STATUS field - Identifies the I/M Monitor status area. 2. Monitor icons - Indicate which Monitors are supported by the vehicle under test, and whether or not the associated Monitor has run its diagnostic testing (Monitor status). -
Page 7: Battery Replacement
Harmful and damaging to essential system components. Bluetooth icon – Indicates communication status with a compatible Innova mobile application (please visit www.innova.com/apps for more information). A solid blue icon indicates an active Bluetooth connection has been established. A solid grey icon indicates Bluetooth is not connected. - Page 8 Scan Tool Controls BATTERY REPLACEMENT Adjustments After Battery Installation The first time the Scan Tool is turned on, you must select the desired display language (English, French or Spanish) and unit of measurement (Standard or metric) as follows: 1. Press the POWER/LINK button to turn the Scan Tool “ON.”...
-
Page 9: Using The Scan Tool
Using the Scan Tool CODE RETRIEVAL PROCEDURE CODE RETRIEVAL PROCEDURE Retrieving and using Diagnostic Trouble Codes (DTCs) for troubleshooting vehicle operation is only one part of an overall diagnostic strategy. Never replace a part based only on the DTC definition. Each DTC has a set of testing procedures, instructions and flow charts that must be followed to confirm the location of the problem. - Page 10 Using the Scan Tool CODE RETRIEVAL PROCEDURE 6. The Scan Tool automatically starts a check of the vehicle’s computer to determine which type of communication protocol it is using. When the Scan Tool identifies the computer’s communication protocol, a communication link is established. A PROTOCOL is a set of rules and procedures for regulating data transmission between computers, and between testing equipment and computers.
- Page 11 Using the Scan Tool CODE RETRIEVAL PROCEDURE To select a previously tested vehicle, select the desired vehicle, then press ENTER . Proceed to step 10. To select a new vehicle, select New Vehicle, then press ENTER Proceed to step 9. 9.
- Page 12 Using the Scan Tool CODE RETRIEVAL PROCEDURE The Scan Tool is capable of retrieving and storing up to 32 codes in memory, for immediate or later viewing. 11. Refer to DISPLAY FUNCTIONS on page 3 for a description of display elements. In the case of long code definitions, a small arrow is shown in the upper/lower right-hand corner of the...
- Page 13 Using the Scan Tool CODE RETRIEVAL PROCEDURE Red LED – Indicates there is a problem with one or more of the vehicle’s systems. The red LED is also used to indicate that DTC(s) are present. In this case, the Malfunction Indicator (Check Engine) lamp on the vehicle’s instrument panel will be illuminated.
-
Page 14: The System Menu
Using the Scan Tool THE SYSTEM MENU - VIEWING OEM ENHANCED DTCs THE SYSTEM MENU The System Menu provides the ability to retrieve “enhanced” DTCs and Anti-Lock Brake System (ABS) DTCs for most BMW, Chrysler/Jeep, Ford/Mazda, GM/Isuzu, Honda/Acura, Hyundai, Mercedes Benz, Nissan, Toyota/Lexus, Volkswagen and Volvo vehicles. -
Page 15: Viewing Oem Enhanced Dtcs (Ford/Mazda Only)
Using the Scan Tool VIEWING OEM ENHANCED DTCs If the definition for the cur- rently displayed code is not available, an advisory mes- sage shows. I/M MONITOR STATUS icons are not displayed when viewing enhanced DTCs. In the case of long code definitions, a small arrow is shown in the upper/lower right-hand corner of the code display area to indicate the presence of additional information. - Page 16 Using the Diagnostic Tool VIEWING OEM ENHANCED DTCs (Ford/Mazda only) 3. A “One moment please” message displays while the test is in progress. If the Scan Tool fails to link to the vehicle’s computer, a “Communication Error” message shows. - Ensure your vehicle is OBD2 compliant. - Verify the connection at the DLC, and verify the ignition is ON.
-
Page 17: Viewing Abs Dtcs
Using the Scan Tool VIEWING ABS DTCs If no codes are present, a “System Pass” message displays. Press any Hotkey. 6. If more than one code was retrieved press DTC/FF to display additional codes one at a time. 7. When the last retrieved DTC has been displayed and DTC/FF is pressed, the Scan Tool returns to the “Priority”... -
Page 18: Viewing Srs Dtcs
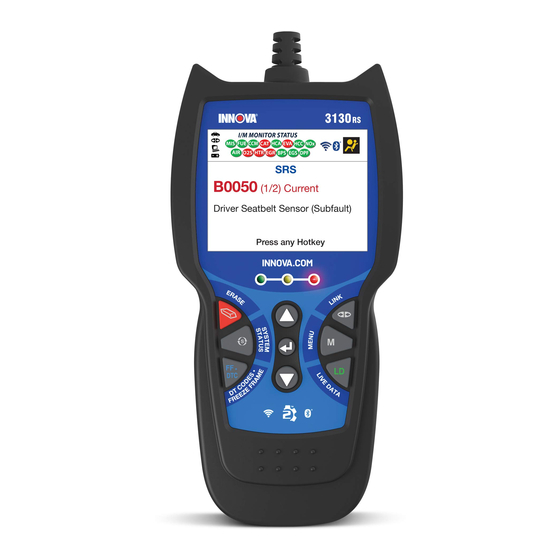
Using the Scan Tool VIEWING SRS DTCs If the definition for the currently displayed code is not available, an advisory message shows. I/M MONITOR STATUS icons are not displayed when viewing ABS DTCs. In the case of long code definitions, a small arrow is shown in the upper/lower right-hand corner of the code display area to indicate the presence of additional information. -
Page 19: Erasing Diagnostic Trouble Codes (Dtcs)
Using the Scan Tool ERASING DIAGNOSTIC TROUBLE CODES (DTCs) If the Scan Tool cannot link to the vehicle’s computer after three attempts, the message “Contact Technical Support” displays. - Press SYSTEM MENU to return to the System Menu. - Turn the ignition off, and disconnect the Scan Tool. - Contact Technical Support for assistance. - Page 20 Using the Scan Tool ERASING DIAGNOSTIC TROUBLE CODES (DTCs) When DTCs are erased, the I/M Readiness Monitor Status program resets the status of all Monitors to a not run condition. To set all Monitors to a DONE status, an OBD2 Drive Cycle must be performed.
-
Page 21: About Repairsolutions
Technical Service Bulletins – Research known problems reported by vehicle manufacturers. Safety Recalls – Research known safety concerns applicable to a vehicle. And much more. Please visit www.innova.com for additional information. Hardware Requirements: Innova Scan Tool with Bluetooth/WiFi Android or iOS Smart Device Accessing RepairSolutions 2®... -
Page 22: Connecting To Bluetooth / Wifi
Using the Scan Tool CONNECTING TO BLUETOOTH / WIFI The RepairSolutions 2 app will store two WiFi configurations only. 3. Retrieve diagnostic data (refer to CODE RETRIEVAL PROCEDURE on page 7 for details). 4. The RepairSolutions 2 app automatically displays a report based on the retrieved diagnostic data. -
Page 23: Chrysler/Jeep Obd1 Systems
Chrysler/Jeep OBD1 Systems VEHICLES COVERED - CODE RETRIEVAL PROCEDURE VEHICLES COVERED This section covers Chrysler fuel injected vehicles from 1989-1995. Model Type Year Model Passenger 1989-1994 Chrysler, Dodge and Plymouth Fuel Cars Injected Models Only (Excluding Lasor/Talon 1.8L, 2.0L (ALL YEARS), 1990 Monaco/Premier, 1993-1995 Intrepid, LHS, Concorde and Vision, 1995 Avenger, Stealth (ALL YEARS) and Cirrus 2.5L (ALL... - Page 24 Chrysler/Jeep OBD1 Systems CODE RETRIEVAL PROCEDURE 3. Turn the ignition ON. DO NOT start the engine. The Chrysler Menu displays. 4. To retrieve codes from the vehicle’s computer: Press UP and DOWN , as necessary, to highlight the model year of the vehicle, then press ENTER 5.
-
Page 25: Erasing Dtcs
Chrysler/Jeep OBD1 Systems ERASING DTCs 10. Follow the testing and repair procedures outlined in the vehicle's service repair manual to correct "hard" DTCs. Codes should be addressed and eliminated in the order they were received, erasing and retesting after each repair is made to be sure the fault was eliminated. - Page 26 Chrysler/Jeep OBD1 Systems ERASING DTCs Erasing DTCs does not fix the problem(s) that caused the code(s) to be set. If proper repairs to correct the problem that caused the code(s) to be set are not made, the code(s) will appear again and the check engine light will illuminate as soon as the problem that cause the DTC to set manifests itself.
-
Page 27: Ford Obd1 Systems
Ford OBD1 Systems VEHICLES COVERED VEHICLES COVERED The Scan Tool is compatible only with EEC-IV Computer Control systems. CAR - Ford, Lincoln, Mercury Computer System/Scan Tool Application Table The following table lists the year and model of all the cars that are covered by the Scan Tool. - Page 28 Ford OBD1 Systems VEHICLES COVERED - TRUCKS/VANS Fuel Systems (Carburetor Computer Digit** Model) System Engine Application/Special Notes 1987-1993 (Cont) 4.6L V-8 W, V SEFI Crown Victoria, Grand Marquis, Mark VII, Town Car 5.0L V-8 F, M, SEFI Capri, Continental, Cougar, E, T, Crown Victoria, Grand Marquis, D, 4...
- Page 29 Ford OBD1 Systems VEHICLES COVERED - TRUCKS/VANS Fuel Systems (Carburetor Computer Engine Digit** Model) Application/Special Notes System 1983 2.8L V-6 FBC (2150A)* Bronco II and Ranger Pickup EEC-IV 1984 2.8L V-6 FBC (2150A)* Bronco II, Ranger Pickup EEC-IV 4.9L I-6 FBC (YFA)* Bronco, E and F Series Trucks/Vans (8500 lb.
-
Page 30: Code Retrieval Procedures
Ford OBD1 Systems CODE RETRIEVAL PROCEDURES - KOEO TEST Fuel Systems (Carburetor Computer Engine Digit** Model) Application/Special Notes System **VIN Number. The VIN number(s) used in this column identify the vehicle’s engine type. This number is the 8th digit of the VIN (Vehicle Identification Number). Consult your vehicle’s repair manual for details. - Page 31 Ford OBD1 Systems CODE RETRIEVAL PROCEDURES - KOEO TEST The second group of codes are called "Continuous Memory" codes. A "Continuous Memory" icon shows to indicate the code is a "Continuous Memory" code. Check your vehicle thoroughly before performing any test. ALWAYS observe safety precautions whenever working on a vehicle.
- Page 32 Ford OBD1 Systems CODE RETRIEVAL PROCEDURES - KOEO TEST If the Scan Tool fails to link to the vehicle's computer, a "Vehicle is not responding" message shows. - Verify the ignition is ON. - Check the cable connections at the Scan Tool and at the vehicle's DLC.
- Page 33 Ford OBD1 Systems CODE RETRIEVAL PROCEDURES - ENGINE TIMING CHECK 12. To prolong battery life, the Scan Tool automatically shuts "Off" after approximately three minutes of no button activity. The DTCs retrieved will remain in the Scan Tool's memory, and may be viewed at any time. If the Scan Tool's batteries are removed, or if the Scan Tool is re-linked to a vehicle to retrieve codes, any prior codes in its memory are automatically cleared.
- Page 34 Ford OBD1 Systems CODE RETRIEVAL PROCEDURES - ENGINE TIMING CHECK The Ford Menu displays. 3. Highlight Timing Check, then press ENTER The Select Model Year screen displays. 4. Highlight the vehicle model year, then press ENTER For 1993 and newer vehicles: The message “Follow instructions in vehicle service manual to perform timing check”...
- Page 35 Ford OBD1 Systems CODE RETRIEVAL PROCEDURES - KOER TEST 10. If timing light readings are not within the acceptable range: Base timing may be out of adjustment, or the computer may have problems with the timing advance circuit. Refer to the vehicle's service repair manual for procedures on adjusting and/or repairing ignition timing.
- Page 36 Ford OBD1 Systems CODE RETRIEVAL PROCEDURES - KOER TEST If the Scan Tool cannot retrieve the Cylinder ID Code, an advisory message displays. Press SYSTEM MENU to exit and repeat the Key On Engine Off (KOEO) test (page 28) until DTC 11 or 111 displays.
-
Page 37: Additional Tests For Eec-Iv Systems
Ford OBD1 Systems ADDITIONAL TESTS FOR EEC-IV SYSTEMS - CYLINDER BALANCE TEST 13. After all repairs have been completed, repeat the KOER Self-Test. 14. If a "pass code" (code 11 or 111) is received, it indicates that the repairs were successful and all the related systems are working properly. - Page 38 Ford OBD1 Systems ADDITIONAL TESTS FOR EEC-IV SYSTEMS - RELAY AND SOLENOID TEST 5. When prompted, turn off all vehicle accessories, turn ignition key OFF and wait for the on screen prompt. If you wish to exit the Cylinder Balance test at this time, press SYSTEM MENU 6.
- Page 39 Ford OBD1 Systems ADDITIONAL TESTS FOR EEC-IV SYSTEMS – RELAY AND SOLENOID TEST The fuel injectors and fuel pump are not energized during this test. Check your vehicle thoroughly before performing any test. ALWAYS observe safety precautions whenever working on a vehicle.
- Page 40 Ford OBD1 Systems ADDITIONAL TESTS FOR EEC-IV SYSTEMS - WIGGLE TEST - Turn the ignition OFF, wait 10 seconds, then turn back ON to reset the computer. BE SURE to perform the added procedures in step 6, if appropriate, BEFORE turning the ignition ON. - Press ENTER to continue.
- Page 41 Ford OBD1 Systems ADDITIONAL TESTS FOR EEC-IV SYSTEMS - WIGGLE TEST Use this test to check for intermittent faults in some circuits. Circuits Tested: 1984 & Newer - Air Charge Temp Sensor (ACT), Barometer Pressure Sensor (BP), Engine Coolant Temp Sensor (ECT), Exhaust Gas Oxygen Sensor (EGO), EGR Valve Position Sensor (EVP), Manifold Absolute Pressure (MAP), Throttle Position Sensor (TP), Vane Air Temp Sensor (VAT)
-
Page 42: Erasing Dtcs
Ford OBD1 Systems ERASING DTCs 7. A "One moment please test is in progress" message shows temporarily. If the Scan Tool fails to link to the vehicle's computer, a "Vehicle is not responding" message shows. For KOEO Wiggle Test: - Verify the ignition is ON. - Turn the ignition OFF, wait 10 seconds, then turn back ON to reset the computer. - Page 43 Ford OBD1 Systems ERASING DTCs If you plan to take the vehicle to a service center for repair, DO NOT erase the codes from the vehicle's computer. If the codes are erased, valuable information that might help the technician troubleshoot the problem will also be erased.
-
Page 44: Vehicles Covered
GM OBD1 Systems VEHICLES COVERED VEHICLES COVERED This Scan Tool may be used to retrieve engine service codes from most General Motors (GM) domestic cars and trucks (EXCEPT Geo, Nova, Saturn and Sprint). Model Year Make Model 1982-93 Buick Century, Electra, Electra Wagon, Estate Wagon, Le Sabre, Le Sabre Wagon, Park Avenue, Reatta, Regal, Grand National, Riviera, Roadmaster, Skyhawk, Skylark, Somerset... -
Page 45: Code Retrieval Procedure
GM OBD1 Systems CODE RETRIEVAL PROCEDURE CODE RETRIEVAL PROCEDURE Retrieving and using Diagnostic Trouble Codes (DTCs) for troubleshooting vehicle operation is only one part of an overall diagnostic strategy. Never replace a part based only on the DTC definition. Each DTC has a set of testing procedures, instructions and flow charts that must be followed to confirm the location of the problem. - Page 46 GM OBD1 Systems CODE RETRIEVAL PROCEDURE - Verify the ignition is ON. - Check the cable connections at the Scan Tool and at the vehicle’s DLC. - Turn the ignition OFF, wait 10-12 seconds, then turn back ON to reset the computer. - Press POWER/LINK 6.
-
Page 47: Erasing Dtcs
GM OBD1 Systems ERASING DTCs ERASING DTCs When the Scan Tool's ERASE function is used to erase DTCs from the vehicle's on-board computer, manufacturer specific data (where applicable) is also erased. If you plan to take the vehicle to a service center for repair, DO NOT erase the codes from the vehicle's computer. -
Page 48: Honda Obd1 Systems
Honda OBD1 Systems VEHICLES COVERED - CODE RETRIEVAL PROCEDURE VEHICLES COVERED Honda/Acura vehicles use a variety of computer systems. The Scan Tool may be used to retrieve engine service codes from the following Honda/Acura vehicles. Model Year Make Model 1990-1991, Honda Accord 1994-1995... -
Page 49: Erasing Dtcs
Honda OBD1 Systems ERASING DTCs Place the transmission in neutral. Turn all vehicle accessories "OFF." Press ENTER to continue. 3. Highlight Read DTCs and press ENTER 4. When the Scan Tool is in the process of retrieving codes, a "One moment please..."... - Page 50 Honda OBD1 Systems ERASING DTCs If you plan to take the vehicle to a service center for repair, DO NOT erase the codes from the vehicle's computer. If the codes are erased, valuable information that might help the technician troubleshoot the problem will also be erased.
-
Page 51: Toyota/Lexus Obd1 Systems
Toyota/Lexus OBD1 Systems VEHICLES COVERED VEHICLES COVERED The following tables identify the Toyota and Lexus OBD1 vehicles that are covered by the Scan Tool. DLC 1 Cars DOHC/ Eng. Eng. Year Model Size Code SOHC Other Type 1995 Camry Coupe 2.2L 5S-FE DOHC... - Page 52 Toyota/Lexus OBD1 Systems VEHICLES COVERED DOHC/ Eng. Eng. Year Model Size Code SOHC Other Type 1991 Supra 3.0L 7M-GE DOHC 1992 Supra 3.0L 7M-GTE DOHC Turbo 1992 Supra 3.0L 7M-GE DOHC 1993 Tercel Sedan 1.5L 3E-E SOHC 1994 Tercel Sedan 1.5L SOHC DLC 2 Cars...
-
Page 53: Code Retrieval Procedure
Toyota/Lexus OBD1 Systems CODE RETRIEVAL PROCEDURE DLC 1 Light Trucks Eng. Eng. DOHC/ Year Model Size Code SOHC Other Type 1992 Previa 2.4L 2TZ-FE DOHC 1993 Previa 2.4L 2TZ-FE DOHC 1994 Previa 2.4L 2TZ-FE DOHC 1994 T100 3.0L 3VZ-FE SOHC 1995 4 Runner 2.4L... -
Page 54: Erasing Dtcs
Toyota/Lexus OBD1 Systems ERASING DTCs Turn off all accessories. 3. Highlight Read DTCs, then press ENTER The Scan Tool will begin the code retrieval process. 4. When the Scan Tool is in the process of retrieving codes, a "One moment please..." message shows. If the Scan Tool fails to link to the vehicle’s computer a “Vehicle is not responding”... - Page 55 Toyota/Lexus OBD1 Systems ERASING DTCs If you plan to take the vehicle to a service center for repair, DO NOT erase the codes from the vehicle's computer. If the codes are erased, valuable information that might help the technician troubleshoot the problem will also be erased.
-
Page 56: Live Data Mode
Live Data Mode VIEWING LIVE DATA The Scan Tool lets you view "real-time" Live Data. This information includes values (volts, rpm, temperature, speed etc.) and system status information (open loop, closed loop, fuel system status, etc.) generated by the various vehicle sensors, switches and actuators. These are the same signal values generated by the sensors, actuators, switches and/or vehicle system status information used by the vehicle's computer when calculating and conducting system adjustments and corrections. -
Page 57: Customizing Live Data (Pids)
Live Data Mode CUSTOMIZING LIVE DATA (PIDs) If communication with the vehicle is lost while viewing Live Data, an advisory message displays. 5. Press and release ENTER to view the currently selected PID in “graph” mode. Press and release ENTER again to return to the PID list. -
Page 58: Recording (Capturing) Live Data
Live Data Mode RECORDING (CAPTURING) LIVE DATA If Live Data is not supported by the vehicle under test, an advisory message displays. Press SYSTEM MENU to return to the System Menu. If custom Live Data was previously configured, the Select PIDs to Use screen displays. - Page 59 Live Data Mode RECORDING (CAPTURING) LIVE DATA If POWER/LINK is pressed at any time while in Live Data mode, any recorded Live Data will be erased from the Scan Tool’s memory. Record by DTC Trigger This function automatically records Live Data information when a DTC sets and saves it in the Scan Tool’s memory.
- Page 60 Live Data Mode RECORDING (CAPTURING) LIVE DATA If the erase was not successful, an advisory message displays. - To retry the erase process, verify that the Scan Tool is properly connected to the vehicle’s DLC and that the ignition is on. Select Erase, then press ENTER - To exit the record function, select Back, then press ENTER...
- Page 61 Live Data Mode RECORDING (CAPTURING) LIVE DATA - Ensure your vehicle is OBD2 compliant. - Verify the connection at the DLC, and verify the ignition is ON. - Turn the ignition OFF, wait 5 seconds, then back ON to reset the computer.
-
Page 62: Live Data Playback
Live Data Mode LIVE DATA PLAYBACK LIVE DATA PLAYBACK Once Live Data has been recorded, it is saved in the Scan Tool's memory. You can view recorded Live Data immediately after recording by selecting Yes from the Record Live Data confirmation screen (see RECORDING (CAPTURING) LIVE DATA on page 56 for more information), or you can view it later using the "Playback"... - Page 63 Live Data Mode LIVE DATA PLAYBACK To exit Live Data Playback mode, select Exit Playback, then press ENTER If there is no Live Data currently stored in the Scan Tool's memory, an advisory message shows on the display. Press LD to exit the "Live Data Playback" mode.
-
Page 64: Additional Tests
Additional Tests SYSTEM TEST MENU In addition to retrieving Diagnostic Trouble Codes (DTCs), you can use the Scan Tool to perform additional diagnostic tests, to view diagnostic and vehicle information stored in your vehicle's on-board computer, and to configure the Scan Tool for your particular needs. Additional tests and related functions are accessed through the Main Menu. - Page 65 Additional Tests SYSTEM TEST MENU 2. Select System Tests, then press ENTER The System Test menu displays. If System Tests is not shown on the Main Menu, the System Tests functions available for your vehicle. O2 Sensor Test OBD2 regulations require that applicable vehicles monitor and test operation of the oxygen (O2) sensors to identify problems that can affect fuel efficiency and vehicle emissions.
- Page 66 Additional Tests SYSTEM TEST MENU 8. When you have finished viewing test data for all desired sensors, select Back, then press ENTER to return to the System Test menu; or, press M to return to the Main Menu. OBD Monitor Test The OBD Monitor Test function retrieves and displays test results for emission-related powertrain components and systems that are not continuously monitored.
-
Page 67: Resetting The Oil Maintenance Light
Additional Tests RESETTING THE OIL MAINTENANCE LIGHT EVAP Test The EVAP Test function lets you initiate a leak test for the vehicle's EVAP system. The Scan Tool does not perform the leak test, but signals to vehicle's on-board computer to initiate the test. The vehicle manufacturer determines the criteria and method for stopping the test once it has been started. -
Page 68: Performing A Service Check
Additional Tests PERFORMING A SERVICE CHECK If the Scan Tool cannot reset the Oil Maintenance Light, an “instruc- tional” dialog displays, showing the manual procedures for reset- ting the indicator light. When finished viewing the instructions, press M to return to the Main Menu. -
Page 69: Battery/Alternator Test
Additional Tests BATTERY/ALTERNATOR TEST BATTERY/ALTERNATOR TEST The Scan Tool can perform a check of the vehicle’s battery and alternator system to ensure the system is operating within acceptable limits. You can perform a battery check only, or an alternator system (battery and alternator) check. - Page 70 Additional Tests BATTERY/ALTERNATOR TEST An “instructional” message shows. 8. Start the vehicle’s engine. Allow the engine to run for several seconds, then turn the engine off. Repeat for a total of three “start/stop” cycles. If the Scan Tool did not detect “cranking status” for the vehicle’s engine, an advisory message shows.
-
Page 71: Using The Dlc Locator
Additional Tests USING THE DLC LOCATOR - VIEWING VEHICLE INFORMATION 7. When the alternator check is complete, a results screen shows charging system voltage and indicates whether or not the charging system is within acceptable limits. The System Status LEDs provide a PASS/FAIL indication, as follows: Green = System within limits Yellow = Over charging or under... - Page 72 Additional Tests VIEWING VEHICLE INFORMATION The Scan Tool can retrieve a list of information (provided by the vehicle manufacturer), unique to the vehicle under test, from the vehicle's on- board computer. This information may include: The vehicle's VIN number The control module identification number The vehicle's calibration ID(s).
-
Page 73: Viewing The Firmware Version
Additional Tests VIEWING THE FIRMWARE VERSION 5. When you have finished viewing the list of available modules, press M to return to the Main Menu. Viewing In-use Performance Tracking (IPT) The Scan Tool can retrieve In-use Performance Tracking (IPT) statistics for monitors supported by the vehicle under test. -
Page 74: The Tool Library
Additional Tests THE TOOL LIBRARY THE TOOL LIBRARY The Tool Library contains valuable reference information for the Scan Tool. The following functions are available: Tool Icons – Shows the full names for the I/M MONITOR STATUS icons shown and descriptions of informational icons on the Scan Tool’s display. - Page 75 Additional Tests THE TOOL LIBRARY The Select Manufacturer screen displays. 3. Select the desired vehicle manufacturer, then press ENTER The Enter DTC screen displays. screen shows code “P0001,” with the “P” highlighted. 4. Use the UP and DOWN buttons, as necessary, to scroll to the desired DTC type (P=Powertrain, U=Network, B=Body, C=Chassis), then press the DTC/FF button.
-
Page 76: Adjustments And Settings
Additional Tests ADJUSTMENTS AND SETTINGS ADJUSTMENTS AND SETTINGS The Scan Tool lets you make several adjustments and settings to configure the Scan Tool to your particular needs. The following adjustments and settings are available: Adjust Brightness: Adjusts the brightness of the display screen. Audible Tone: Turns the Scan Tool’s audible tone “on”... - Page 77 Additional Tests ADJUSTMENTS AND SETTINGS To return to the Tool Settings menu without making changes, press M. Enabling/Disabling Navigational Footers 1. Select Footer Messages in the Tool Settings menu, then press ENTER The Footer Messages screen dis- plays. 2. Select On of Off as desired, then press ENTER to save your changes.
- Page 78 Additional Tests ADJUSTMENTS AND SETTINGS 2. Select the desired unit of measurement, then choose Save to save your changes. To return to the Tool Settings menu without making changes, press M. Exiting the MENU Mode Press M to return to the Main Menu.
-
Page 79: Using Scan Tool Memory
Using Scan Tool Memory VIEWING DATA IN MEMORY When you retrieve DTCs from a vehicle, the data is saved to the Scan Tool’s memory. Each time you retrieve DTCs, existing data in the Scan Tool's memory is overwritten with the new data. VIEWING DATA IN MEMORY When you turn the Scan Tool on while NOT connected to a vehicle, and data is currently saved in the Scan Tool’s memory, the Scan Tool enters... - Page 80 Notes...
- Page 81 Notes...
- Page 82 Notes...
-
Page 83: Warranty And Servicing
UPDATES and OPTIONAL ACCESSORIES, please contact your local store, distributor or the Service Center. USA & Canada: (800) 544-4124 (6:00 AM-6:00 PM PST, Monday through Saturday) All others: (714) 241-6802 (6:00 AM-6:00 PM PST, Monday through Saturday) FAX: (714) 241-3979 (24 hr.) Web: www.innova.com...
Need help?
Do you have a question about the CarScan and is the answer not in the manual?
Questions and answers