
Related Manuals for FlexQube eQart


Summary of Contents for FlexQube eQart
- Page 1 User manual. Date 07/2020 Revision eQart Firmware 3.1.2 APK version: 1.2.7...
-
Page 2: Copyright And Disclaimer
FlexQube makes no warranties in respect of this document or its contents. The content of this document is subject to change without prior notice. Every precaution has been taken in the preparation of the user manual. -
Page 3: Table Of Contents
Table of contents Copyright and disclaimer ..........................1 Introduction to this document ......................4 Document history ........................4 eQart Introduction ...........................5 Additional information about the eQart ..................5 Safety ..............................6 Safety message types .......................6 Important safety notifications ....................6 eQart Certification ........................7 Intended use ..........................7 Inappropriate operation ......................7... - Page 4 Towing ........................... 21 Mother/daughter ........................21 Unpacking of eQart ........................22 Accessories with eQart ......................22 Unboxing of eQart ......................... 22 Starting up the eQart ......................24 Cockpit Operation ......................... 25 Cockpit ........................... 27 10.1.1 Manual Drive ......................... 27 10.1.2 Line Follow ........................
-
Page 5: Introduction To This Document
User manual rev. 1.2 Introduction to this document This information will give you the following knowledge. • Unboxing of the eQart. • Startup, implementation, and operation of the eQart. • Technical description of the eQart. • Maintenance of the eQart. Document history... -
Page 6: Eqart Introduction
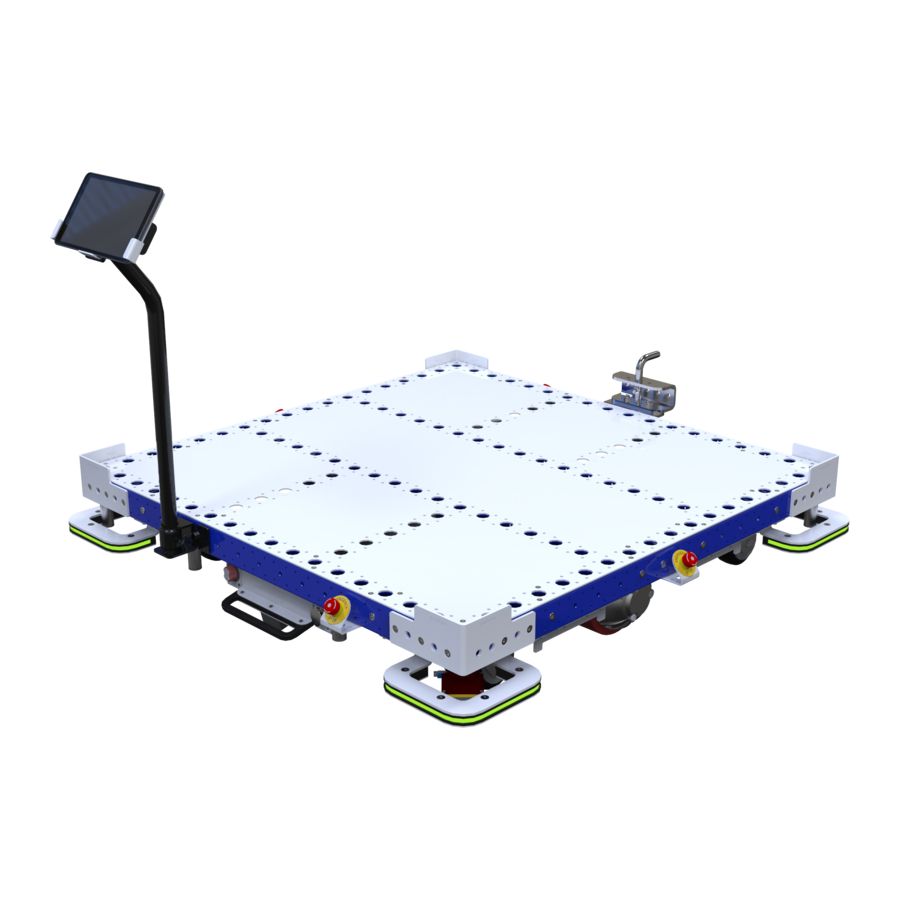
The eQart is ideal for recurring transport such as A to B or circular flow layouts. The eQart has a modular architecture enabling sizes from 840 x 840 mm up to 2510 x 2510 mm. The modules creating the eQart is the 1) brain 2) motors 3) battery and safety corners. -
Page 7: Safety
The laser scanner has a planar reading area 150 mm above the floor. Any object below OR above this level will not be visible for the eQart. Make sure that the route is clear from obstacles that are not visible to the eQart safety systems. Otherwise, it can result in major damage and cause eQart to collide with objects and make the load fall off. -
Page 8: Eqart Certification
Certification the eQart is certified according to the Machinery Directive 2006/42/EC, which includes the base platform for L x W (Length x Width) between 840 mm to 2520 mm. The eQart is certified and follows the following standards: •... -
Page 9: Safety Functions
3.8.2 Emergency stops The eQart is equipped with 4 x emergency stops placed on each of the 4 sides. When the emergency stop has activated the power to the motors is cut off, and the brakes will be immediately activated. -
Page 10: Product Specification
▪ Voltage: 25.9V ▪ Full charge: 2.5 hours • Operating conditions: ▪ Temperature 0⁰C to 40⁰C ▪ Indoor use only The cart serial number and CE Marking is stamped on a sign attached to the eQart base. Automation your way... -
Page 11: Nameplate & Markings
The detail of the nameplate is as shown in the image below. • Nameplate gives the primary data related to eQart. • The marked entry is dependent on customer configuration of the eQart • The product name connects the eQart ID with the android application. •... -
Page 12: Mechanical Design
User manual rev. 1.2 Mechanical design The eQart is based on six smart modules enabling a high degree of scalability and flexibility in design. 1. Brain Module (onboard computer & visual system) 2. Battery Module 3. Motor Module 4. Emergency Stop Modules 5. -
Page 13: Brain Module
User manual rev. 1.2 Brain Module • The Brain module is placed in the center in between the motor modules of the eQart. • The Brain module and its onboard computer are controlling all the systems/functionality of the eQart. -
Page 14: Swap Battery Module
60 Ah Li-ion battery. • The battery does not have internal charging but is equipped with an external charging port to be used together with the standard eQart charger. • Special care must be taken when removing the battery module from the cart. -
Page 15: Motor Module
The base size can vary from 840 x 840 mm up to 2510 x 2510 mm in steps 70 mm. • The base can vary a lot for different applications such as Mother-daughter eQart which affects the load capacity etc. -
Page 16: Led Corner Module
User manual rev. 1.2 LED Corner Module • The LED Corner module has a robust metal bracket mounted under the eQart with a full RGB LED strip. • The LED lights show the indication of traveling mode and status of the eQart with flashing or steady light in different colors. -
Page 17: Eqart Cockpit Holder Module
The eQart Cockpit Holder module is placed on the front side of eQart or the side depending on the eQart application. • The stand for the eQart Cockpit can be used to store and charge the tablet via the USB-C charging cable integrated into the stand. •... -
Page 18: Laser Scanner Functionality
Laser scanner functionality The eQart is equipped with an ISO 13489:1 safety rated laser scanner that is used to detect objects in the eQart’ s traveling path, bringing the cart to a safe stop before colliding with a person or an obstacle. -
Page 19: Figure 11 Sensor Operations
User manual rev. 1.2 Corner Module with Laser scanners Corner Module w/o Laser scanners Protection Zone Warning Zone 1 Warning Zone 2 Corner Module with Laser scanners Corner Module w/o Laser scanners Figure 11 Sensor Operations Automation your way... -
Page 20: Led Light Functionality
User manual rev. 1.2 LED Light Functionality The eQart has LED corner modules located in each corner of eQart with RGB light that light or blinks according to the mode of operation. For Manual Drive • LED indicates ORANGE light in the driving direction for manual drive operation, when switching direction in the eQart Cockpit the eQart will switch to the LEDs in the opposite direction. -
Page 21: Line Follow Drive
User manual rev. 1.2 Line Follow Drive • When the eQart operates in Line Follow Drive it will only blink in the driving direction, when switching direction in the eQart Cockpit it will switch to the LEDs in the opposite direction. -
Page 22: User Application
Towing The eQart can be used to tow tugger carts using either a tow bar or a hitch placed on the rear side of the eQart. An eQart used for towing needs 500 kg of payload to ensure traction for good towing capability. -
Page 23: Unpacking Of Eqart
Unboxing of eQart ATTENTION Do not unload eQart with a forklift as it might damage sensitive parts. ATTENTION Do not activate the main switch until eQart is fully out of the box and placed on the floor. ATTENTION Do not use the Maintenance drive or Cockpit to drive out the eQart from the box. -
Page 24: Figure 17 Eqart Unboxing - 1
1. Remove the screws in the lid which is attaching the front side and the top lid to the box. 2. Remove the front lid from the box. 3. Take off the top lid and place it on the floor as shown in the image. The eQart now has a ramp to roll out of the box. -
Page 25: Starting Up The Eqart
User manual rev. 1.2 Starting up the eQart 1. The eQart ON/ OFF switch is placed in front of the battery module next to the charging port. To start the eQart make sure to deactivate all emergency stop buttons. -
Page 26: Cockpit Operation
The operator must check that emergency stop buttons are deactivated on the eQart. • The eQart name is shown in the Wi-Fi settings of the tablet when it gets connected. This connection is protected with a password provided with the eQart delivery. - Page 27 When eQart is not connected with wifi, the pop-up message shows that “You are not connected with eQart”. • In case, when the eQart is connected with one tablet and another user tries to connect to that eQart by another tablet, then the pop-up message will appear that “eQart is connected with another tablet”.
-
Page 28: Cockpit
3. Navigation 4. Settings Cockpit In the Cockpit mode, users can reach most of the functionality needed to use the eQart in daily operation. • If an obstacle is detected or an Emergency Stop is activated, then the pop-up message will be displayed. -
Page 29: Line Follow
User manual rev. 1.2 9. If the eQart drives over a line on the ground in manual mode the blue line will light up and a pop up will appear in the eQart Cockpit, the eQart is then able to start line follow. -
Page 30: Map & Routes
LEDs in the opposite direction. • When moving on a straight Blue line the full speed of the eQart is up to 0.6 m/s (1.5 mph). In corners, the eQart will naturally slow down to handle navigation. •... -
Page 31: Create New Route
User manual rev. 1.2 • In the eQart Cockpit, the user can see the current position of the eQart and the line it has recorded when it is creating the map. • The eQart will record all straight paths, turns and junctions put down on the floor. - Page 32 3. Press the start button to start the recording of the map layout. The live map generation is shown in the Cockpit. 4. When the eQart has recorded all the available paths and stations it will stop and mark itself as finished.
- Page 33 User manual rev. 1.2 5. Press the edit button to change the shape of the route. This function tries to correct the slip error of encoder and try to join the ends of the map smoothly. 6. There are two options shows in the edit map.
-
Page 34: Recorded Maps
User manual rev. 1.2 Following is an example of how the eQart creates the map: 1. The eQart is located at Stop - 04 and starts to create a map as shown in “Figure 24 Map Routing of eQart”. -
Page 35: Figure 25 Recorded Maps
• If the cart is at Stop – 04 and user select destination as Stop – 06, the eQart finds the shortest route. After pressing the start button the eQart starts to travel towards Stop –... -
Page 36: Navigation
User manual rev. 1.2 Navigation • The user selects a map as a default map from recorded maps in the eQart Cockpit under the Navigation view. • After selecting a default map, the default map is highlighted. • Select the path direction from the edit map. -
Page 37: Settings
User manual rev. 1.2 Settings In the Settings menu, the user can access the settings for both the eQart and the Cockpit. • There are three tabs in Settings: 1. General 2. Configuration 3. Diagnosis Updating the Cockpit application and eQart Firmware •... -
Page 38: Settings > Configuration
In the “Motor´s time” view the Cockpit will display the total running time of the electric motor of the eQart. Registered number In the “Register number” view the user can register their mobile number, the eQart will be able to send its status to that number by SMS. About eQart The “About eQart”... - Page 39 User manual rev. 1.2 Assign cart name • The “Assign cart name” view the user can assign the name to the eQart. This should be a unique name easy to identify. • Once assigned, the eQart name will be connected to that specific eQart, and it will also be the name of the Wi-Fi identification.
- Page 40 User manual rev. 1.2 P & F sensors The P & F sensors are an optional custom feature of the eQart. Users can opt for the extra P & F ultrasonic sensors option. The laser sensor can only detect objects in a single plane at a height of 150mm.
-
Page 41: Settings > Diagnosis
• Note The eQart will only create a Debug log for one line follow action after it is activated. If the eQart is put into line follow mode a second time the Debug Log will be removed automatically. - Page 42 User manual rev. 1.2 • The Debug log will present all the actions the eQart has recorded while in Diagnosis mode. Map Data When recording a Map for Navigation the eQart will use encoder data, RFID- stations, and junction data to create the full map.
- Page 43 During navigation or map creation the eQart will follow the line and looking for any intersections in its travel path. • If the eQart detects a faulty intersection while in line follow mode it will lead to an error in the left/ right turning sequence. •...
- Page 44 All Images To make a general diagnosis for the line follow function or the Map recording the All images diagnosis can record all the images that eQart sees. • To start the All Images Diagnosis, check the All images box in the "Diagnosis" menu.
-
Page 45: Eqart Cloud Server
User manual rev. 1.2 eQart Cloud Server the eQart cloud server provides access to the user's profile information, user-assigned eQart in the cart list, and maps that have been uploaded to the cloud. User Sign-up • Users will receive the registration link from FlexQube to register the cloud account for the eQart. -
Page 46: Profile
Users can edit profile information and change the password. 11.2.2 Cart list • In the “Cart list”, all the eQart that have been assigned to the user account will be displayed on the page. • Users can access the information on each of the eQart. -
Page 47: Map
User manual rev. 1.2 11.2.3 Map • In the “Map” page all the recorded maps that have been uploaded from the eQart Cockpit can be viewed. • Users can delete recorded maps not in use anymore. Automation your way... -
Page 48: Maintenance Drive
Maintenance Drive ATTENTION Please read through safety instructions before using the Maintenance drive. • When the eQart is stuck, and it is not possible to operate the eQart using the Cockpit, the user can use the Maintenance drive. • Cases when Maintenance Drive can be used: ▪... -
Page 49: Maintenance
User manual rev. 1.2 Maintenance To ensure safe usage and long life for the eQart the following procedures must be followed regularly. All maintenance should be performed or be supervised by FlexQube personnel as the use of non- approved spare parts or any modification will affect the safety, standard certification, and void the guarantee. -
Page 50: Maintenance Operation
OFF. To service the eQart modules, access under the eQart is needed to be able to replace the modules. To perform the service, it is needed to lift or flip over the eQart. -
Page 51: Figure 29 Bottom Of Eqart Showing The Eqart Modules
Disconnect the LED light cable and the Laser sensor cables connected to the Brain module. ▪ Remove the 4 self-tapping screws attaching the Corner module to the Base frame. ▪ The Corner module is now loose to be removed from the eQart. 4x Angle Battery 8x Bolts plates module handle 2x Threaded Figure 29 Bottom of eQart showing the eQart modules. -
Page 52: Major Fault
Motor module to be able to roll away the eQart manually. ▪ As a last step, the eQart can be lifted with a forklift by the included fork pockets under the eQart. Please note that many parts under the eQart are fragile so lift with caution. - Page 53 User manual rev. 1.2 List of Figures Figure 1 Example of eQart Nameplate ....................10 Figure 2 Exploded view of the mechanical design of the eQart ............11 Figure 3 Brain Module ........................... 12 Figure 4 Emergency Stop Module ......................12 Figure 5 Swap Battery Module ......................
- Page 54 User manual rev. 1.2 FlexQube HQ August barks gata 1 421 32 Västra Frölunda Sweden + 46 70 6514834 FlexQube GmbH Feldbergstrasse 27-29 61440 Oberursel Germany +49 (160) 2436305 FlexQube Inc. 720 Empire Expy GA 30401 Swainsboro +1 (734) 624 2121 www.flexqube.com...
Need help?
Do you have a question about the eQart and is the answer not in the manual?
Questions and answers