TP-Link Omada EAP115-Wall Quick Installation Manual
300mbps wireless n wall-plate access point
Hide thumbs
Also See for Omada EAP115-Wall:
- User manual (104 pages) ,
- Quick installation manual (2 pages)
Table of Contents
Advertisement
Quick Links
Quick Installation Guide
300Mbps Wireless N Wall-Plate Access Point
EAP115-Wall
©2018 TP-Link 7106508202 REV2.1.0
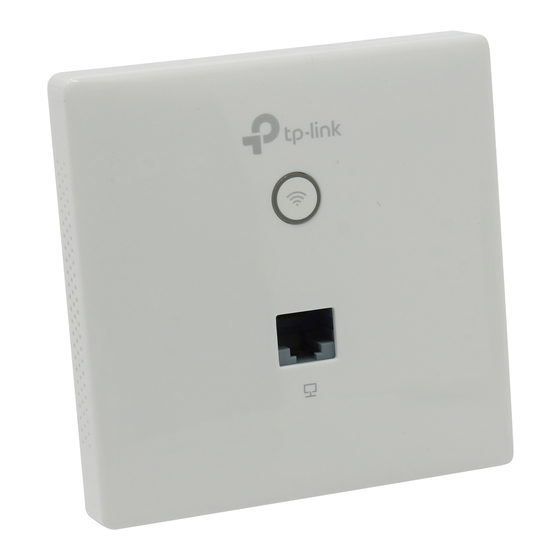
Hardware Overview
1
Front Panel
LED
LED/Wi-Fi Button
When the EAP is working in Standalone Mode and enabled with Wi-Fi
Control, press the button to turn on/off both of the Wi-Fi and LED. In other
cases, press the button to turn on/off the LED only.
LAN Port
A wired device can be connected to the LAN port via an Ethernet cable
and access the network.
RESET
With the EAP powered on, press and hold the button for about 5 seconds
until the LED flashes. The EAP will restore to factory default settings.
LED Indicator
On:
Working normally/Initializing.
Off:
Working abnormally/Power off/LED is turned off.
Flashing:
Initialization: The LED flashes twice after initialization is complete.
Upgrade: The LED flashes once per second while upgrading.
Reset: The LED flashes five times in quick session during the reset. The
EAP will then reboot.
Rear Panel
UPLINK+PoE Port
Connected to a PSE (Power Sourcing Equipment), such as a PoE switch, for
both data transmission and Power.
2
Pre-Installation Checklist
Before installation, be sure that you have the following items:
1. A pre-installed wall junction box
2. An RJ45 plug
3. A triangular screwdriver
LED/Wi-Fi Button
3
Installation Steps
LAN Port
EAP115-Wall can be mounted into either an 86mm wall junction box or a
RESET
standard EU wall junction box. The junction box should be pre-installed with a
running-in-wall Ethernet cable connected to a PoE switch.
86mm wall junction box
1. Detach the faceplate of the junction box with a Phillips screwdriver
(demonstrated with an 86mm wall junction box).
2. Detach the faceplate of the EAP with a screwdriver.
3. Connect the Ethernet cable inside the junction box to an RJ45 plug.
Then connect the cable to the UPLINK+PoE port. Position the Ethernet
cable to ensure it is not strained.
4. A Phillips screwdriver
5. A PoE switch
4. Insert the enclosed screws and tighten them with a triangular
screwdriver to secure the mounting bracket.
Standard EU wall junction box
5. Press the faceplate of the EAP back into position.
Note:
Do not over tighten the screws.
If the enclosed screws do not fit the junction box, use the screws attached to the
junction box instead.
Advertisement
Table of Contents

Related Manuals for TP-Link Omada EAP115-Wall


Summary of Contents for TP-Link Omada EAP115-Wall
- Page 1 3. Connect the Ethernet cable inside the junction box to an RJ45 plug. Then connect the cable to the UPLINK+PoE port. Position the Ethernet cable to ensure it is not strained. ©2018 TP-Link 7106508202 REV2.1.0 Hardware Overview Pre-Installation Checklist Front Panel Before installation, be sure that you have the following items: 1.
- Page 2 TP-Link ID. 1. Download the TP-Link Omada app on your mobile device. It can be b. Launch the app and log in with your TP-Link ID. Then go to Cloud downloaded from Apple Store or Google Play: Access.
Need help?
Do you have a question about the Omada EAP115-Wall and is the answer not in the manual?
Questions and answers