
Related Manuals for Sahara X475


Summary of Contents for Sahara X475
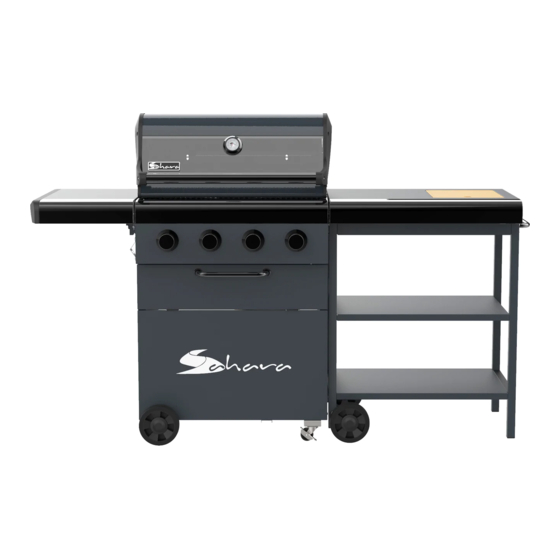
- Page 1 7 5 Barbecue 509B Photograph is not to scale. Specification subject to change without prior notice. Manufactured by Universal Innovations www.saharabbqs.com...
- Page 2 These instructions are for your safety. Read them thoroughly before use and retain them for future reference. DANGER: WARNING: If you smell gas: Do not store or use gasoline or other 1. Shut off gas to the appliance. flammable vapors and liquids in the 2.
-
Page 3: Table Of Contents
Parts Supplied Description Illustration Description Illustration Cabinet Base Side Shelf Left + Right Vaporising Side Wall Cabinet Cooking Brace Plate Grill Cabinet Warming Front Panel Rack Grease Tray Cross Bar Grease Cup Bracket Axle Grease Assembly Cart Wheel Caster Bracket Wheel Left Cart Frame... - Page 4 Parts Supplied Hardware Supplied Description Illustration Description Illustration M6x12 Right Cart Bolt Frame M4 x 10 Cart Shelf Bolt M6 x 45 Cart Rail Bolt Handle Hardware items are not shown at actual Assembly size. Before You Start Side Cart Check the contents of the box and make sure Tabletop you have all the parts and fittings listed.
- Page 5 Assembly Step 1 M6x12 Bolt (Ref A) Cabinet Base Left + Right Side Wall Fit left and right side walls to the cabinet base as shown below using 8 of the M6x12 bolts (Ref A). Note: The right side wall has a hole in the top corner. This is a view from the back.
- Page 6 Assembly Step 2 Cabinet Brace Plate (x2) M6x12 Bolt (Ref A) Fit the two cabinet brace plates to the cabinet base and side wall assembly using 8 of the M6x12 bolts (Ref A) as shown below. M6x12 Bolt (Ref A) Cabinet Brace Plate...
- Page 7 Assembly Step 3 Cabinet Front Panel M6x12 Bolt (Ref A) Note: Flip cabinet assembly over so that the left side wall is on the ground. Fit cabinet front panel to base and side wall assembly as shown below using 6 of the M6x12 bolts (Ref A). Note: An extra person will be needed to hold the door in position while tightening the fixings.
- Page 8 Assembly Step 4 Cross Bar M4 x 10 Bolts (Ref B) Fit the cross bar using 4 of the M4x10 bolts (Ref B). Secure chain to cabinet front panel using the pre-fitted M6x12 bolt and washer. Cross Bar...
-
Page 9: Cabinet Base
Assembly Step 5 M6x12 Bolt (Ref A) Axle Assembly Caster Wheel (x2) Turn the barbecue cabinet over and fit axle assembly and two caster wheels to the cabinet base using 16 of the M6x12 bolts (Ref A). Axle Assembly Caster Wheel Cabinet Base... -
Page 10: Cylinder Supports
Assembly Step 6 Cylinder Supports M6x12 Bolt (Ref A) Turn the grill over and fit the two cylinder supports to the cabinet base using 6 of the M6x12 bolts (Ref A). Cylinder Support... -
Page 11: Firebox
Assembly Step 7 M6x12 Bolt (Ref A) Firebox Position firebox onto cabinet. Open hood and use 4 of the M6x12 bolts (Ref A) to secure firebox into position. Note: Fixing holes are located on inside of firebox (2 on each side). Note: Two people are required to lift firebox into position. -
Page 12: Side Shelf
Assembly Step 8 Side Shelf Use pre-fitted R-clip and pin to secure the side shelf. The long bar is used to secure the side shelf in the upright position. Long bar R-clip and pin... -
Page 13: Vaporising Bar
Assembly Step 9 Vaporising Bar (x4) Cooking Grill Warming Rack 1. Fit vaporising bars (x4) into position as shown. 2. Fit cooking grill into position as shown. 3. Fit warming rack into position as shown. -
Page 14: Grease Tray
Assembly Step 10 M6x12 Bolt (Ref A) Grease Tray Grease Cup Bracket Grease Cup Attach grease cup bracket to grease tray using one of the M6x12 bolts (Ref A) and then slide into the back of the grill as shown below. Slide grease cup into the grease cup bracket as shown. Grease Tray Grease Cup Bracket Grease Cup... -
Page 15: Cart Wheel Bracket
Assembly Step 11 M6x12 Bolt (Ref A) Cart Wheel Bracket (x2) Left Cart Frame Cart Wheel (x2) 1. Fit cart wheel brackets to left cart frame as shown below using 8 of the M6x12 bolts (Ref A). 2. Fit the 2 cart wheels to the cart wheel brackets using prefitted bolt and washer attached to wheels. - Page 16 Assembly Step 12 Right Cart Frame Cart Shelves (x2) M6x12 Bolt (Ref A) Lie the left cart frame down and attach the middle cart shelf first using 2 of the M6x12 bolts (Ref A). Then attach the bottom cart shelf using 3 of the M6x12 bolts (Ref A). Then attach the right cart frame using 5 of the M6x12 bolts (Ref A).
- Page 17 Assembly Step 13 Cart Rail (x2) Handle Assembly M6x45 Bolt (Ref C) M6x12 Bolt (Ref A) Fit two cart rails to cart frame as shown using 8 of the M6x45 bolts (Ref C). Fit handle assembly to side cart using 2 of the M6x12 Bolts (Ref A).
- Page 18 Assembly Step 14 Side Cart Tabletop Utility Bin Chopping Board M6x12 Bolt (Ref A) Attach the side cart tabletop to the cart frame using 5 of the M6x12 Bolts (Ref A). Place utility bin and chopping board into the side cart tabletop as shown.
- Page 19 Assembly Step 15 To fit the cart to the grill body, lift the cart slightly on the left and lower down to lock in to the grill side brackets. Note: make sure the side cart wheels are on the left hand side. If you wish to keep the side cart detached, you can remove the side brackets from the grill.
- Page 20 Assembly Step 16 Load gas cylinder into the cabinet through the back, positioning it between the two cylinder supports and securing with chain. Connect the gas cylinder to the regulator as shown. Perform leak test (see page 22). Use cabinet front panel for easy access to gas hose and regulator. Note: Grease cup needs to be on the opposite side to the gas cylinder.
- Page 21 Assembly Step 17 NOTE: Leak Test to be performed before using the appliance. Leak Testing Your grill has been checked at all factory connections for leakage. To be performed in a well ventilated area. Confirm all control knobs are in the off position.
- Page 22 SAFETY INSTRUCTIONS compatible with the connection for outdoor cooking appliances. Warnings • The cylinder used must include a collar to • Failure to read and follow these instructions could protect the cylinder valve. result in serious injury or damage to propery. •...
- Page 23 Use Instructions - Grill • Never overload the grill with food – evenly space over the cooking grill surface, ensuring sufficient Before proceeding, make certain that you air circulation to the burners. understand the WARNINGS section of this manual. • DO NOT store or cover the grill until fully •...
- Page 24 Manual Lighting Instructions Care and Maintenance • Remove the cooking grill and vapor bar from • Regularly clean your grill between uses and barbecue. especially after extended periods of storage. • Place a lit match beside the burner (at the same •...
- Page 25 • The burners should be cleaned annually, or Fig. B whenever heavy build-up is found, to ensure that there are no signs of blockage (debris, insects) in either the burner portholes or the venturi tubes of the burners fitted over the valve outlets. A clogged tube can lead to a fire beneath the grill.
- Page 26 • Leak test annually and whenever the gas bottle is removed or replaced. Gas and Regulator • The gas hose must be connected in accordance with these instructions. When installe 6. Wire brush entire outer surface of burner to • If the grill is to be stored indoors, the gas parts of the hose should be contained within the Patio Heater pole and gas cylinder c remove food residue and dirt.
- Page 27 BBQ Specifications Burner 4 Burner Injector Size 0.039" Gas/Pressure 11" per W.C Input Rate (main) 11,700 BTU/HR*1 (Orifice size: 1.0 MM) Standard ANSI STD Z21.58-2018 Outdoor Cooking Gas Appliances TECHNICAL AND SERVICING INFORMATION This appliance is designed for outdoor use only using Propane gas at a supply pressure of 11" per WC and must be serviced by a competent person in accordance with the instructions included.
- Page 28 BARBECUE GUARANTEE This barbecue is made by Universal Innovations. It is made to an exacting quality standard and is covered by the following guarantee. The product has a 10 year limited warranty, regarding proper use. Sink + Hood: 10 years (no rust through/burn through/excludes fading/colour change) Cooking grill: 10 years (no rust through/burn through/excludes fading/colour change) Burner/Vaporising bar/Warming rack:...
Need help?
Do you have a question about the X475 and is the answer not in the manual?
Questions and answers