Table of Contents
Advertisement
Quick Links
where inspiration flows
NOTION
Installation Guide
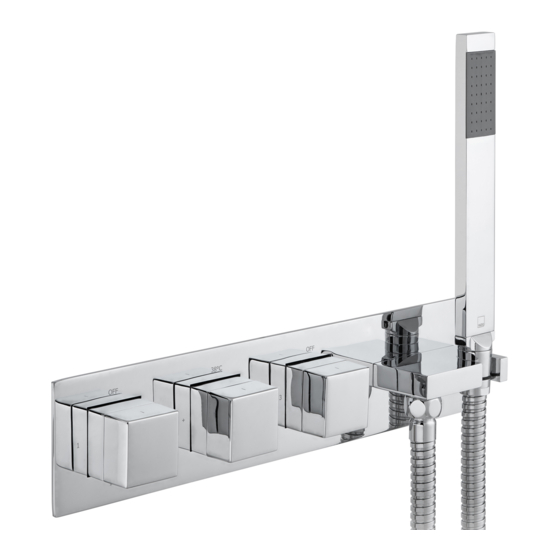
3 handle, 3 outlet thermostatic shower valve
TAB-128/3WO-NOT-CP
This instruction booklet covers model:
TAB-128/3WO-NOT-CP
Vado
Wedmore Road, Cheddar, Somerset, England BS27 3EB
tel 01934 744466.
fax 01934 744345
aftersales @ vado.com
www.vado.com
Keep for future reference
Version 1, 1-2-20
Advertisement
Table of Contents

Related Manuals for VADO NOTION TAB-128/3WO-NOT-CP


Summary of Contents for VADO NOTION TAB-128/3WO-NOT-CP
- Page 1 Installation Guide 3 handle, 3 outlet thermostatic shower valve TAB-128/3WO-NOT-CP This instruction booklet covers model: TAB-128/3WO-NOT-CP Vado Wedmore Road, Cheddar, Somerset, England BS27 3EB tel 01934 744466. fax 01934 744345 aftersales @ vado.com www.vado.com Keep for future reference Version 1, 1-2-20...
- Page 2 Important - please read Contents of Packaging Please read these instructions carefully before starting installation and keep for future reference. Remove all packaging and check the product for missing parts or damage before starting installation. Any alterations made to this product and fittings may infringe water regulations and will invalidate the guarantee.
- Page 3 Contents of Packaging Dimensions 306mm ¾" ¾" Adaptors ¾" to ½" x 4 Handset 80mm 80mm 95mm 370mm Shower hose with 2 washers ½"...
- Page 4 Installation - Quick guide Installation - Quick guide 263mm 90mm...
- Page 5 If you are fitting the valve to a partition wall or a wall of particularly soft substrate you will need specialist fixings. Please contact VADO or retailer for WG-STUDFAST-C-S/S fixing. Mortar guard During installation please leave the mortar guard secured to the valve to avoid...
- Page 6 Installation Installation Connect hot supply to the lower right 263mm Outlet Cold inlet of the valve and cold supply to the 90mm upper right inlet. Connect outlet 1 & 2 to the desired channels e.g. outlet 1 to the shower head, outlet 2 to the bath.
- Page 7 Installation - handles Installation - handset Spigot Handset Shrouds holder Handle mark Flow Rubber Handle washer Temperature Shrouds Handle Flow Handle Cover Handset outlet plate Place a rubber washer into the nut end of the hose and attach it to the handset outlet (see above).
- Page 8 Temperature commissioning Notes: Stop Splines The valve has been factory set under balance pressures and hot water supply at 65° C. When your specific operating conditions are significantly different from the above, the temperature of the water may vary from the setting. When the difference is too great, you can adjust the calibration of the valve to suit individual requirements of the installation: 1.
Need help?
Do you have a question about the NOTION TAB-128/3WO-NOT-CP and is the answer not in the manual?
Questions and answers