
Related Manuals for Insignia NS-DWR3SS1


Summary of Contents for Insignia NS-DWR3SS1
- Page 1 USER GUIDE Top Control Dishwasher NS-DWR3SS1 Before using your new product, please read these instructions to prevent any damage.
-
Page 2: Table Of Contents
Contents Introduction ............3 IMPORTANT SAFETY INSTRUCTIONS . -
Page 3: Introduction
Top Control Dishwasher Introduction Congratulations on your purchase of a high-quality Insignia product. Your NS-DWR3SS1 represents the state of the art in dishwasher design and is designed for reliable and trouble-free performance. IMPORTANT SAFETY INSTRUCTIONS CAUTION RISK OF ELECTRIC SHOCK... - Page 4 WARNING Electric Shock Hazard Failure to follow these instructions can result in electric shock, fire, or death. WARNING–DANGER Never allow children to play with, operate, or crawl inside the dishwasher. Turn off the dishwasher before carrying out user maintenance on it. If a component part is damaged, it must be replaced by the manufacturer, its service agent, or similar qualified persons in order to avoid a hazard.
- Page 5 Top Control Dishwasher • Under certain conditions, hydrogen gas may be produced in a hot water system that has not been used for two weeks or more. HYDROGEN GAS IS EXPLOSIVE. If the hot water system has not been used for such a period, before using, turn on all hot water faucets and let water flow from each for several minutes.
-
Page 6: Package Contents
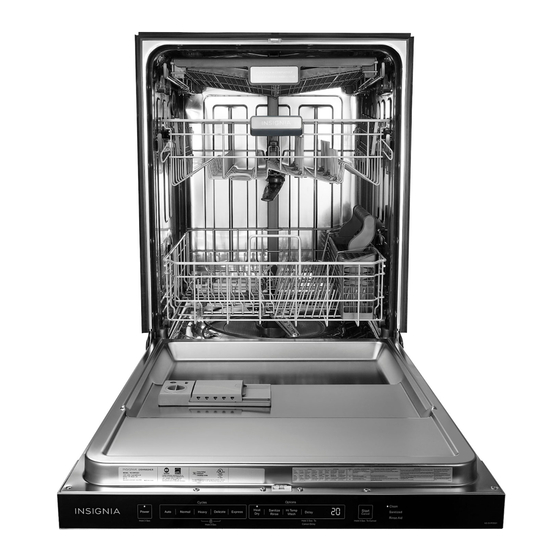
Package contents • Dishwasher • Hose • Installation hardware (four wood screws, two top mounting clips, and one hose clamp) • User Guide • Installation Guide Main components Top rack Upper spray arm Cup shelf Adjustable upper rack Tub gasket Middle spray arm Silverware... -
Page 7: Installing And Setting Up Your Dishwasher
Top Control Dishwasher Installing and setting up your dishwasher Water supply temperature should be between 120° ~ 149° F (49° ~ 65° C). Dispose of the discarded appliance and packing material properly. The dishwasher must be grounded or it can result in a risk of electric shock. -
Page 8: Wash Cycle Selections
Wash cycle selections Cycle times are approximate and will vary with options selected. Hot water is necessary to activate dishwasher detergent and melt fatty food soils. An automatic sensor checks the incoming water temperature and, if it is not hot enough, the timer will be delayed to allow for the water to heat for the main wash of all cycles. -
Page 9: Using Your Dishwasher
Top Control Dishwasher Using your dishwasher Using the control panel Your dishwasher’s control panel is located on the top edge of the door. The door must be opened to make settings and operate the dishwasher. Power Turn the power on and off by pressing and holding the power button for three seconds. - Page 10 CYCLE CYCLE DESCRIPTION WATER USE TIME (MIN.) Use to lock all controls to prevent children from accidentally changing the dishwasher cycle or starting the Child dishwasher. Press the Heavy and Lock Delicate buttons at the same time to activate or cancel the child lock. The indicator light turns on.
- Page 11 Top Control Dishwasher • 9 - Hi Temp Wash—Use to maintain the water temperature at 140° F (60° C) max. during the wash portion of the cycle. This option is available with the Auto, Normal, and Heavy cycles. AVAILABLE OPTIONS CYCLES HEAT DRY SANITIZE RINSE...
-
Page 12: Basic Operation
To load more dishes or pause the dishwasher while it’s already running, open the door. A safety mechanism stops the cycle. For additional information, see Adding a dish on page 19. CAUTION: To avoid injury open the door slowly and carefully, and keep your face away from the dishwasher. -
Page 13: Preparing And Loading Dishes
Top Control Dishwasher Preparing and loading dishes Preparing dishes for washing • Scrape away large pieces of food, bones, pits, toothpicks, and similar items.The continuous filtered wash system will remove the remaining food particles. • Burned-on foods should be loosened before loading. •... - Page 14 Adjusting the top rack This dishwasher has a convenient top rack for silverware, cutlery, and small items. This rack can be adjusted to accommodate varying loads, as shown below. Left and right racks angled Left rack adjusted to lower position and right rack angled Left rack adjusted to lower position and right rack to upper position Left rack adjusted to lower position and right rack moved to the left Left rack adjusted to lower position and right rack removed...
- Page 15 Top Control Dishwasher Loading the top rack You can place the items in the top rack randomly or in an orderly fashion. The image below shows how to load the top rack for 16 place settings : Large spoons Small Knives spoons Small forks...
- Page 16 Adjusting the upper rack The height of the upper rack can be adjusted to accommodate loading taller dishes in either rack. Lift the rack to move it to the upper position. Upper rack in the upper position Press the handles to move it to the lower position. Upper rack in the lower position www.insigniaproducts.com...
- Page 17 Top Control Dishwasher Loading the upper rack The upper rack is designed for cups, glasses, small plates, bowls, and plastic items marked dishwasher-safe.For best results, place the items with the soiled surface facing down or toward the center.Tilt them slightly for better drainage. Note: Make sure that the loaded dishes do not interfere with the rotation of the middle spray arm, which is located just below the upper rack.You can check this by rotating the middle spray arm by hand.
- Page 18 Loading the bottom rack The bottom rack is designed to accommodate plates, bowls, saucers, and cookware. The adjustable rack lets you load items up to 13 in. (33 cm) high. Large items should be placed along the edge, with the inside facing down, so they do not interfere with the middle or lower spray arms or prevent the detergent dispenser from opening.
-
Page 19: Adding A Dish
Top Control Dishwasher Loading the silverware basket The silverware basket is made up of three separate sections that can be used in combination or separately and which can be placed in either the upper or lower racks. Knives and salad forks Spoons Knives and sa lad forks... -
Page 20: Filling The Detergent Dispenser
Filling the detergent dispenser Push the detergent dispenser cover latch inwards to open the detergent cup. The cover is spring-loaded and will pop open automatically. Add detergent (dry powder, liquid, or packets) to the cup. Close the detergent dispenser cover. The amount of detergent required depends on the cycle selected and the soil level on the dishes. -
Page 21: Filling The Rinse Aid Dispenser
Top Control Dishwasher Filling the rinse aid dispenser Your dishwasher is designed to use a liquid rinse aid. The use of a rinse aid greatly improves drying performance after the final rinse. Do not use a solid or bar-type rinse aid. Under normal conditions, the rinse aid will last approximately one month. -
Page 22: Factors Affecting Performance
Factors affecting performance Using rinse aid Rinse aid greatly improves drying and reduces water spots and filming. Without rinse aid, your dishes and dishwasher interior will have excessive moisture. In addition, the heated dry option will not perform as well without rinse aid. -
Page 23: Water Pressure
Top Control Dishwasher Water pressure For optimum performance, the hot water supply line for your dishwasher must provide water pressure of at least 20 psi and not more than 120 psi. You may experience low water pressure during high-demand periods, such as when laundry or showers are in use while you are washing the dishes. - Page 24 Remove the bottom rack. Rotate the cylinder filter, then lift it out. www.insigniaproducts.com...
- Page 25 Top Control Dishwasher Lift the fine filter from the bottom of the tub. Take out the fabric filter. Flush the filters by holding them under running water. Replace the fabric filter. Replace the fine filter. Replace the cylinder filter. Replace the bottom rack. www.insigniaproducts.com...
-
Page 26: Cleaning The Door And Tub Gaskets
Cleaning the door and tub gaskets Clean the door gasket with a damp cloth to remove food particles regularly. The inside of the dishwasher is self-cleaning under normal use. If needed, the tub gasket can be cleaned with a damp cloth. Use a brush to clean the opening in the end of the gasket. -
Page 27: Cleaning The Air Gap
Top Control Dishwasher Cleaning the air gap An air gap is an external plumbing device that is not actually part of your dishwasher. Some state or local plumbing codes require the installation of a drain air gap between the dishwasher and the home drain system. It is usually located on the countertop near the sink or the dishwasher. -
Page 28: Troubleshooting
Troubleshooting Refer to this table to correct minor issues before calling for service. Error codes CODE MEANING POSSIBLE CAUSE POSSIBLE SOLUTION Either the water flow • Faucet is not opened • Make sure that the is insufficient, or the • Water pressure is too water is turned on to water pressure from the dishwasher. - Page 29 Top Control Dishwasher PROBLEM POSSIBLE CAUSE POSSIBLE SOLUTION The dishwasher The door may not be Make sure that the door is closed and won’t start closed properly. latched. The power is off or not Make sure that the power is connected connected.
- Page 30 PROBLEM POSSIBLE CAUSE POSSIBLE SOLUTION The dishes are The water pressure is Make sure that the water pressure is not clean too low. above 20 psi. Use your dishwasher when enough water demand is low. The inlet water Make sure that the dishwasher is temperature is too low.
- Page 31 Top Control Dishwasher PROBLEM POSSIBLE CAUSE POSSIBLE SOLUTION The detergent Improper operation of Add detergent and rinse aid only as dispenser will the detergent cover. indicated in this manual. See Filling the not close detergent dispenser on page 20. Water remains The previous cycle has Make sure that the current cycle is in the...
-
Page 32: Specifications
Specifications Capacity Maximum 16 place settings Dimensions (WxDxH) 23.9 x 24.5 x 33.8 in. (60.6 x 67.4 x 85.7 cm) Power requirements 120 V~60 Hz Current 8.4 A Water pressure Between 20 and 120 psi (138 and 827 kPa) Noise (dB) 49 dB www.insigniaproducts.com... -
Page 33: One-Year Limited Warranty
Product is determined to be defective by an authorized Insignia repair center or store personnel, Insignia will (at its sole option): (1) repair the Product with new or rebuilt parts; or (2) replace the Product at no charge with new or rebuilt comparable products or parts. - Page 34 • Damage due to incorrect operation or maintenance • Connection to an incorrect voltage or power supply • Attempted repair by any person not authorized by Insignia to service the Product • Products sold “as is” or “with all faults”...
- Page 35 1-877-467-4289 (U.S. and Canada) or 01-800-926-3000 (Mexico) INSIGNIA is a trademark of Best Buy and its affiliated companies. Distributed by Best Buy Purchasing, LLC 7601 Penn Ave South, Richfield, MN 55423 U.S.A. ©2020 Best Buy. All rights reserved. V2 ENGLISH...