Tru-Test XRS2 Service Manual
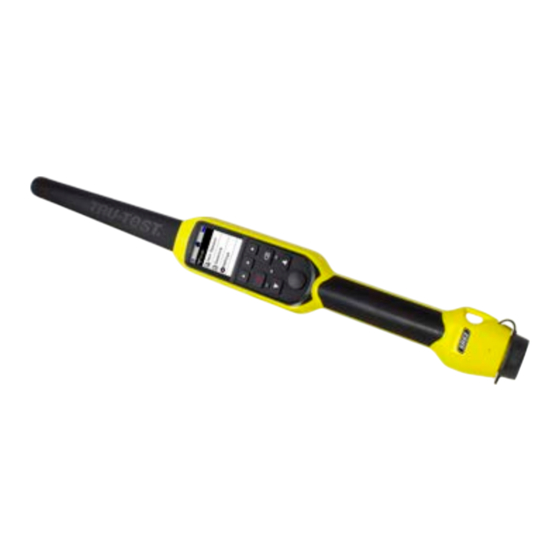
Eid stick reader
Hide thumbs
Also See for XRS2:
- Quick start manual (88 pages) ,
- Setup manual (7 pages) ,
- Setup manual (5 pages)

Related Manuals for Tru-Test XRS2


Summary of Contents for Tru-Test XRS2
- Page 1 EID Stick Reader LEVEL 1 SERVICE MANUAL XRS2, SRS2 XRS2 EID Stick Reader SRS2 EID Stick Reader Issue 5, 03/2018...
-
Page 2: General Information For Servicing
Bluetooth ® word mark and logos are registered trademarks owned by Bluetooth SIG, Inc. Any use by Tru-Test Limited is under licence. All trademarks with an * are neither owned by nor licensed to Tru-Test Limited and belong to their respective owners. -
Page 3: Table Of Contents
XRS2 and SRS2 EID Stick Reader Contents General information for servicing ..........................2 Service centre requirements ............................4 Product feedback ............................. 4 Technical bulletins ............................4 Returning a product ............................4 Taking precautions ............................4 Service equipment ............................5 Useful resources .............................. 6 Parts diagram ................................ -
Page 4: Service Centre Requirements
Returning a product Before a product or assembly is returned to Tru-Test for service or analysis, please advise us beforehand so that a Return Authorisation (RA) number can be allocated. The RA number will ensure that we are ready for the product when it is received and assist us in providing efficient and prompt service. -
Page 5: Service Equipment
® indicator. enabled indicator Micro SD card For transferring the contents of the stick reader’s memory to a PC for analysis by Tru-Test reader technical support. Used when data stored on the stick reader has become corrupted. Issue 5, 03/2018... -
Page 6: Useful Resources
XRS2 and SRS2 EID Stick Reader Useful resources The following videos and documents are available as an extra resource to assist when servicing a stick reader. They can be downloaded from the Tru-Test livestock website livestock.tru-test.com. SRS2 EID Stick Reader How-to videos •... -
Page 7: Parts Diagram
XRS2 and SRS2 EID Stick Reader Parts diagram Issue 5, 03/2018... -
Page 8: Parts List
XRS2 and SRS2 EID Stick Reader Parts list Part Recommended Description Contents number quantities Changes to the product Stick reader main on page 22. 829182P battery Both models 1 x 3.7 V Li-ion battery Coin cell battery Both models Purchase... - Page 9 XRS2 and SRS2 EID Stick Reader Part Recommended Description Contents number quantities Screws Both models Standard case screws SSS20416P (No. 4x5/8 pan-pozi stainless steel) - pack of PCA & LCD Cradle screws 816753P (No. 4x3/8 pan-pozi zinc plated) - pack of 50...
-
Page 10: Troubleshooting
XRS2 and SRS2 EID Stick Reader Troubleshooting Battery and charging problems Symptom Cause Solution Both models: Power adaptor is faulty Try charging the stick reader battery using a known good power adaptor. Replace power adaptor if The charging symbol on required. - Page 11 XRS2 and SRS2 EID Stick Reader Symptom Cause Solution Both models: Faulty charger circuit. Replace the main module. See page 37. The battery appears to be fully charged, but immediately drops to ~80% charge when the stick reader is disconnected from the mains power supply.
-
Page 12: Performance Problems
Test the battery. See page 28. Replace battery if required. See page 36. Stick reader may have Use the Data Link firmware recovery feature to recover the XRS2/SRS2. In Data Link, select accidentally been disconnected during a firmware update. Tools Updates Recover XRS2/SRS2…. -
Page 13: Scanning Problems
XRS2 and SRS2 EID Stick Reader Scanning problems Symptom Cause Solution Both models: Read Mode has been set to In Standard and Single read modes, the stick Standard or Single modes. reader will stop scanning after 3 seconds if no tag is... - Page 14 XRS2 and SRS2 EID Stick Reader Symptom Cause Solution when the Read button is pressed. Scanning continues for 3 seconds or until a tag is read. If the Read button is held down continuously, the stick reader will continue to scan.
-
Page 15: Unexpected Behaviour During Use
XRS2 and SRS2 EID Stick Reader Unexpected behaviour during use Symptom Cause Solution Both models: The stick reader automatically Use the keypad to navigate to the Home Settings switches off after a period of General Auto Off and press the ‘Scan/Select’... - Page 16 XRS2 and SRS2 EID Stick Reader Symptom Cause Solution Both models: The maximum number of Start a new session. records allowed in a session has When scanning Refer to the Quickstart guide on how to start been reached. records a warning is a new session.
-
Page 17: Data Link Problems
XRS2 and SRS2 EID Stick Reader Data Link problems Symptom Cause Solution Both models: Data Link has been set to Change the file format to .xls. Refer to the Data Link help menu. import sessions in an NLIS or EIDs display in Excel .csv format and the EID... -
Page 18: Information For Servicing
Power on the stick reader. Launch Data Link by double-clicking on the Data Link icon on the desktop: After a several seconds, ‘Connected to SRS2/XRS2’ should be displayed in the bottom left-hand corner and all sessions saved on the device will be displayed. -
Page 19: Lcd Handling And Storage Precautions
XRS2 and SRS2 EID Stick Reader LCD handling and storage precautions Do not subject the LCD panel to physical shock as the glass may break and injuries may occur. If the glass breaks, do not touch it with bare hands. Fragments of broken glass may cause injuries. - Page 20 XRS2 and SRS2 EID Stick Reader Keypad FFC To disconnect the keypad FFC: Carefully lift the keypad connector locking tab. Gently pulled out the FFC using your thumb and fore finger. To connect the keypad FFC: Carefully lift the keypad connector locking tab.
- Page 21 XRS2 and SRS2 EID Stick Reader Display FFC To disconnect the display FFC: Use your finger nails to gently lift both tabs of the locking mechanism. Gently remove the FFC with your thumb and fore finger. To connect the display FFC: Use your finger nails to gently lift both tabs of the locking mechanism.
-
Page 22: Connections On The Main Module
Before you service an EID stick reader, you should familiarise yourself with the information contained in Technical Bulletin 18-007 “XRS2 and SRS2 Stick Reader - Change to spare parts: main battery and case”, available for dowloading from the Tru-Test service website service.tru-test.com This bulletin outlines: Why the changes have been made •... -
Page 23: Disposing Of The Product And/Or The Batteries
XRS2 and SRS2 EID Stick Reader Disposing of the product and/or the batteries This symbol on the product or its packaging indicates that this product must not be disposed of with other waste. Instead, it is your responsibility to dispose of your waste equipment by handing it over to a designated collection point for the recycling of waste electrical and electronic equipment and removal of any batteries. -
Page 24: Testing The Stick Reader
Testing the power connection Turn off the stick reader. Plug the USB A to mini USB cable (824575) into the XRS2/SRS2 power adapter (830419), and plug it into the stick reader’s USB port. Verify that the display turns on and the battery show ‘charging’... -
Page 25: Testing The Bluetooth ® Wireless Connection
Bluetooth Testing the ® wireless connection Bluetooth Bluetooth Test the wireless connection by connecting the stick reader with Tru-Test -enabled weigh scale indicator (e.g. EziWeigh7i, XR5000). Bluetooth This test will ensure that the module and surrounding circuitry is functioning correctly. - Page 26 XRS2 and SRS2 EID Stick Reader Use the Up/Down buttons to select the weigh scale indicator you want to connect to, and press the Scan/Select button to initiate a connection. After a few seconds, verify that the stick reader has connected to the correct weigh scale indicator, the blue...
-
Page 27: Testing The Scanning Functionality
Testing the scanning functionality The SRS2 and XRS2 EID Stick Reader are designed to read ISO11784/ISO11785 compliant HDX and FDX-B tags. Under normal circumstances the stick reader will be able to read both tag types at a range of at least 30 cm. (Up to 35 cm). -
Page 28: Testing The Buttons
Testing the main battery The SRS2 and XRS2 EID Stick Reader contains a built-in 3.7 V Li-ion battery back with integrated protection circuit, and internal temperature sensor for monitoring temperature during charging. The PCA contains a dedicated battery management integrated circuit for charging the battery. -
Page 29: Testing The Coin Cell Battery Voltage
XRS2 and SRS2 EID Stick Reader Testing the main battery If there are doubts about the battery capacity, or if the battery doesn’t appear to hold its charge, test the battery. Charge the stick reader in a cool dry place for 6 hours at 10-40 ºC (50-104 ºF). The battery will not fully charge if too hot or cold, or charge as quickly if the stick reader is left powered on while charging. -
Page 30: Repair Procedures
XRS2 and SRS2 EID Stick Reader Repair procedures Disassembling and assembling the stick reader case Do NOT use a variable speed drill to tighten or undo the screws. The case front and case rear are supplied as a single spare part. Even if only one half of the case is damaged and requires replacement, it is important that both case halves are replaced in order to provide an effective seal. - Page 31 XRS2 and SRS2 EID Stick Reader Closing the case Stick readers are often used in very harsh environmental conditions. Correct installation of the case halves and screws are essential to help maintain an effective environmental seal for the case. Incorrect installation can lead to case leaks and serious malfunctions. Ensure that the cleaned screw fits the old thread when tightening.
- Page 32 XRS2 and SRS2 EID Stick Reader Clamp the two halves of the case tightly together. Seat screws by hand first and then tighten the case screws using a torque-limited screwdriver set to 0.5 Nm (4.5 lbf-in), or hand screwdriver. The screws must be tightened in the same order as shown in picture below in order to obtain a consistent pressure on the case gasket.
-
Page 33: Removing Corrupted Data
If data stored on the stick reader becomes corrupted, it must be removed, and the stick reader needs to be reset to its default settings before it is returned to the customer. The corrupted data should be sent to Tru-Test technical support team for analysis. -
Page 34: Replacing The Main Battery
The new style case will accommodate the new style battery which is a different size to the old one. See the technical bulletin 18-007 “XRS2 and SRS2 Stick Reader - Change to spare parts: main battery and case” for details. -
Page 35: Replacing The Coin Cell Battery
XRS2 and SRS2 EID Stick Reader Close the case, see page 31. Check that the stick reader operates and place on charge for 3 hours. Disposing of the product and/or the batteries 10 For instructions on the safe disposal of batteries, see page 23. -
Page 36: Replacing The Antenna Assembly
XRS2 and SRS2 EID Stick Reader Replacing the antenna assembly Open the case. See page 30. Carefully lift the antenna assembly off the main module. Ensure that the antenna wires are not pulled tightly. Unsolder the two antenna wires. The antenna assembly wires to be unsoldered: Solder new antenna assembly wires to the PCB. -
Page 37: Replacing The Main Module
XRS2 and SRS2 EID Stick Reader Replacing the main module When replacing the main module, ensure that the correct module is used (the module for SRS2 • and XRS2 models are different). Replacing the main module will cause all customer data to be lost. Ensure that all data is •... - Page 38 XRS2 and SRS2 EID Stick Reader To refit the main module: Place the main module into the case front by inserting the front edge under the clips of the cradle. Locating the front end of the PCA: Ensure that all plastic swarf is removed. Refit the screw securing the main module to the case front by hand first.
- Page 39 XRS2 and SRS2 EID Stick Reader The keypad connector in the open position: The tail connection in the closed position: Ensure that the FFC is fully engaged and straight before pushing down and engaging the connector's retention flap. Reconnect the display FFC to the main module. See page 21.
-
Page 40: Replacing The Display Module
XRS2 and SRS2 EID Stick Reader Replacing the display module To remove the display module: Open the case. See page 30. Remove the antenna assembly. See page 36. Remove the main module. See page 37. Manually remove two screws securing the cradle to the case front. - Page 41 XRS2 and SRS2 EID Stick Reader Replace the display module into the allocated space. Display fitted onto window area: Cradle fitted over display: Screwing the cradle to the case: Issue 5, 03/2018...
- Page 42 XRS2 and SRS2 EID Stick Reader Refit the cradle into the case. Ensure that all plastic swarf is removed from screw bosses. Refit the two screws securing the cradle to the case front. If available, use a torque limited screwdriver set to 0.5 Nm (4 lbf-in) once the screws has been seated by hand to prevent stripping of the screws.
-
Page 43: Replacing The Usb Loom
XRS2 and SRS2 EID Stick Reader Replacing the USB loom To remove the USB loom: Open the case. See page 30. Remove the main battery. See page 36. Remove the counterweight. Disconnect the USB loom from the main module. Unscrew the nut securing the USB connector using a 21 mm socket. -
Page 44: Replacing The Vibration Motor
XRS2 and SRS2 EID Stick Reader Ensure that the wire loom has been tucked behind retention ribs. Wire looms tucked behind retention tabs: Refit the counterweight. Refit the main battery. See page 36. Refit the antenna assembly. See page 36. - Page 45 XRS2 and SRS2 EID Stick Reader Ensure that the wire loom has been tucked behind retention tabs. Refit the counterweight. Refit the main battery. See page 36. 10 Refit the main module. See page 37. 11 Refit the antenna assembly. See page 36.
-
Page 46: Replacing The Usb Cover
XRS2 and SRS2 EID Stick Reader Replacing the USB Cover To replace the coin cell battery: Open the case. See page 30. USB cover placement: Remove the USB cover. Refit a new USB cover by sliding the tail into the dove tail slot. -
Page 47: Replacing The Case
Open the case. See page 30. Remove all internal components: Check the spare part to make sure you have the correct case for the XRS2 or SRS2 model: SRS2 EID Stick Reader: XRS2 EID Stick Reader: Refit all internal components into the new case front. - Page 48 XRS2 and SRS2 EID Stick Reader Close the case. See page 31. Issue 5, 03/2018...
-
Page 49: Fault Report Card
XRS2 and SRS2 EID Stick Reader Fault report card Email to: From: Service Department (Distributor) Tru-Test Ltd service@trutest.co.nz (Tru-Test Ltd representative) Date Return authority (RA) number Warranty Yes No Product returned: XRS2 EID Stick Reader SRS2 EIDStick Reader...
Need help?
Do you have a question about the XRS2 and is the answer not in the manual?
Questions and answers
My hoover won't recharge