Advertisement
Quick Links
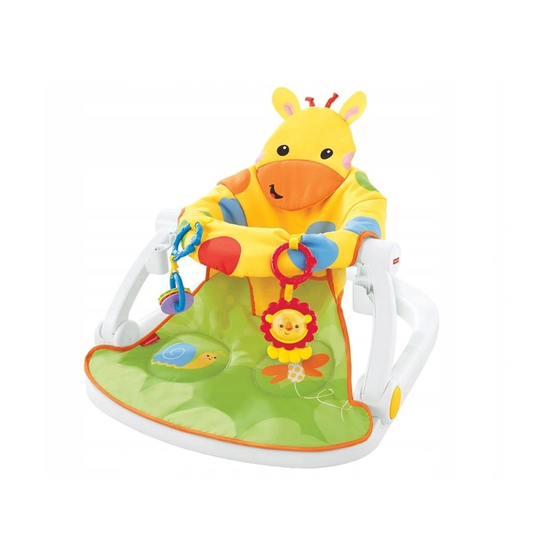
Placing and Removing Baby
• Place the assembled product
on the floor.
• Kneel or stand behind the seat
and fit or remove baby's legs into
or from the leg openings in the
seat pad. Carefully lower or lift baby
into or out of the seat.
Sentar y sacar al bebé
• Poner el producto ensamblado
sobre el piso.
• Arrodillarse o pararse detrás de la silla
y meter o sacar las piernas del bebé
en/de los orificios de pierna del colchón.
Sentar o sacar cuidadosamente al bebé
en/de la silla.
fisher-price.com
1
CMX43
Linkable, Removable Toys
• Fit the link on each toy to
a loop on the seat.
Juguetes que se pueden
conectar y quitar
• Conectar el aro de cada
juguete en una conexión
en la silla.
Advertisement

Subscribe to Our Youtube Channel
Related Manuals for Fisher-Price CMX43


Summary of Contents for Fisher-Price CMX43
- Page 1 CMX43 Linkable, Removable Toys • Fit the link on each toy to a loop on the seat. Juguetes que se pueden conectar y quitar • Conectar el aro de cada juguete en una conexión en la silla. Placing and Removing Baby •...
- Page 2 AYUDA AL CONSUMIDOR 1-800-432-5437 (US) Fisher-Price, Inc., 636 Girard Avenue, East Aurora, NY 14052. Hearing-impaired consumers/Clientes con problemas auditivos 1-800-382-7470. Centro de Servicio en México: 59-05-51-00 Ext. 5206 ó 01-800-463-59-89 MÉXICO ARGENTINA Importado y distribuido por Mattel de México, S.A.
- Page 3 Consumer Information Información al consumidor WARNING To prevent serious injury or death: • Fall Hazard – Never use on any elevated surface, since child’s movement may cause the product to slide or tip over. Use only on a floor. • Suffocation Hazard – Never use on a soft surface (bed, sofa, cushion), since the product can tip over and cause suffocation in soft surfaces.
- Page 4 DO NOT use if any parts are missing or filosos. NO usar el producto si falta o está rota broken. Contact Fisher-Price for replacement alguna pieza. Póngase en contacto con la oficina parts and instructions if needed. Never Mattel más próxima a su localidad para obtener...
- Page 5 Assembly Montaje Rear Base Base trasera 2 Frames 2 armazones Hub Button Botón de conexión • Fit the rear base onto the ends of the frames and push to “snap” in place. • Pull on the rear base to be sure it's attached. •...
- Page 6 Assembly Montaje • Empujar el armazón cerca de una clavija del Seat Ring asiento para ajustar el aro del asiento en Aro del asiento su lugar. Atención: si las piezas no se ajustan en su lugar, quizá el aro del asiento esté al revés. Quitar el aro del asiento de los armazones y voltearlo de modo que el lado ancho, plano quede hacia la base delantera.
- Page 7 Assembly Montaje TOP VIEW VISTA DE ARRIBA Pad Pegs • Pull the edge of the seat pad around the Clavijas del colchón seat ring. • Fit the eight buttons holes on the pad to the eight pegs under the seat ring. •...
- Page 8 Assembly Opening the Frame Montaje for Use Abrir el armazón para uso • Insert and "snap" the pegs on the pad into the holes in the front base. • Lift the frames until each "snaps" into place. • Insertar y ajustar las clavijas del colchón en Push down on the seat ring to be sure the los orificios de la base delantera.
- Page 9 Using the Tray Folding the Frame for Uso de la bandeja Portability and Storing Doblar el armazón para Tray Bandeja transportabilidad y almacenamiento Sockets Conexiones Sockets Conexiones • Fit the posts on the tray to the underside of Hint: Before first time use, wash the tray the frame sockets for storage.
- Page 10 Care Mantenimiento • To clean the frame, wipe clean using Note: This product comes with replacement a mild cleaning solution and damp cloth. Do warning labels which you can apply over the not use bleach. Do not use harsh or abrasive factory applied warning label if English is not cleaners.
Need help?
Do you have a question about the CMX43 and is the answer not in the manual?
Questions and answers