
Related Manuals for GTCO CalComp QUIKRULER III


Summary of Contents for GTCO CalComp QUIKRULER III
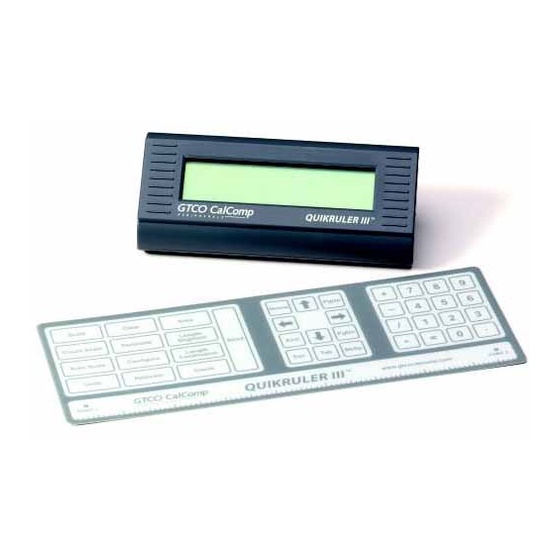
- Page 1 QuikRuler III 1 QUIKRULER III™ USER’S GUIDE THE PORTABLE MEASURING SYSTEM FOR USE WITH A DIGITIZER...
-
Page 2: Table Of Contents
Starting QuikRuler III Making Selections Stylus 16-Button Cursor Configuring QuikRuler III The QuikRuler Menu Relocating the Menu While Working with QuikRuler III If You Lose the Menu Location Using the Configure Function Setting Fractional Digits Setting Tone Options Selecting Your Language... -
Page 3: Quikruler Iii Overview
QuikRuler III display to your PC, for use in a spreadsheet or estimating package. Best of all, you do not need any special experience or training. QuikRuler III is compatible with all leading estimating software. Simply select a function from the QuikRuler Menu, click the... -
Page 4: Set Up
QuikRuler III 4 Set Up Components QuikRuler III combines a digitizer, stylus or cursor, and portable display into a single system that is easy to move and set up as needed. -
Page 5: Connecting The Components
QuikRuler III 5 Connecting the Components 1. Connect the 8-pin mini-DIN end of the digitizer interface cable to the QuikRuler III Display Module. 2. Attach the RJ12 end of the digitizer interface cable to the digitizer. 3. Join the stylus or optional cursor to the digitizer when using a corded pointing device. -
Page 6: Optional Pc Connections
QuikRuler III 6 Optional PC Connection To send data directly from QuikRuler III to a PC, connect the keyed end of the supplied USB cable to the QuikRuler Display Module and the USB connector end to an available USB port on the computer. -
Page 7: Making Selections
QuikRuler III 7 Making Selections Use either a stylus or cursor to trace and measure drawings. You can also use either device to make selections from the QuikRuler Menu. This manual assumes you are using a stylus. Stylus... -
Page 8: 16-Button Cursor
QuikRuler III 8 16-Button Cursor... -
Page 9: Configuring Quikruler Iii
2. Put the menu where you want it to be relocated and tape it down. QuikRuler III prompts you to Select Point 1. 3. Click the stylus on the left point of the menu. QuikRuler III then prompts you to Select Point 2. -
Page 10: If You Lose The Menu Location
If you inadvertently move the QuikRuler Menu, unplug Quikruler cable, plug back in, and follow initial menu set up steps page 6. Using the Configure Function QuikRuler III provides a number of user preference settings. Use the Configure button to set: Number of digits to the right of the decimal point ... -
Page 11: Setting Fractional Digits
Setting Fractional Digits (Digits to the right of the period [.]] Configure QuikRuler III can display from 0 to 8 digits to the right of the decimal point. Use this option to set the number of digits to the right of the decimal point. -
Page 12: Setting The Last Output Character
QuikRuler function to save your setting or activate the selected function. Choosing the Decimal Point Character QuikRuler III can display either a period (.) or a comma (,) as the decimal point character when numeric values are shown. 1. Display the Decimal Pnt Char option on line 1. -
Page 13: Setting The Units And The Scale
QuikRuler function to save your setting or activate the selected function. Setting the Units and the Scale Use the functions to tell QuikRuler III the units in which you want measurements to be displayed and the scale of the drawing being measured. First, Identify the Unit of Measure... -
Page 14: Manually Setting The Scale
QuikRuler III displays the current scale setting on line 2. For example, if the current scale is 1 cm = 3 km, QuikRuler III displays 1:3 on line 2 with the flashing cursor positioned over the 3. 3. Change the scale by clicking on a number on the QuikRuler Menu. For example, click on if the desired scale is 1 cm = 5 km. -
Page 15: Automatically Setting The Scale
On other drawings, you can set the scale automatically using a straight surface in the drawing that is of a known length. Simply mark the starting and ending points of the surface and tell QuikRuler III the distance between the two points. Set the Scale Automatically... - Page 16 Auto Scale function. 2. Follow the prompts that QuikRuler III displays to select the starting and ending scale points. For example, using the illustration of the map legend shown below, you would select the point just below 0 as the...
-
Page 17: Setting The Counting Scale
You can use QuikRuler’s function to count areas or other components on your drawing. For example, if you are using QuikRuler III to estimate how much electrical wiring will be required for a building, you could use the function to count how many electrical outlets will be needed. -
Page 18: Measuring The Size Of An Area
QuikRuler III 18 Measuring the Size of an Area QuikRuler III can instantly calculate the size of an area on your drawing. Follow these steps: Area 1. Click on the button on the QuikRuler Menu to activate the calculation function. -
Page 19: Adding Or Subtracting Areas
QuikRuler III 19 2. When you reach a straight edge, lift the stylus tip at one end of the edge and press it back down at the other end. Adding or Subtracting Areas After calculating the size of an area, you can add an additional area to it, or subtract another area from it. -
Page 20: Measuring The Length Of A Perimeter
QuikRuler Menu to activate the function. QuikRuler III displays the current count. 2. Continue the current count either by touching the pen tip to the elements you are counting in the drawing, or by clicking on the gray buttons on your stylus. -
Page 21: Measuring A Continuous Length
QuikRuler III 21 2. Follow the prompts that QuikRuler III displays to select the starting and ending points of the segment. QuikRuler III displays the length of the segment. 3. To measure another segment, click on its starting and ending points. You do not have to click on the button first. -
Page 22: Adding Or Subtracting Lengths
QuikRuler III 22 5. If the segment you are measuring is a straight line, click on the starting point of the line, lift up the stylus and click on the ending point. Adding or Subtracting Lengths To add or subtract lengths, follow these steps: 1. -
Page 23: Using Quikruler Iii As A Calculator
QuikRuler III 23 Using QuikRuler III as a Calculator You can use the arithmetic operations and the numeric keypad buttons on the QuikRuler Menu to perform calculator functions. You can use the calculator to transform your measurements in various ways. For example, suppose you are using a drawing to estimate the amount of carpeting that will be required for an entire floor of an office building. -
Page 24: Editing Data On The Display
QuikRuler III functions. Editing Data on the Display QuikRuler III provides several ways of editing and correcting the data on the display. Correcting Mistakes When Accumulating Measurements When you are accumulating measurements for areas and lengths, use the function to clear the current measurement. -
Page 25: Sending Data To Your Pc
The option is used to set the last character sent, terminating the numeric value on line 2 of the QuikRuler III display. For example, select the Down Arrow <↓> or Enter option as the last character when you want to enter a column of values to your spreadsheet. This will enter the value in a cell and move the cursor to the cell immediately below the entry, where it will be ready for the next value. -
Page 26: Messages
Messages QuikRuler III displays a variety of messages as you use its functions. Most of the messages are indicative of normal operation, such as prompts that instruct you how to perform the next step in a process. -
Page 27: Transducer Button Functions
QuikRuler III 27 If you receive any of these messages and the above suggestions do not correct the problem, contact GTCO CalComp Technical Support. Appendix A: Transducer Button Functions Transducer Element Function Stylus Tip switch QuikRuler Menu selections Gray button... -
Page 28: Conversion Table
QuikRuler III 28 Appendix B: Conversion Table... -
Page 29: Radio Frequency Energy Notice
QuikRuler III 29 Scale to convert: 3/16”=1’ Make both sides the same unit of measure (inches): 3/16” = 12” Multiply both sides by the denominator (16) to eliminate the fraction: 3/16*16 = 12*16 Result: 3 = 192 Divide both sides by the numerator (3) to get the ratio: 3/3 = 192/3 = 64”... -
Page 30: Canada
QuikRuler III 30 Canada This digital apparatus does not exceed the Class B limits for radio noise emissions from digital apparatus as set out in the radio interference regulations of the Canadian Department of Communications. Le present appareil num rique n’emet pas bruits radioelectriques depassant é... -
Page 31: Bescheinigung Des Herstellers/Importeurs
In order to avoid the dissemination of the hazardous substances into the environment and to diminish the pressure on our natural resources, GTCO CalComp encourages you to return this product to the appropriate take- back system facility. These facilities reuse or recycle most of the materials in this equipment in a responsible way. -
Page 32: Limited Warranty For The Quikruler
3. Any product not sold by an Authorized Dealer of GTCO Calcomp. GTCO CalComp will pay all labor and material expenses for covered items, but will not pay for the following: 1. Removal or installation charges. 2. Costs for initial technical adjustments (set up), including adjustment of user controls. - Page 33 Return Material Authorization Number (RMA#) and shipping instructions by calling: 800.220.1137. 2. Ship the product to GTCO CalComp with the RMA# marked clearly on the outside of the box. Without a clearly marked RMA# on the shipping box, GTCO CalComp reserves the right to refuse the shipment.
- Page 34 Technologies assumes no responsibility for technical, or editorial errors, or omissions that may appear in this document, or for the use of this material. Nor does GTCO CalComp by Turning Technologies make any commitment to update the information contained in this document. This document contains proprietary information which is protected by copyright.
Need help?
Do you have a question about the QUIKRULER III and is the answer not in the manual?
Questions and answers